Python developer and educator with 15+ years building production systems across data engineering, web APIs, and AI tooling. Founder of Python How To Program — 270+ in-depth tutorials covering the modern Python stack.
Building user authentication from scratch sounds like a good idea until you’re three weeks in, wrestling with password hashing edge cases, session management bugs, and the nagging realization that you’ve probably missed half the security best practices. Authentication is deceptively complex — you need to handle password resets, token expiration, email verification, brute-force protection, and compliance with frameworks like GDPR and SOC 2. Most Python developers who’ve built auth systems manually can tell you: it’s a massive rabbit hole that distracts from your actual product.
The good news? You don’t have to build it yourself anymore. A growing number of Python developers are abandoning custom authentication in favor of no-code authentication services — third-party platforms that handle all the heavy lifting. These services let you add enterprise-grade authentication to your Python web applications in minutes, not months, without writing a single line of password validation logic or worrying about whether your security implementation is bulletproof.
In this guide, we’ll explore why no-code authentication has become the default choice for modern Python developers, how it works, and which services actually deliver on their promises. By the end, you’ll understand when to use these services and when (if ever) rolling your own auth actually makes sense.
What is No-Code Authentication?
No-code authentication refers to third-party platforms that provide complete user authentication and identity management without requiring you to build the infrastructure yourself. Instead of storing passwords in your database, validating credentials, managing sessions, and implementing security protocols, you delegate all of this to a specialized service. Your application communicates with the authentication service via APIs or SDKs, and the service handles the heavy lifting.
These platforms operate on a simple principle: authentication is so critical to security that it deserves specialized infrastructure. They invest heavily in compliance certifications, security audits, penetration testing, and infrastructure redundancy — things that are expensive and time-consuming for individual developers to maintain. By using a dedicated service, you inherit that mature security posture immediately.
The flow is straightforward. A user visits your Python application and attempts to log in. Instead of your app checking a password hash against your database, your app redirects the user to the authentication service’s login page. The service handles the login, issues tokens or sessions, and redirects the user back to your app. Your app then trusts those tokens to grant access to protected resources. From your Python code’s perspective, you’re just validating tokens and reading user claims — the hard parts are gone.
Auth is hard. Letting someone else handle it is easy.
Quick Example: Flask + Auth0
Here’s a minimal Flask application using Auth0 for authentication:
That’s it. The service handles password validation, token management, multi-factor authentication, and all the compliance headaches. Your app just needs to validate the token and read the user’s claims.
Rolling Your Own Auth vs No-Code Services
Let’s be direct about the tradeoffs. Building authentication yourself gives you complete control and customization options. You can design the exact user experience you want, integrate with proprietary identity systems, and avoid third-party dependencies. But control comes at a cost.
Factor
Roll Your Own Auth
No-Code Auth Service
Development Time
4-8 weeks minimum
30 minutes to 1 week
Security Compliance
Your responsibility, risky
SOC 2, GDPR, HIPAA certified
Password Storage
You manage hashing, salts
Provider handles securely
Token Management
Session handling, expiration logic
Automatic token lifecycle
Multi-Factor Auth
Build from scratch
Included out of the box
Social Login
Integrate each provider separately
Pre-built integrations
Breach Monitoring
Not typically implemented
Included, active alerts
Customization
Complete flexibility
Templated, some limits
Maintenance Burden
Ongoing patches, security updates
Managed by provider
Cost
Developer time (expensive)
$0-500/month depending on scale
For most Python developers and teams, the comparison is clear. The cost of building and maintaining auth incorrectly far exceeds the cost of a third-party service.
Don’t roll your own crypto. Don’t roll your own auth either.
Top No-Code Authentication Services for Python
Auth0
Auth0 is the enterprise standard for no-code authentication. It provides comprehensive identity management, supports 30+ identity providers (Google, GitHub, Okta, Salesforce, etc.), and includes advanced features like passwordless authentication, risk-based access control, and detailed audit logs. For Python developers, Auth0 offers excellent SDK support via the authlib library and direct REST API access. The platform is SOC 2 certified and supports OAuth2, OpenID Connect, and SAML. Auth0’s pricing starts free for development and scales to $1,000+ per month for enterprise deployments.
Firebase Authentication
Firebase Auth is Google’s simplified authentication service, tightly integrated with the Firebase ecosystem. It’s lighter-weight than Auth0 and excels at rapid prototyping. Firebase supports email/password, phone authentication, and social login. For Python backends, you can verify Firebase tokens and manage users via their Admin SDK. The learning curve is shallow, and pricing is very reasonable — you pay for usage, typically under $100/month unless you’re at scale. Firebase Auth is ideal if you’re already invested in Google Cloud Platform or need quick, low-maintenance authentication.
Clerk
Clerk is a newer entrant focused on developer experience. It emphasizes pre-built authentication UI components and seamless session management. Clerk supports email, phone, OAuth (Google, GitHub, Apple), and passkeys. The platform includes organizational support out of the box, making it valuable for B2B applications. For Python backends, Clerk provides webhooks for user lifecycle events and middleware libraries for FastAPI and Flask. Clerk’s free tier is generous, and paid plans start around $99/month. It’s growing rapidly among startups and indie developers.
Supabase Auth
Supabase Auth is PostgreSQL-native and built on GoTrue (an open-source authentication service). If your Python application already uses Supabase for the database, adding auth is seamless — users are stored in a dedicated auth schema in your own database. Supabase supports email/password, OAuth, passwordless login, and magic links. For Python developers, Supabase provides the supabase-py SDK and REST API access. The major advantage is control — user data stays in your database, not a third-party silo. Pricing is based on usage and very affordable at scale.
Key Benefits for Python Developers
Security You Can’t Hack
Third-party auth services employ teams of security engineers, cryptographers, and compliance specialists. They undergo regular penetration testing, maintain bug bounty programs, and achieve certifications like SOC 2 and GDPR compliance. As an individual developer, achieving the same level of security would require thousands of hours and deep cryptographic expertise. When you use a no-code service, you’re inheriting a security posture that would cost your company hundreds of thousands of dollars to replicate.
Reclaim Weeks of Development Time
Authentication isn’t a differentiator for most applications. Your users don’t care if you built the login system yourself or outsourced it. What they care about is that it works reliably and securely. By using a no-code service, you redirect weeks of development effort toward features that actually move the needle — your product’s core value proposition. A typical auth implementation takes 4-8 weeks of developer time. A third-party service gets you to launch in hours.
Compliance Made Manageable
GDPR, HIPAA, SOC 2, CCPA — modern applications must meet increasingly complex compliance requirements. These standards demand careful handling of user data, audit trails, data retention policies, and security controls. Reputable auth services are already certified for these frameworks. Using them doesn’t eliminate your compliance responsibilities, but it dramatically simplifies them. You’re not starting from scratch trying to understand what GDPR requires of user authentication.
Automatic Scalability
Building auth at small scale is different from auth at large scale. At 1,000 users, a simple password database works fine. At 1 million users, you need distributed databases, caching layers, rate limiting, DDoS protection, and redundancy across regions. Third-party services handle this complexity invisibly. Your application scales from hobby project to enterprise system without changing how you call the auth API.
OAuth: a dance where four parties never trust each other.
When to Build Your Own Authentication
Despite the overwhelming advantages of no-code services, there are legitimate scenarios where building custom auth makes sense. Be honest with yourself: you probably don’t have one of these reasons.
Extreme Customization Needs: If your authentication flow requires unconventional user workflows (like a game with progression-based access gates or a specialized medical application with role-based biology), you might need custom logic. Even then, you can often layer custom logic on top of a third-party provider rather than replacing it entirely.
Regulatory Isolation Mandate: Some regulated industries require complete data sovereignty. A hospital system might be legally required to store patient authentication data exclusively within a private data center. In that case, running your own auth server (hardened and based on proven open-source code, not from scratch) is sometimes necessary.
Offline-First Application: If your Python application runs offline with intermittent connectivity (like a mobile app or field tool), a third-party auth service won’t help you validate users without internet. You’ll need to build local authentication with cached credentials. But even then, you can sync to third-party auth when connectivity returns.
Zero External Dependencies: Some organizations have architectural policies against third-party dependencies for security or liability reasons. If your company forbids external SaaS, you have no choice but to build your own. Understand that this decision extracts a real cost in engineering time and risk.
For everyone else? Use a third-party service and ship your product faster.
Real-Life Example: Django + Clerk
Let’s look at a more complete example using Django and Clerk, showing how to implement protected routes and user profile management:
import os
import requests
from functools import wraps
from django.shortcuts import redirect
from django.http import JsonResponse
from django.conf import settings

CLERK_API_KEY = os.getenv('CLERK_API_KEY')
CLERK_DOMAIN = os.getenv('CLERK_DOMAIN')

def require_clerk_auth(view_func):
    @wraps(view_func)
    def wrapped_view(request, *args, **kwargs):
        auth_header = request.headers.get('Authorization', '')
        if not auth_header.startswith('Bearer '):
            return JsonResponse({'error': 'Unauthorized'}, status=401)

        token = auth_header.split(' ')[1]
        headers = {
            'Authorization': f'Bearer {CLERK_API_KEY}',
            'Content-Type': 'application/json'
        }

        response = requests.get(
            f'{CLERK_DOMAIN}/api/v1/tokens/decode',
            params={'token': token},
            headers=headers
        )

        if response.status_code != 200:
            return JsonResponse({'error': 'Invalid token'}, status=401)

        request.clerk_user = response.json()
        return view_func(request, *args, **kwargs)

    return wrapped_view

# views.py
from django.http import JsonResponse
from django.views.decorators.http import require_http_methods

@require_http_methods(["GET"])
@require_clerk_auth
def get_profile(request):
    user_id = request.clerk_user.get('sub')
    return JsonResponse({
        'user_id': user_id,
        'email': request.clerk_user.get('email'),
        'created_at': request.clerk_user.get('iat')
    })

@require_http_methods(["POST"])
@require_clerk_auth
def update_profile(request):
    user_id = request.clerk_user.get('sub')
    data = request.POST

    # Update user in your database
    # (authenticate via Clerk token above)

    return JsonResponse({'status': 'updated'})
This example uses Clerk’s token validation endpoint to secure Django views. The decorator extracts the token from the Authorization header, validates it with Clerk’s API, and attaches the decoded user information to the request. Your view then has access to authenticated user data without ever touching passwords or sessions.
Frequently Asked Questions
How much does no-code authentication cost?
Most services offer free tiers for development and small projects. Auth0 starts free with limited features, Firebase Auth charges per identity verification (typically $0.01-$0.05 per auth event), and Clerk offers a generous free tier up to 5,000 monthly active users. For production applications, expect $20-500/month depending on user volume and features. This is almost always cheaper than the developer time required to build your own system.
Am I locked into a vendor?
Switching auth providers is possible but requires refactoring code. Your application code is tightly integrated with your chosen provider’s SDK and API. However, the integration layer is usually concentrated in middleware or decorators, so switching is more like rewriting an adapter than rewriting the entire system. Consider this when choosing a provider, but don’t let lock-in fears paralyze you — using the wrong auth approach (building it yourself) has far worse lock-in consequences.
Where does my user data live?
Most no-code providers (Auth0, Clerk, Firebase) store user data in their infrastructure. Supabase is unique in storing auth data in your own PostgreSQL database. If data residency is critical, Supabase is your answer. If you’re in an industry with strict data privacy requirements, check the provider’s data center locations and compliance certifications. Most enterprise services offer data residency options (e.g., EU-only data storage).
Can I customize the login UI?
All major providers support white-label login pages. Auth0 and Clerk allow embedding authentication directly in your application using their UI libraries. Firebase offers pre-built UI components or headless APIs if you want complete control over the interface. Supabase provides the supabase-auth-ui for quick setup or raw API access for custom interfaces. The level of customization varies by provider, but all offer more flexibility than building from scratch.
What if I have legacy users from a custom auth system?
Most providers support user imports. You can bulk-import existing user records (with hashed passwords if you trust your hash algorithm) into Auth0, Clerk, or Firebase. The import process typically takes a few steps and a bit of data transformation. During the transition, you might temporarily support both old and new auth systems, gradually migrating users. This is a known problem with known solutions.
Can I use no-code auth for offline-first apps?
No-code services require internet connectivity to authenticate users initially. For offline-first applications, you’ll need to implement local authentication with cached credentials. Some services like Supabase provide offline SDKs that sync when connectivity returns. If offline operation is essential, plan for a hybrid approach: use third-party auth for online users and implement local fallback logic for offline scenarios.
No-code authentication has fundamentally changed how Python developers should approach user login and identity management. The era of building custom auth systems is over for most applications. The services available today — Auth0, Firebase Auth, Clerk, and Supabase Auth — offer security, compliance, and features that rival or exceed what you could build in a reasonable timeframe.
The practical decision is simple: unless you have a specific, documented reason to build your own auth system, use a third-party provider. Spend your engineering time on your product’s core value proposition. Let experts handle the complex, security-critical job of authentication.
Start with the quick example in this guide, pick a provider that matches your architecture, and add authentication to your Python application in an afternoon. Your future self will thank you when you’re not debugging password reset tokens at 2 AM.
Generating random numbers in Python is a fairly straightforward activity which can be done in a few lines. There maybe many variations which you need to do ranging from decimal places, random numbers between a start and end number, and many more. We’ll go through many useful examples in this article.
The most basic way to generate random numbers in python is with the random library:
import random

num = random.random()

print( f"Random number between 0.0 and 1.0 ={num}\n")
Output as follows:
You’ll see that each time it is run it has a new random number.
Written by Pubs
Python developer and educator with 15+ years building production systems across data engineering, web APIs, and AI tooling. Founder of Python How To Program — 270+ in-depth tutorials covering the modern Python stack.
Generating the same random number each time and why this matters
Sometimes, you may want to generate some random numbers, but then be able to generate the same random numbers each time. Now this may sound counter intuitive as the whole point of getting random numbers is so that, well, they are random. One scenario where you would like to regenerate the same random numbers is during testing. You may find some unusual behaviour and this is where you may want to replicate that behaviour for which you’l l need the same input. This is where you’d want to generate the same random number and you can do that in python using the seed function from the random library.
The idea behind the seed function is that you can think of it as a specific key which can be used to generate a series of random numbers which stems from a given key. Use a different seed and you’ll generate a different set of random numbers.
See the following example code which generates a random number between 1 and 0:
import random

random.seed(1)

for i in range(1,5):
    num = random.random()
    print( f"Random number between 0.0 and 1.0 ={num}\n")
Output as follows:
No matter how many times it is run, since the seed is the same each time, it generates the same numbers.
Python Random Number Between 1 and 10
Now that we know how to generate random numbers, how do you do it between two numbers? This is easily done in with either randint() for whole numbers or with uniform() for decimal numbers.
import random

num_int = random.randint(1,10)
print( f"Random whole number between 1 and 10 ={num_int}\n")

num_uni = random.uniform(1,10)
print( f"Random decimal number between 1 and 10 ={num_uni}\n")
Python Generate Random Numbers From A Range
Suppose you needed to generate random numbers from a range of data whether that be numbers, names or even a pack of cards. This can be done through selecting the random element in an array by choosing the index randomly. For example, if you had an array of 5 items, then you can randomly chose and index from 0 to 4 (where 0 is the index of the first item).
There is another and shorter way in python which is to use the random.choice() function. If you pass it an array, it will then randomly return one of the elements.
Here’s an example to randomly select a name from a list with both using the index (to show you how it works), and the much most efficient random.choice() library function:
import random

###### Selecing numbers from a range
names_list = [ "Judy", "Harry", "Sarah", "Tom", "Gloria"]

rand_index = random.randint( 0, len(names_list)-1 )

print( f"Randomly selected person 1 is = { names_list[ rand_index] }\n")
print( f"Randomly selected person 2 is = { random.choice( names_list) }\n")
And the output is different each time:
Generate Random String Of Length n in Python
If you want to generate a specific length string (e.g. to generate a password), both the random and the string libraries can come in handy where you can use it to create an easy password generator as follows:
import random, string

###### Create a random password
def generate_password( pass_len=10):
    password = ""

    for i in range(1,pass_len+1):
        password = password + random.choice( string.ascii_letters + string.punctuation )
    return password

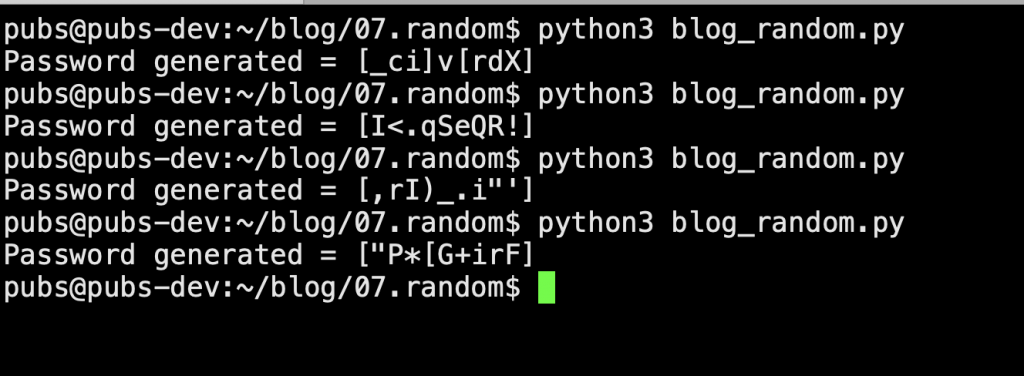
print( f"Password generated = [{ generate_password(10) }] ")
This will output a new password each time between square brackets:
If there are specific characters you want to include or exclude, you can simply replace the string.punctuation with your own list/array of specific characters to be included
Random Choice Without Replacement In Python
Suppose you wanted to randomly select items from a list without repeating any items. For example, you have a list of students and you have to select them in a random order to go first in a specific activity. In many programming languages you may need to generate a random list and remember the previously selected items to prevent any repeated selections. In the random library, there is a function called random.sample() that will do all that for you:
import random

#### Select unique random elements
students = ["John", "Tom", "Paul", "Sarah", "July", "Rachel"]

random_order = random.sample( students, 6)
print(random_order)
This will generate a unique list without repeating any selections:
[mfe_send_fox body=”
Sign up to the email list and get articles straight to your inbox. Plus get our free python one liner list!
In order to generate a date between two dates, this can be done by converting the dates into days first. This can be combined with the random.randint() in addition to the days of the date differences then adding back to the start date:
import random, datetime

#### Select a random date between two dates:
d1 = datetime.date( 2013,  2, 26 )
d2 = datetime.date( 2015, 12, 15 )
diff = d2 - d1
new_date_days = random.randint( 0, diff.days )

print( f"Random date is {   d1 + datetime.timedelta( days=new_date_days ) }")
The output would be as follows:
Generate Random Temporary Filename in Python
A common need is to generate a random filename often for temporary storage. This might be for a log file, a cache file or some other scenario and can be easily done with the similar string generation as above. First a letter should be determined and then the remaining letters can be added with also numbers as well.
The random library has many uses from generating numbers to specific strings with a given length for password generation. Typically, these use cases sometimes have specialised libraries as there can be nuances (e.g for passwords, you may not want a repeating sequence which may be possible through random luck) which you can search for through pypi.org. However, many can be created with simple lines of code as demonstrated above. Send comments below or email me to ask further questions.
Subscribe
Not subscribed to our email list? Sign up now and get your next article in your inbox:
You have a folder of PDFs, Word documents, and PowerPoint decks that you need to feed into an LLM pipeline — a RAG system, a document summarizer, or a knowledge base builder. The problem is that LLMs work best with plain text, and most documents are packed with binary formatting, embedded fonts, and layout metadata that the model cannot interpret. Sending a raw PDF to an LLM is like handing someone a ZIP file and asking them to read it.
Microsoft’s markitdown library solves this by converting dozens of file formats — PDF, DOCX, PPTX, XLSX, HTML, CSV, EPUB, images, and audio — into clean Markdown that any LLM can process. It is a single pip install, works from Python code or the command line, and handles the conversion pipeline so your code does not have to. The Markdown output preserves headings, tables, and code blocks in a structured format that models handle especially well.
This article covers everything you need to get documents into your AI pipelines with MarkItDown. You will learn how to install it, convert individual files and entire directories, work with the Python API, handle different file types, and build a real document-processing pipeline that prepares files for a RAG system. By the end you will have a working utility that accepts any folder of mixed-format documents and outputs a structured Markdown dataset ready for embedding.
MarkItDown: Quick Example
Before diving into the details, here is the fastest path from a file to Markdown text you can feed into an LLM. This example converts an HTML page to Markdown in four lines of Python.
# quick_markitdown.py
from markitdown import MarkItDown

md = MarkItDown()
result = md.convert("https://example.com")
print(result.text_content[:500])
Output:
Example Domain
==============

This domain is for use in illustrative examples in documents. You may use this
domain in literature without prior coordination or asking for permission.

[More information...](https://www.iana.org/domains/reserved)
The MarkItDown() constructor creates a converter instance, and convert() accepts a file path, a URL, or a file-like object. The result is a DocumentConverterResult object — result.text_content holds the clean Markdown string ready to pass into any LLM or text processing pipeline.
The real power emerges when you need to handle PDFs, Office files, and mixed directories at scale. The sections below cover all of that, starting with installation.
What Is MarkItDown and Why Use It?
MarkItDown is an open-source Python library from Microsoft that acts as a universal document-to-Markdown converter. Think of it as a universal adapter — on one end you plug in a document in almost any format, and on the other end you get clean, structured Markdown text. The library was built specifically with LLM use cases in mind: the Markdown output is structured in a way that helps models understand document hierarchy (headings, tables, code blocks) rather than receiving a flat blob of text.
The key difference from alternatives like pypdf2 or python-docx is breadth and consistency. Those libraries require a different API for each format, handle only one format each, and return raw extracted text with no structure. MarkItDown gives you one API that handles all formats and preserves semantic structure as Markdown.
Format
MarkItDown
pypdf2 / python-docx / openpyxl
PDF
Yes
pypdf2 only
DOCX
Yes
python-docx only
PPTX
Yes
python-pptx only
XLSX
Yes
openpyxl only
HTML / URL
Yes
No
EPUB
Yes
No
CSV / JSON
Yes
No
Images (OCR)
Yes (optional)
No
Audio (transcription)
Yes (optional)
No
Unified output format
Markdown
Raw text / format-specific objects
The optional image OCR and audio transcription require extra dependencies (and an LLM API key for the best results), but the core document converters — PDF, Office, HTML — work completely offline with no API key required. That makes MarkItDown an excellent fit for any pipeline where you control the infrastructure.
Installing MarkItDown
MarkItDown is on PyPI. A basic install that handles PDFs, Office documents, and HTML covers most use cases and has minimal dependencies.
# Install the base package
pip install markitdown

# For PDF support (pdfminer.six is included in most installs)
pip install markitdown[pdf]

# For all optional extras (OCR, audio, Azure Document Intelligence)
pip install markitdown[all]
The [pdf] extra pulls in pdfminer.six for text-based PDF extraction. If you need image OCR within PDFs, you will also need an LLM plugin (covered in the advanced section). For most document-to-Markdown pipelines the base install is all you need — it handles DOCX, PPTX, XLSX, HTML, CSV, JSON, and EPUB without any extras.
One API to rule them all. Finally.
Converting Files, URLs, and Streams
The MarkItDown class is the main entry point. It auto-detects the file format based on extension or MIME type, so you call the same method regardless of what you are converting.
Converting a Local File
Pass any local file path as a string. MarkItDown detects the format automatically and returns a DocumentConverterResult.
# convert_file.py
from markitdown import MarkItDown

md = MarkItDown()

# Convert a DOCX file
result = md.convert("report.docx")
print(f"Title: {result.title}")
print(f"Characters: {len(result.text_content)}")
print()
print(result.text_content[:300])
Output:
Title: Q3 Sales Report
Characters: 4821

# Q3 Sales Report

**Prepared by:** Finance Team
**Date:** September 30, 2025

## Executive Summary

Revenue grew 12% year-over-year driven by the enterprise segment...
The result.title property extracts the document title from metadata where available (DOCX, PDF). The text_content property always holds the full Markdown string. Notice that the headings from the Word document are preserved as Markdown heading levels — this is exactly the structural information that LLMs use to understand document hierarchy.
Converting a URL
Pass a URL string and MarkItDown fetches the page and converts the HTML to Markdown. This works especially well for documentation pages, Wikipedia articles, and any page with semantic HTML structure.
# convert_url.py
from markitdown import MarkItDown

md = MarkItDown()
result = md.convert("https://docs.python.org/3/library/json.html")

print(result.text_content[:600])
Output:
json --- JSON encoder and decoder
=================================

**Source code:** [Lib/json/__init__.py](https://github.com/python/cpython/tree/3.13/Lib/json/__init__.py)

JSON (JavaScript Object Notation), specified by [RFC 7159](https://datatracker.ietf.org/doc/html/rfc7159.html)...

## json.dumps(obj, *, skipkeys=False, ...)

Serialize obj to a JSON formatted str...
Navigation menus, footers, and sidebars are typically stripped out, leaving the actual content. This makes URL conversion a fast way to pull documentation into a RAG corpus without building a custom scraper for every site.
Converting from a File-Like Object
When you receive a file as bytes (from an API response, an email attachment, or a web upload), you can convert it directly from a BytesIO object without writing it to disk first.
# convert_stream.py
import io
from markitdown import MarkItDown
import requests

md = MarkItDown()

# Download a PDF into memory and convert without saving to disk
response = requests.get("https://www.w3.org/WAI/WCAG21/wcag21.pdf")
pdf_stream = io.BytesIO(response.content)

# Must pass extension hint when using streams -- no filename to detect from
result = md.convert(pdf_stream, file_extension=".pdf")
print(f"Converted {len(result.text_content)} characters from in-memory PDF")
print(result.text_content[:400])
Output:
Converted 87432 characters from in-memory PDF

Web Content Accessibility Guidelines (WCAG) 2.1
================================================

W3C Recommendation 05 June 2018

Abstract
--------

Web Content Accessibility Guidelines (WCAG) 2.1 covers a wide range of...
The file_extension parameter is required when passing a stream because there is no filename to inspect. Always include it for streams to ensure the correct converter is selected.
BytesIO: no temp files, no disk I/O, no drama.
Format-Specific Conversion Options
Most formats work out of the box, but a few have options worth knowing about. PowerPoint files get per-slide conversion, Excel files convert to Markdown tables, and PDFs expose page-level control.
Excel and CSV to Markdown Tables
Excel sheets are converted to Markdown tables — one table per worksheet. This is particularly useful when feeding structured data to LLMs that need to reason about tabular information.
# convert_excel.py
from markitdown import MarkItDown

md = MarkItDown()
result = md.convert("sales_data.xlsx")
print(result.text_content)
Output (example with a two-sheet workbook):
## Sheet1

| Month | Revenue | Units |
|-------|---------|-------|
| Jan   | 84000   | 420   |
| Feb   | 91200   | 456   |
| Mar   | 78500   | 392   |

## Sheet2

| Region | Manager | Target |
|--------|---------|--------|
| East   | Alice   | 100000 |
| West   | Bob     | 95000  |
Each worksheet becomes an H2 section followed by a Markdown table. LLMs handle this format well for question-answering tasks — the model can identify column headers, filter by region, and compute simple aggregations when the data is in this structured Markdown table format rather than raw CSV text.
PowerPoint Slide Extraction
PPTX files are converted slide by slide. Each slide becomes a section with its title as a heading and the body text extracted below it. Speaker notes are included when present.
# convert_pptx.py
from markitdown import MarkItDown

md = MarkItDown()
result = md.convert("product_roadmap.pptx")

# Show first 500 chars to see the structure
print(result.text_content[:500])
Output:
## Slide 1: Product Roadmap 2026

Vision: Ship the AI-native workflow layer by Q3.

- Q1: Core infrastructure and auth
- Q2: Integration layer + partner APIs
- Q3: Public launch
- Q4: Enterprise tier

**Notes:** Emphasize the partnership angle -- this is key differentiator vs competitors.

## Slide 2: Q1 Milestones

- Authentication service -- 95% complete
- Database migration -- in progress
...
Speaker notes appear as bold “Notes:” blocks after each slide’s content. For meeting-notes pipelines or sales-deck summarizers this is especially useful — you get the full context that the presenter intended to convey, not just the bullet points on the slide.
Speaker notes included. Your LLM finally hears what the presenter was thinking.
Batch Converting a Directory
Real pipelines rarely deal with a single file. Here is a pattern to convert every supported file in a directory, log any failures, and save all results to a single Markdown file for easy embedding.
# batch_convert.py
import os
from pathlib import Path
from markitdown import MarkItDown

SUPPORTED = {".pdf", ".docx", ".pptx", ".xlsx", ".html", ".csv", ".json", ".epub"}

def batch_convert(input_dir: str, output_path: str) -> dict:
    """Convert all supported files in input_dir to a single Markdown file."""
    md = MarkItDown()
    results = {"success": [], "failed": []}
    output_parts = []

    for fpath in sorted(Path(input_dir).rglob("*")):
        if fpath.suffix.lower() not in SUPPORTED:
            continue

        print(f"Converting: {fpath.name}")
        try:
            result = md.convert(str(fpath))
            # Separate each document with a clear section header
            section = f"\n\n---\n## Document: {fpath.name}\n\n{result.text_content}"
            output_parts.append(section)
            results["success"].append(str(fpath))
        except Exception as exc:
            print(f"  FAILED: {exc}")
            results["failed"].append({"file": str(fpath), "error": str(exc)})

    with open(output_path, "w", encoding="utf-8") as f:
        f.write("# Document Corpus\n")
        f.write(f"Converted {len(results['success'])} documents.\n")
        f.write("".join(output_parts))

    return results


if __name__ == "__main__":
    stats = batch_convert("./docs", "corpus.md")
    print(f"\nDone: {len(stats['success'])} converted, {len(stats['failed'])} failed")
Output:
Converting: annual_report.pdf
Converting: onboarding.docx
Converting: roadmap.pptx
Converting: q3_data.xlsx
  FAILED: File appears to be encrypted

Done: 3 converted, 1 failed
The try/except around each conversion is essential — encrypted PDFs, corrupted files, or unsupported subtypes will raise exceptions rather than silently producing empty output. The pattern above logs the failure and continues with the rest of the batch, which is the right behavior for any automated pipeline. The output corpus.md contains all documents separated by clear section dividers that chunk-based RAG systems can split on.
Using MarkItDown with LLM Pipelines
The most common use case is feeding converted documents into an LLM. Here is how to wire MarkItDown into an OpenAI-compatible pipeline for a simple document Q&A pattern.
# doc_qa.py
from markitdown import MarkItDown
from openai import OpenAI

def answer_from_document(file_path: str, question: str, api_key: str) -> str:
    """Convert a document to Markdown and answer a question about it."""
    md = MarkItDown()
    result = md.convert(file_path)
    doc_text = result.text_content

    # Truncate if the document exceeds a safe context window size
    max_chars = 80000  # ~20K tokens for most models
    if len(doc_text) > max_chars:
        doc_text = doc_text[:max_chars] + "\n\n[Document truncated...]"

    client = OpenAI(api_key=api_key)
    response = client.chat.completions.create(
        model="gpt-4o-mini",
        messages=[
            {
                "role": "system",
                "content": "You are a document analyst. Answer questions based only on the provided document.",
            },
            {
                "role": "user",
                "content": f"Document:\n\n{doc_text}\n\nQuestion: {question}",
            },
        ],
    )
    return response.choices[0].message.content


# Example usage
answer = answer_from_document(
    "contract.pdf",
    "What is the termination clause?",
    api_key="your-openai-api-key"
)
print(answer)
Output:
Section 12.3 of the contract states that either party may terminate this agreement
with 30 days written notice. Termination for cause requires only 5 business days
notice and must be accompanied by written documentation of the breach.
This pattern works with any OpenAI-compatible API — swap the base URL and API key for Anthropic, Gemini, or a local Ollama endpoint and the pattern is identical. The key insight is that MarkItDown’s Markdown output is substantially better context than raw extracted text because the model can use heading levels and table structure to locate specific sections of long documents.
Raw PDF to LLM: garbled. Markdown to LLM: actually works.
Real-Life Example: Building a Document Corpus Preparer for RAG
This project ties together everything from this article. It accepts a folder of mixed-format documents, converts all of them to Markdown, chunks the output into LLM-ready segments, and saves a JSON file that a vector database like Chroma or Pinecone can ingest directly.
# rag_preparer.py
import json
import os
from pathlib import Path
from markitdown import MarkItDown

SUPPORTED = {".pdf", ".docx", ".pptx", ".xlsx", ".html", ".csv", ".epub"}
CHUNK_SIZE = 1500   # characters per chunk (~375 tokens)
CHUNK_OVERLAP = 150 # overlap so context is not lost at boundaries


def chunk_text(text: str, size: int = CHUNK_SIZE, overlap: int = CHUNK_OVERLAP) -> list:
    """Split text into overlapping chunks."""
    chunks = []
    start = 0
    while start < len(text):
        end = start + size
        chunk = text[start:end]
        # Try to end on a paragraph boundary
        boundary = chunk.rfind("\n\n")
        if boundary > size // 2:
            chunk = chunk[:boundary]
        chunks.append(chunk.strip())
        start += len(chunk) - overlap
    return [c for c in chunks if len(c) > 50]  # drop tiny trailing chunks


def prepare_rag_corpus(docs_dir: str, output_path: str) -> None:
    md = MarkItDown()
    corpus = []
    chunk_id = 0

    for fpath in sorted(Path(docs_dir).rglob("*")):
        if fpath.suffix.lower() not in SUPPORTED:
            continue

        print(f"Processing: {fpath.name}")
        try:
            result = md.convert(str(fpath))
            chunks = chunk_text(result.text_content)
            for i, chunk in enumerate(chunks):
                corpus.append({
                    "id": f"chunk_{chunk_id:05d}",
                    "source_file": fpath.name,
                    "source_title": result.title or fpath.stem,
                    "chunk_index": i,
                    "total_chunks": len(chunks),
                    "text": chunk,
                })
                chunk_id += 1
            print(f"  -> {len(chunks)} chunks")
        except Exception as exc:
            print(f"  FAILED: {exc}")

    with open(output_path, "w", encoding="utf-8") as f:
        json.dump(corpus, f, indent=2, ensure_ascii=False)

    print(f"\nCorpus saved: {len(corpus)} chunks from {chunk_id} total across all docs")
    print(f"Output: {output_path}")


if __name__ == "__main__":
    prepare_rag_corpus("./knowledge_base", "rag_corpus.json")
Output:
Processing: company_handbook.pdf
  -> 47 chunks
Processing: product_specs.docx
  -> 18 chunks
Processing: roadmap_2026.pptx
  -> 9 chunks
Processing: pricing.xlsx
  -> 3 chunks

Corpus saved: 77 chunks from 77 total across all docs
Output: rag_corpus.json
The output rag_corpus.json is ready to embed. Each chunk carries its source file and title as metadata, so your vector database can filter by document when answering queries that should be scoped to a specific source. The overlapping chunks prevent context loss at boundaries — a sentence that straddles a chunk boundary will appear in both adjacent chunks, so the model always sees complete context around any retrieved passage. To extend this project, add an embedding step using sentence-transformers or the OpenAI Embeddings API and pipe the corpus directly into your vector store of choice.
Frequently Asked Questions
Can MarkItDown convert password-protected PDFs?
No — password-protected PDFs raise an exception during conversion because the underlying pdfminer.six library cannot read encrypted content without the password. You will see a PDFPasswordIncorrect or PDFEncryptionError. The fix is to pre-decrypt the PDF before conversion using a library like pikepdf: open with the password and save a decrypted copy, then convert the decrypted file. Always wrap conversion in try/except in batch pipelines so a single locked file does not abort the entire run.
Does MarkItDown extract images from PDFs?
With the base install, MarkItDown extracts text from PDFs but skips embedded images. If your PDFs are scanned documents (images of text, not actual text layers), the base converter will return little or no content. For scanned PDFs you need to add an LLM plugin — MarkItDown supports Azure Document Intelligence and OpenAI Vision as optional backends that can OCR images within documents. Pass an llm_client and llm_model to the MarkItDown constructor to enable this. The optional dependency install is pip install markitdown[all].
How should I handle very large documents?
For documents that produce more than 100,000 characters of Markdown, pass the whole text to an LLM in a single call only if your model supports a large context window (128K+). Otherwise, use the chunking pattern from the real-life example above — split the Markdown at paragraph boundaries with a 10% overlap and embed the chunks rather than the whole document. MarkItDown itself handles arbitrarily large files without issue; the bottleneck is always the downstream LLM context window, not the conversion step.
How well does MarkItDown handle complex tables?
Simple flat tables — with consistent column counts and no merged cells — convert reliably to Markdown tables. Complex tables with merged headers, multi-row cells, or heavily styled cells may produce irregular Markdown. Excel files generally convert better than Word or PDF tables because the underlying data is already structured. If you find table output unreliable for a specific document type, consider using openpyxl or python-docx for that format and MarkItDown for everything else in the same pipeline.
Can I stream the conversion output?
MarkItDown does not support streaming output — the convert() call blocks until the full document is converted and returns the complete result. For large documents this can take several seconds, especially for multi-hundred-page PDFs. If you need non-blocking behavior in an async pipeline, wrap the conversion in asyncio.run_in_executor() to run it in a thread pool and await the result without blocking your event loop.
Can I add a custom converter for a format MarkItDown does not support?
Yes — MarkItDown has a plugin system. You can register a custom DocumentConverter subclass for any file extension. Implement the convert() method that accepts a file path and returns a DocumentConverterResult, then register it via md.register_converter(MyConverter()). This is useful for proprietary formats specific to your industry — medical records in HL7, CAD files, or internal XML schemas — where you have the parsing logic but need to plug it into the same batch pipeline that handles standard formats.
Conclusion
MarkItDown removes the most painful part of building LLM document pipelines: writing and maintaining a different parser for every file format. A single MarkItDown().convert() call handles PDFs, DOCX, PPTX, XLSX, HTML, CSV, EPUB, and more, returning clean Markdown that LLMs can reason over rather than raw binary or poorly-structured text. The real-life example above gives you a complete RAG corpus preparer that you can extend — add an embedding step, plug in a vector store, or swap in a different chunking strategy depending on your document types.
The next step is to test it on your actual document set. Run the batch converter, inspect the output Markdown for any formatting issues specific to your files, and tune the chunk size to match your embedding model’s token limit. For OCR-heavy or audio transcription pipelines, explore the optional llm_client parameter to unlock MarkItDown’s full feature set.
Use random.randint(a, b) for integers or random.random() for a float between 0 and 1. Example: import random; num = random.randint(1, 100).
What is the difference between random and secrets?
The random module is for simulations and games but NOT for security. The secrets module provides cryptographically secure randomness for passwords, tokens, and security-sensitive applications.
How do I generate a random list of numbers?
Use [random.randint(1, 100) for _ in range(10)] for random integers. For unique numbers, use random.sample(range(1, 101), 10). For float arrays, use numpy.random.rand(10).
How do I set a random seed?
Call random.seed(42) before generating numbers. The same seed always produces the same sequence, useful for testing and reproducible experiments.
Can I generate numbers following a specific distribution?
Yes. Use random.gauss() for normal, random.uniform() for uniform. NumPy offers numpy.random.normal(), poisson(), binomial(), and many more.
For some of your web apps you develop in python, you will want to run them on the cloud so that your script can run 24/7. For some of your smaller applications, you may want to find the right free python hosting service so you don’t have to worry about the per month charges. These web applications might be a website written in flask, or using another web framework, it might be other types of python apps that runs in the background and runs your automation. This is where you can consider some of the hosting services that have a free plan and are still very easy to setup.
To find the right hosting platforms that fits your needs, you want to consider a few things:
Ease of access to upload projects
What type of support they provide
What specifications that virtual server environment has to offer
One such new platform is called deta.sh. Deta is a free hosting service that can be used to provide web hosting for deploying python web applications or other types of python applications that run in the background.
The deta service, as of mid-2022, is still in the development stage and is expected to have a permanent free python hosting service so that online python applications can be setup and deployed quickly and easily. Deta is a relatively new service but is a service that is intended to compete with pythonanywhere, heroku, and similar services to run python on web servers. The service lets you host python script online without fuss directly from a command line, much like how you can check in code to github. Although it is new, it has the potential to be one of the best free python hosting there is in order to get your python online.
The platform provides you mini virtual environments (called ‘micros’) where you can host your python scripts. These can be separated into workspaces called ‘projects’ so that you can also more easily manage your environments. The way you can access/upload your code is with the command line through a password Access Token.
We will go through step by step how to run your python online. For this article, we will guide you on using deta to host a simple flask based web page so that you can have python as a webserver.
Written by Pubs
Python developer and educator with 15+ years building production systems across data engineering, web APIs, and AI tooling. Founder of Python How To Program — 270+ in-depth tutorials covering the modern Python stack.
Deta.sh is effectively a cloud python hosting service which sits on top of AWS and allows you to deploy your python code into a virtual machine (called a deta micro), store files (called data drive) and also store data (called deta base). Unlike AWS or other hosting services, you can quickly host and run your script without going through the hassle of setting up server, security configurations etc.
The Deta.sh team offers the service for free in order to allow developers to monetize the solutions where deta.sh will be able to share some of that revenue. To date, there are no paid Deta.sh hosting plans for python hosting and no intention. So you can continue to run python code online forever.
To begin with, head over to the website https://deta.sh to first create an account.
Enter a unique username, password and email. The Email must be real in order to activate your account
Once you have submitted, go to your email and click on the verify link.
You will be taken to this “verification success” page. Here you can sign in, but also join the “Discord” channel. You can get any help very quickly from the community that’s there.
After you click on sign-in, enter the same username and password, and you will be taken to the default page where you will have the ability to “See My Key”
Click on the “See My Key” to see your secret password. You will only be able to see it once and will not be able to see it ever again.
This is what they project key will look like:
You need both the key and the project id.
Think of the key like a password and the “Project ID” as a password. When you want to access your deta.sh to upload programs, make changes, you will need to use your project key to access your space.
If you lose your project id/key, you will not be able to recover it. However, you can create a new one with Settings->Create Key option.
Create a new project key with Settings -> Create Key (this key you see on the screen has already been deleted!)
One thing I’d like to call out is the Project ID. This is the ID of this particular s[ace
If you have multiple programs which access deta.sh, it is best to have separate project keys. The reason is that if one of your keys are compromised, then you can simply just change that key and not have all your applications be affected.
Setting Up Your Remote Access For Deta.sh
We will first setup deta.sh in the command line interface so that you can communicate to your deta.sh space on the cloud.
You can do this with either one of:
Mac / Linux:
curl -fsSL https://get.deta.dev/cli.sh | sh

Windows:
iwr https://get.deta.dev/cli.ps1 -useb | iex
Once that’s done, what will happen is that there will be a hidden folder called $HOME/.deta that is created (specifically in the case of Mac / Linux). It’s in this directory that the deta command line application will be found.
You can type deta --help to check that the command line tool was installed correctly
Next, you will need to create an access token so that you can connect to your deta.sh account. For this you will need to create an access token. Go to your deta.sh home page (e.g. https://web.deta.sh/) and then go back to the main projects page.
Next, click on the Create Access token under settings
Once you create token, this will create an Access Token so that you don’t need to login each time.
Copy this Access Token and then, create a file called tokens in the $HOME/.deta/ directory. Steps for Mac/Linux are:
cd $HOME/.deta
nano tokens
You can then add the following json inside the tokens file:
{
"deta_access_token": "<your access token created above>"
}
Finally, you can install the python library that will be used to access the deta components with the deta library.
pip install deta
Have a Free Python Hosting Flask on Deta.sh
To create an environment to host your python code and have python web hosting, you need to create something called a “micro“. This is almost like a mini virtual server with 128mb of memory but will not be running all the time. They will wake up, execute your code, and then go back to sleep. Deta.sh is not designed for long running applications with heavy computations (use one of the public cloud providers for that!). Also, each micro has its own python online cloud private access.
To begin with, you can use the command deta new --python <micro name>. The <micro name> is the name to label the mini-virtual name.
The above command will create a directory called flask_test with a python script called main.py
The default code in the main.py is:
def app(event):
    return "Hello, world!"
At the same time, this code will be uploaded to deta.sh. If you go to the dashboard page https://web.deta.sh/ you will see a sub-menu under the Micro menu. You may need to refresh your browser if you had it open.
You will notice that there’s also a URL for this deta micro which is the end point where your application output can be accessed. Think of this simply as the console output.
If you encountered any errors, in the command line, you can type deta logs to get an output of any errors from the logs.
To make a more useful application, we can create a flask application to show a more functional webpage. In order to do this, you will need to dell deta.sh to install the flask library. You cannot use pip install unfortunately, but instead you need to use the requirements.txt instead.
First, add flask into a requirements.txt file in your local directory. So your file should simply look like this:
#requirements.txt
flask
Then in your main.py code file, you add the following, again this is in your local directory
In order to now upload the changes to your micro, you will need to run the command deta deploy. This will upload the files requirements.txt and updates to main.py into your micro.
deta deploy
When executed, this should upload the code and install the libraries:
Managing Flask Forms On Free Python Hosting
Now that we have a simple static web page, we can create a more complex example where there’s a form that can be submitted. Using the weather API from openweathermap API, we can show the weather for a given location.
To get the weather data, we need to install two libraries pyowm and datetime. Hence, this will need to be added to requirements.txt.
#requirements.txt
flask
pyowm
datetime
Then for the code, the following can be updated in the main.py:
When the form is submitted from the / url, then the function def get_weather() is called to process the form. The variable that was passed, can be access through request.form['location'].
The above code works by first providing a form through the function def get_location() which generates a very simple form through HTML:
When the submit button is pressed, the form calls the /weather URL with the field location. Once called, then the python function def get_weather() is called upon which a call to OpenWeatherMap.org is made to get the weather data for the given location.
Conclusion
This is just a tip of the iceberg of what you can do with deta. You can also run scheduled jobs, run a NoSQL database, and have file storage as well. Contact us if you’d like us to cover these areas too.
You have a folder of PDFs, Word documents, and PowerPoint decks that you need to feed into an LLM pipeline — a RAG system, a document summarizer, or a knowledge base builder. The problem is that LLMs work best with plain text, and most documents are packed with binary formatting, embedded fonts, and layout metadata that the model cannot interpret. Sending a raw PDF to an LLM is like handing someone a ZIP file and asking them to read it.
Microsoft’s markitdown library solves this by converting dozens of file formats — PDF, DOCX, PPTX, XLSX, HTML, CSV, EPUB, images, and audio — into clean Markdown that any LLM can process. It is a single pip install, works from Python code or the command line, and handles the conversion pipeline so your code does not have to. The Markdown output preserves headings, tables, and code blocks in a structured format that models handle especially well.
This article covers everything you need to get documents into your AI pipelines with MarkItDown. You will learn how to install it, convert individual files and entire directories, work with the Python API, handle different file types, and build a real document-processing pipeline that prepares files for a RAG system. By the end you will have a working utility that accepts any folder of mixed-format documents and outputs a structured Markdown dataset ready for embedding.
MarkItDown: Quick Example
Before diving into the details, here is the fastest path from a file to Markdown text you can feed into an LLM. This example converts an HTML page to Markdown in four lines of Python.
# quick_markitdown.py
from markitdown import MarkItDown

md = MarkItDown()
result = md.convert("https://example.com")
print(result.text_content[:500])
Output:
Example Domain
==============

This domain is for use in illustrative examples in documents. You may use this
domain in literature without prior coordination or asking for permission.

[More information...](https://www.iana.org/domains/reserved)
The MarkItDown() constructor creates a converter instance, and convert() accepts a file path, a URL, or a file-like object. The result is a DocumentConverterResult object — result.text_content holds the clean Markdown string ready to pass into any LLM or text processing pipeline.
The real power emerges when you need to handle PDFs, Office files, and mixed directories at scale. The sections below cover all of that, starting with installation.
What Is MarkItDown and Why Use It?
MarkItDown is an open-source Python library from Microsoft that acts as a universal document-to-Markdown converter. Think of it as a universal adapter — on one end you plug in a document in almost any format, and on the other end you get clean, structured Markdown text. The library was built specifically with LLM use cases in mind: the Markdown output is structured in a way that helps models understand document hierarchy (headings, tables, code blocks) rather than receiving a flat blob of text.
The key difference from alternatives like pypdf2 or python-docx is breadth and consistency. Those libraries require a different API for each format, handle only one format each, and return raw extracted text with no structure. MarkItDown gives you one API that handles all formats and preserves semantic structure as Markdown.
Format
MarkItDown
pypdf2 / python-docx / openpyxl
PDF
Yes
pypdf2 only
DOCX
Yes
python-docx only
PPTX
Yes
python-pptx only
XLSX
Yes
openpyxl only
HTML / URL
Yes
No
EPUB
Yes
No
CSV / JSON
Yes
No
Images (OCR)
Yes (optional)
No
Audio (transcription)
Yes (optional)
No
Unified output format
Markdown
Raw text / format-specific objects
The optional image OCR and audio transcription require extra dependencies (and an LLM API key for the best results), but the core document converters — PDF, Office, HTML — work completely offline with no API key required. That makes MarkItDown an excellent fit for any pipeline where you control the infrastructure.
Installing MarkItDown
MarkItDown is on PyPI. A basic install that handles PDFs, Office documents, and HTML covers most use cases and has minimal dependencies.
# Install the base package
pip install markitdown

# For PDF support (pdfminer.six is included in most installs)
pip install markitdown[pdf]

# For all optional extras (OCR, audio, Azure Document Intelligence)
pip install markitdown[all]
The [pdf] extra pulls in pdfminer.six for text-based PDF extraction. If you need image OCR within PDFs, you will also need an LLM plugin (covered in the advanced section). For most document-to-Markdown pipelines the base install is all you need — it handles DOCX, PPTX, XLSX, HTML, CSV, JSON, and EPUB without any extras.
One API to rule them all. Finally.
Converting Files, URLs, and Streams
The MarkItDown class is the main entry point. It auto-detects the file format based on extension or MIME type, so you call the same method regardless of what you are converting.
Converting a Local File
Pass any local file path as a string. MarkItDown detects the format automatically and returns a DocumentConverterResult.
# convert_file.py
from markitdown import MarkItDown

md = MarkItDown()

# Convert a DOCX file
result = md.convert("report.docx")
print(f"Title: {result.title}")
print(f"Characters: {len(result.text_content)}")
print()
print(result.text_content[:300])
Output:
Title: Q3 Sales Report
Characters: 4821

# Q3 Sales Report

**Prepared by:** Finance Team
**Date:** September 30, 2025

## Executive Summary

Revenue grew 12% year-over-year driven by the enterprise segment...
The result.title property extracts the document title from metadata where available (DOCX, PDF). The text_content property always holds the full Markdown string. Notice that the headings from the Word document are preserved as Markdown heading levels — this is exactly the structural information that LLMs use to understand document hierarchy.
Converting a URL
Pass a URL string and MarkItDown fetches the page and converts the HTML to Markdown. This works especially well for documentation pages, Wikipedia articles, and any page with semantic HTML structure.
# convert_url.py
from markitdown import MarkItDown

md = MarkItDown()
result = md.convert("https://docs.python.org/3/library/json.html")

print(result.text_content[:600])
Output:
json --- JSON encoder and decoder
=================================

**Source code:** [Lib/json/__init__.py](https://github.com/python/cpython/tree/3.13/Lib/json/__init__.py)

JSON (JavaScript Object Notation), specified by [RFC 7159](https://datatracker.ietf.org/doc/html/rfc7159.html)...

## json.dumps(obj, *, skipkeys=False, ...)

Serialize obj to a JSON formatted str...
Navigation menus, footers, and sidebars are typically stripped out, leaving the actual content. This makes URL conversion a fast way to pull documentation into a RAG corpus without building a custom scraper for every site.
Converting from a File-Like Object
When you receive a file as bytes (from an API response, an email attachment, or a web upload), you can convert it directly from a BytesIO object without writing it to disk first.
# convert_stream.py
import io
from markitdown import MarkItDown
import requests

md = MarkItDown()

# Download a PDF into memory and convert without saving to disk
response = requests.get("https://www.w3.org/WAI/WCAG21/wcag21.pdf")
pdf_stream = io.BytesIO(response.content)

# Must pass extension hint when using streams -- no filename to detect from
result = md.convert(pdf_stream, file_extension=".pdf")
print(f"Converted {len(result.text_content)} characters from in-memory PDF")
print(result.text_content[:400])
Output:
Converted 87432 characters from in-memory PDF

Web Content Accessibility Guidelines (WCAG) 2.1
================================================

W3C Recommendation 05 June 2018

Abstract
--------

Web Content Accessibility Guidelines (WCAG) 2.1 covers a wide range of...
The file_extension parameter is required when passing a stream because there is no filename to inspect. Always include it for streams to ensure the correct converter is selected.
BytesIO: no temp files, no disk I/O, no drama.
Format-Specific Conversion Options
Most formats work out of the box, but a few have options worth knowing about. PowerPoint files get per-slide conversion, Excel files convert to Markdown tables, and PDFs expose page-level control.
Excel and CSV to Markdown Tables
Excel sheets are converted to Markdown tables — one table per worksheet. This is particularly useful when feeding structured data to LLMs that need to reason about tabular information.
# convert_excel.py
from markitdown import MarkItDown

md = MarkItDown()
result = md.convert("sales_data.xlsx")
print(result.text_content)
Output (example with a two-sheet workbook):
## Sheet1

| Month | Revenue | Units |
|-------|---------|-------|
| Jan   | 84000   | 420   |
| Feb   | 91200   | 456   |
| Mar   | 78500   | 392   |

## Sheet2

| Region | Manager | Target |
|--------|---------|--------|
| East   | Alice   | 100000 |
| West   | Bob     | 95000  |
Each worksheet becomes an H2 section followed by a Markdown table. LLMs handle this format well for question-answering tasks — the model can identify column headers, filter by region, and compute simple aggregations when the data is in this structured Markdown table format rather than raw CSV text.
PowerPoint Slide Extraction
PPTX files are converted slide by slide. Each slide becomes a section with its title as a heading and the body text extracted below it. Speaker notes are included when present.
# convert_pptx.py
from markitdown import MarkItDown

md = MarkItDown()
result = md.convert("product_roadmap.pptx")

# Show first 500 chars to see the structure
print(result.text_content[:500])
Output:
## Slide 1: Product Roadmap 2026

Vision: Ship the AI-native workflow layer by Q3.

- Q1: Core infrastructure and auth
- Q2: Integration layer + partner APIs
- Q3: Public launch
- Q4: Enterprise tier

**Notes:** Emphasize the partnership angle -- this is key differentiator vs competitors.

## Slide 2: Q1 Milestones

- Authentication service -- 95% complete
- Database migration -- in progress
...
Speaker notes appear as bold “Notes:” blocks after each slide’s content. For meeting-notes pipelines or sales-deck summarizers this is especially useful — you get the full context that the presenter intended to convey, not just the bullet points on the slide.
Speaker notes included. Your LLM finally hears what the presenter was thinking.
Batch Converting a Directory
Real pipelines rarely deal with a single file. Here is a pattern to convert every supported file in a directory, log any failures, and save all results to a single Markdown file for easy embedding.
# batch_convert.py
import os
from pathlib import Path
from markitdown import MarkItDown

SUPPORTED = {".pdf", ".docx", ".pptx", ".xlsx", ".html", ".csv", ".json", ".epub"}

def batch_convert(input_dir: str, output_path: str) -> dict:
    """Convert all supported files in input_dir to a single Markdown file."""
    md = MarkItDown()
    results = {"success": [], "failed": []}
    output_parts = []

    for fpath in sorted(Path(input_dir).rglob("*")):
        if fpath.suffix.lower() not in SUPPORTED:
            continue

        print(f"Converting: {fpath.name}")
        try:
            result = md.convert(str(fpath))
            # Separate each document with a clear section header
            section = f"\n\n---\n## Document: {fpath.name}\n\n{result.text_content}"
            output_parts.append(section)
            results["success"].append(str(fpath))
        except Exception as exc:
            print(f"  FAILED: {exc}")
            results["failed"].append({"file": str(fpath), "error": str(exc)})

    with open(output_path, "w", encoding="utf-8") as f:
        f.write("# Document Corpus\n")
        f.write(f"Converted {len(results['success'])} documents.\n")
        f.write("".join(output_parts))

    return results


if __name__ == "__main__":
    stats = batch_convert("./docs", "corpus.md")
    print(f"\nDone: {len(stats['success'])} converted, {len(stats['failed'])} failed")
Output:
Converting: annual_report.pdf
Converting: onboarding.docx
Converting: roadmap.pptx
Converting: q3_data.xlsx
  FAILED: File appears to be encrypted

Done: 3 converted, 1 failed
The try/except around each conversion is essential — encrypted PDFs, corrupted files, or unsupported subtypes will raise exceptions rather than silently producing empty output. The pattern above logs the failure and continues with the rest of the batch, which is the right behavior for any automated pipeline. The output corpus.md contains all documents separated by clear section dividers that chunk-based RAG systems can split on.
Using MarkItDown with LLM Pipelines
The most common use case is feeding converted documents into an LLM. Here is how to wire MarkItDown into an OpenAI-compatible pipeline for a simple document Q&A pattern.
# doc_qa.py
from markitdown import MarkItDown
from openai import OpenAI

def answer_from_document(file_path: str, question: str, api_key: str) -> str:
    """Convert a document to Markdown and answer a question about it."""
    md = MarkItDown()
    result = md.convert(file_path)
    doc_text = result.text_content

    # Truncate if the document exceeds a safe context window size
    max_chars = 80000  # ~20K tokens for most models
    if len(doc_text) > max_chars:
        doc_text = doc_text[:max_chars] + "\n\n[Document truncated...]"

    client = OpenAI(api_key=api_key)
    response = client.chat.completions.create(
        model="gpt-4o-mini",
        messages=[
            {
                "role": "system",
                "content": "You are a document analyst. Answer questions based only on the provided document.",
            },
            {
                "role": "user",
                "content": f"Document:\n\n{doc_text}\n\nQuestion: {question}",
            },
        ],
    )
    return response.choices[0].message.content


# Example usage
answer = answer_from_document(
    "contract.pdf",
    "What is the termination clause?",
    api_key="your-openai-api-key"
)
print(answer)
Output:
Section 12.3 of the contract states that either party may terminate this agreement
with 30 days written notice. Termination for cause requires only 5 business days
notice and must be accompanied by written documentation of the breach.
This pattern works with any OpenAI-compatible API — swap the base URL and API key for Anthropic, Gemini, or a local Ollama endpoint and the pattern is identical. The key insight is that MarkItDown’s Markdown output is substantially better context than raw extracted text because the model can use heading levels and table structure to locate specific sections of long documents.
Raw PDF to LLM: garbled. Markdown to LLM: actually works.
Real-Life Example: Building a Document Corpus Preparer for RAG
This project ties together everything from this article. It accepts a folder of mixed-format documents, converts all of them to Markdown, chunks the output into LLM-ready segments, and saves a JSON file that a vector database like Chroma or Pinecone can ingest directly.
# rag_preparer.py
import json
import os
from pathlib import Path
from markitdown import MarkItDown

SUPPORTED = {".pdf", ".docx", ".pptx", ".xlsx", ".html", ".csv", ".epub"}
CHUNK_SIZE = 1500   # characters per chunk (~375 tokens)
CHUNK_OVERLAP = 150 # overlap so context is not lost at boundaries


def chunk_text(text: str, size: int = CHUNK_SIZE, overlap: int = CHUNK_OVERLAP) -> list:
    """Split text into overlapping chunks."""
    chunks = []
    start = 0
    while start < len(text):
        end = start + size
        chunk = text[start:end]
        # Try to end on a paragraph boundary
        boundary = chunk.rfind("\n\n")
        if boundary > size // 2:
            chunk = chunk[:boundary]
        chunks.append(chunk.strip())
        start += len(chunk) - overlap
    return [c for c in chunks if len(c) > 50]  # drop tiny trailing chunks


def prepare_rag_corpus(docs_dir: str, output_path: str) -> None:
    md = MarkItDown()
    corpus = []
    chunk_id = 0

    for fpath in sorted(Path(docs_dir).rglob("*")):
        if fpath.suffix.lower() not in SUPPORTED:
            continue

        print(f"Processing: {fpath.name}")
        try:
            result = md.convert(str(fpath))
            chunks = chunk_text(result.text_content)
            for i, chunk in enumerate(chunks):
                corpus.append({
                    "id": f"chunk_{chunk_id:05d}",
                    "source_file": fpath.name,
                    "source_title": result.title or fpath.stem,
                    "chunk_index": i,
                    "total_chunks": len(chunks),
                    "text": chunk,
                })
                chunk_id += 1
            print(f"  -> {len(chunks)} chunks")
        except Exception as exc:
            print(f"  FAILED: {exc}")

    with open(output_path, "w", encoding="utf-8") as f:
        json.dump(corpus, f, indent=2, ensure_ascii=False)

    print(f"\nCorpus saved: {len(corpus)} chunks from {chunk_id} total across all docs")
    print(f"Output: {output_path}")


if __name__ == "__main__":
    prepare_rag_corpus("./knowledge_base", "rag_corpus.json")
Output:
Processing: company_handbook.pdf
  -> 47 chunks
Processing: product_specs.docx
  -> 18 chunks
Processing: roadmap_2026.pptx
  -> 9 chunks
Processing: pricing.xlsx
  -> 3 chunks

Corpus saved: 77 chunks from 77 total across all docs
Output: rag_corpus.json
The output rag_corpus.json is ready to embed. Each chunk carries its source file and title as metadata, so your vector database can filter by document when answering queries that should be scoped to a specific source. The overlapping chunks prevent context loss at boundaries — a sentence that straddles a chunk boundary will appear in both adjacent chunks, so the model always sees complete context around any retrieved passage. To extend this project, add an embedding step using sentence-transformers or the OpenAI Embeddings API and pipe the corpus directly into your vector store of choice.
Frequently Asked Questions
Can MarkItDown convert password-protected PDFs?
No — password-protected PDFs raise an exception during conversion because the underlying pdfminer.six library cannot read encrypted content without the password. You will see a PDFPasswordIncorrect or PDFEncryptionError. The fix is to pre-decrypt the PDF before conversion using a library like pikepdf: open with the password and save a decrypted copy, then convert the decrypted file. Always wrap conversion in try/except in batch pipelines so a single locked file does not abort the entire run.
Does MarkItDown extract images from PDFs?
With the base install, MarkItDown extracts text from PDFs but skips embedded images. If your PDFs are scanned documents (images of text, not actual text layers), the base converter will return little or no content. For scanned PDFs you need to add an LLM plugin — MarkItDown supports Azure Document Intelligence and OpenAI Vision as optional backends that can OCR images within documents. Pass an llm_client and llm_model to the MarkItDown constructor to enable this. The optional dependency install is pip install markitdown[all].
How should I handle very large documents?
For documents that produce more than 100,000 characters of Markdown, pass the whole text to an LLM in a single call only if your model supports a large context window (128K+). Otherwise, use the chunking pattern from the real-life example above — split the Markdown at paragraph boundaries with a 10% overlap and embed the chunks rather than the whole document. MarkItDown itself handles arbitrarily large files without issue; the bottleneck is always the downstream LLM context window, not the conversion step.
How well does MarkItDown handle complex tables?
Simple flat tables — with consistent column counts and no merged cells — convert reliably to Markdown tables. Complex tables with merged headers, multi-row cells, or heavily styled cells may produce irregular Markdown. Excel files generally convert better than Word or PDF tables because the underlying data is already structured. If you find table output unreliable for a specific document type, consider using openpyxl or python-docx for that format and MarkItDown for everything else in the same pipeline.
Can I stream the conversion output?
MarkItDown does not support streaming output — the convert() call blocks until the full document is converted and returns the complete result. For large documents this can take several seconds, especially for multi-hundred-page PDFs. If you need non-blocking behavior in an async pipeline, wrap the conversion in asyncio.run_in_executor() to run it in a thread pool and await the result without blocking your event loop.
Can I add a custom converter for a format MarkItDown does not support?
Yes — MarkItDown has a plugin system. You can register a custom DocumentConverter subclass for any file extension. Implement the convert() method that accepts a file path and returns a DocumentConverterResult, then register it via md.register_converter(MyConverter()). This is useful for proprietary formats specific to your industry — medical records in HL7, CAD files, or internal XML schemas — where you have the parsing logic but need to plug it into the same batch pipeline that handles standard formats.
Conclusion
MarkItDown removes the most painful part of building LLM document pipelines: writing and maintaining a different parser for every file format. A single MarkItDown().convert() call handles PDFs, DOCX, PPTX, XLSX, HTML, CSV, EPUB, and more, returning clean Markdown that LLMs can reason over rather than raw binary or poorly-structured text. The real-life example above gives you a complete RAG corpus preparer that you can extend — add an embedding step, plug in a vector store, or swap in a different chunking strategy depending on your document types.
The next step is to test it on your actual document set. Run the batch converter, inspect the output Markdown for any formatting issues specific to your files, and tune the chunk size to match your embedding model’s token limit. For OCR-heavy or audio transcription pipelines, explore the optional llm_client parameter to unlock MarkItDown’s full feature set.
Deta Space offers a free tier for personal use. The original Deta.sh Micros service has evolved. For free Python hosting alternatives, consider Railway, Render, PythonAnywhere, or Google Cloud Run’s free tier.
What are the best free Python hosting alternatives?
PythonAnywhere offers a free tier for web apps. Render provides free static sites and web services. Railway has a free trial. Google Cloud Run and AWS Lambda have generous free tiers for serverless deployments.
How do I deploy a Python Flask app for free?
Use Render (connect GitHub repo), PythonAnywhere (upload directly), or Railway (deploy from GitHub). Each provides different advantages for hobby and small-scale projects.
What should I consider when choosing Python hosting?
Consider free tier limits, sleep/cold-start behavior, database availability, custom domain support, deployment method, Python version support, and scaling options.
Can I host a Python bot or script for free?
Yes. PythonAnywhere allows always-on tasks. Google Cloud Functions and AWS Lambda handle event-driven scripts. For Discord/Telegram bots, Railway and Render offer free tiers suitable for small bots.
The python await and async is one of the more advanced features to help run your programs faster by making sure the CPU is spending as little time as possible waiting and instead as much time as possible working. If ever you see a capable chef, you’ll know what I mean. The chef is not just following a recipe step by step (i.e. working synchronously), the chef is boiling water to cook the pasta , measuring the amount of pasta, chopping tomatoes for the pasta sauce until the water boils etc (i.e. the chef is working asynchronously). The chef is minimizing the time they are waiting idle and always working on a task. That’s the same idea with async and await.
For this tutorial, we will focus on python 3.7 as it has some of the more modern features of await and async. We will call out some of the differences for python 3.4 – 3.6.
Written by Pubs
Python developer and educator with 15+ years building production systems across data engineering, web APIs, and AI tooling. Founder of Python How To Program — 270+ in-depth tutorials covering the modern Python stack.
The async await keywords help to define in your program which parts need to run sequentially, and which parts may take sometime but other parts of the program can execute while this step completes. A modern example of this is that if you’re downloading a web page it may take a few seconds, while the download is happening you can execute other parts of your program.
How does async await work in Python?
Sometimes the best way to explain something is to show how you would achieve the same thing without the feature.
Continuing with the restaurant theme, suppose you are running a hamburger stall (you’re the waiter and the chef) and it is almost instant to collect payment for a customer and serve the final hamburger, but the most time consuming task is to cooking the beef patty which takes 2 seconds (one could only wish!).
See the below diagram:
Figure 1: Sequentially serving customers at a hamburger stall
In the above diagram:
Step 1: you would first get the order and collect the money from Customer 1
Step 2: you would then put a beef patty on the cook top and then wait for 2 seconds for the beef patty to cook. At the same time, Customer 1 is also waiting for 2 seconds.
Step 3: when the beef patty is cooked, you can then plate this onto a hamburger bun
Step 4: pass the final hamburger to Customer 1
Step 5: You would then start to serve Customer 2 (who has already been waiting 2 seconds for you to serve Customer 1). You can then repeat steps 2-4
With the above approach, Customer 1 would have their burger in about 2 seconds, Customer 2 approx 4 seconds, and then Customer 3 approx 6 seconds.
The equivalent code would be as follows:
import time, datetime, timeit

customer_queue = [ "C1", "C2", "C3" ]

def get_next_customer():
    return customer_queue.pop(0)    #Get the first customer from list

def cook_hamburger(customer):
    start_customer_timer = timeit.default_timer()
    print( f"[{customer}]: Start cooking hamberger for customer")
    time.sleep(2)   # It takes 2 seconds to cook the hamburger
    end_customer_timer = timeit.default_timer()
    print( f"[{customer}]: Finish cooking hamberger for customer.  Total {end_customer_timer-start_customer_timer} seconds\n")

def run_shop():
    while customer_queue:
        curr_customer = get_next_customer()
        cook_hamburger(curr_customer)

def main():
    print('Hamburger Shop')
    start = timeit.default_timer()
    run_shop()
    stop = timeit.default_timer()
    print(f"** Total runtime: {stop-start} seconds ***")

if __name__ == '__main__':
    main()
The code above is fairly straightforward. We have a list of customers that are queuing in the list customer_queue which are being looped under the def run_shop(). For each customer (get_next_customer()), we call cook_hamburger() to cook the hamburger for 2 seconds and wait for it to complete.
Running this code you would get the following output:
As expected, the total runtime for 3 customers is 6 seconds since each customer is served sequentially.
Cooking Hamburgers Asynchronously and coding the event loop manually
Instead of serving the customer and cooking the hamburger for each customer, you can obviously do some of the tasks asynchronously, meaning you can start the task but you don’t have to sit and wait, you can do something else. See the following diagram where the chef/waiter is serving multiple customers and cooking at the same time. It’s not explicitly shown here, but the chef/waiter is constantly checking on the status of the next task and if a task doesn’t require his/her attention they’ll move on to the next task. This process of always looking for something to do is the equivalent of the “event loop”. The Event Loop is a programming construct where the logic is to always look for a task to execute and if there’s a task which will take some time it can release control to the next task in the loop.
Figure 2: Example of how the event loop works in a real life example – the chef/waiter is always busy!
In the above example, the following is happening:
Step 1: you would first get the order and collect the money from Customer 1
Step 2: you would then put a beef patty on the cook top and then let it cook, then immediately move on to the next customer while the patty is cooking.
Step 3: you would first get the order and collect the money from Customer 2. You would also check if the first beef patty has completed cooking yet.
Step 4: you would then put another beef patty on the cook top and then let it cook, then immediately move on to the next customer while the patty is cooking.
…
Step 5: When any of the beef patties are done, you would plate it
Step 6: Pass the plated hamburger to the respective customer. Note, in the above example we’ve assumed it to be Customer 1, but it could be any customer depending on which beef patty cooked fully first.
Step 7: When any of the beef patties are done, you would plate it, and server
This is the equivalent of the event loop. The chef/waiter is constantly checking if it needs to serve the customer or check on the hamburgers which are cooking. When there’s a hamburger is placed on the stove and we need to wait 2 seconds, the chef/waiter moves to the next task and does not wait for the 2 seconds to complete. When the hamburger is done, it is then served to the customer.
How can this be done programatically? Glad you asked:
import time ,datetime, timeit

customer_queue = [ "C1", "C2", "C3" ]
hamburger_queue = []

def get_next_customer():
    if customer_queue: return customer_queue.pop(0)    #Get the first customer from list
    return None

def start_cooking_hamburger(customer):
    print( f"[{customer}]: Start cooking hamberger for customer")
    hamburger = { "customer":customer, "start_cooking_time": timeit.default_timer(), "cooked":False}
    hamburger_queue.append( hamburger )

def check_hamburger_status():
    curr_timer = timeit.default_timer()

    #Check if it's cooking, but release control
    for index, hamburger in enumerate(hamburger_queue):
        elapsed_time = curr_timer-hamburger['start_cooking_time']
        if elapsed_time > 2: #2 second has passed for hamrburger to cook
            print( f"[{hamburger['customer']}]: Finish cooking hamberger for customer.  Total {elapsed_time} seconds\n")
            del hamburger_queue[ index].  #delete from list to mark as done

def run_shop():
    while customer_queue or hamburger_queue:        #Event loop
        curr_customer = get_next_customer()
        if curr_customer: start_cooking_hamburger(curr_customer)
        check_hamburger_status()

def main():
    print('Hamburger Shop')
    start = timeit.default_timer()
    run_shop()
    stop = timeit.default_timer()
    print(f"** Total runtime: {stop-start} seconds ***")

if __name__ == '__main__':
    main()
The output of the code is as follows:
Output running asynchronously – notice the runtime of 2 seconds compared to the 6 seconds in the synchronsous method.
So there’s a few things happening here:
There’s a new list called hamburger_queue[] which is keeping track of each hamburger that is being cooked
The event loop is the while customer_queue or hamburger_queue within the run_shop() function
We have a new function called start_cooking_hamburger() which helps to keep track of the task to cooking starting. Why is this needed? Well in the past we would simply wait for a given task. Now, since we are doing something else while we wait, we need to remember a few things to come back to the task
We also have a new function called check_hamburger_status() which checks the status of each hamburger being cooked (i.e. item in hamburger_queue[]), and if it is cooked (i.e. 2 seconds have passed), then it is considered complete
You may notice in the output that Customer 3 was in fact served before Customer 2. This is because that the execution order is not guarantee.
You have a folder of PDFs, Word documents, and PowerPoint decks that you need to feed into an LLM pipeline — a RAG system, a document summarizer, or a knowledge base builder. The problem is that LLMs work best with plain text, and most documents are packed with binary formatting, embedded fonts, and layout metadata that the model cannot interpret. Sending a raw PDF to an LLM is like handing someone a ZIP file and asking them to read it.
Microsoft’s markitdown library solves this by converting dozens of file formats — PDF, DOCX, PPTX, XLSX, HTML, CSV, EPUB, images, and audio — into clean Markdown that any LLM can process. It is a single pip install, works from Python code or the command line, and handles the conversion pipeline so your code does not have to. The Markdown output preserves headings, tables, and code blocks in a structured format that models handle especially well.
This article covers everything you need to get documents into your AI pipelines with MarkItDown. You will learn how to install it, convert individual files and entire directories, work with the Python API, handle different file types, and build a real document-processing pipeline that prepares files for a RAG system. By the end you will have a working utility that accepts any folder of mixed-format documents and outputs a structured Markdown dataset ready for embedding.
MarkItDown: Quick Example
Before diving into the details, here is the fastest path from a file to Markdown text you can feed into an LLM. This example converts an HTML page to Markdown in four lines of Python.
# quick_markitdown.py
from markitdown import MarkItDown

md = MarkItDown()
result = md.convert("https://example.com")
print(result.text_content[:500])
Output:
Example Domain
==============

This domain is for use in illustrative examples in documents. You may use this
domain in literature without prior coordination or asking for permission.

[More information...](https://www.iana.org/domains/reserved)
The MarkItDown() constructor creates a converter instance, and convert() accepts a file path, a URL, or a file-like object. The result is a DocumentConverterResult object — result.text_content holds the clean Markdown string ready to pass into any LLM or text processing pipeline.
The real power emerges when you need to handle PDFs, Office files, and mixed directories at scale. The sections below cover all of that, starting with installation.
What Is MarkItDown and Why Use It?
MarkItDown is an open-source Python library from Microsoft that acts as a universal document-to-Markdown converter. Think of it as a universal adapter — on one end you plug in a document in almost any format, and on the other end you get clean, structured Markdown text. The library was built specifically with LLM use cases in mind: the Markdown output is structured in a way that helps models understand document hierarchy (headings, tables, code blocks) rather than receiving a flat blob of text.
The key difference from alternatives like pypdf2 or python-docx is breadth and consistency. Those libraries require a different API for each format, handle only one format each, and return raw extracted text with no structure. MarkItDown gives you one API that handles all formats and preserves semantic structure as Markdown.
Format
MarkItDown
pypdf2 / python-docx / openpyxl
PDF
Yes
pypdf2 only
DOCX
Yes
python-docx only
PPTX
Yes
python-pptx only
XLSX
Yes
openpyxl only
HTML / URL
Yes
No
EPUB
Yes
No
CSV / JSON
Yes
No
Images (OCR)
Yes (optional)
No
Audio (transcription)
Yes (optional)
No
Unified output format
Markdown
Raw text / format-specific objects
The optional image OCR and audio transcription require extra dependencies (and an LLM API key for the best results), but the core document converters — PDF, Office, HTML — work completely offline with no API key required. That makes MarkItDown an excellent fit for any pipeline where you control the infrastructure.
Installing MarkItDown
MarkItDown is on PyPI. A basic install that handles PDFs, Office documents, and HTML covers most use cases and has minimal dependencies.
# Install the base package
pip install markitdown

# For PDF support (pdfminer.six is included in most installs)
pip install markitdown[pdf]

# For all optional extras (OCR, audio, Azure Document Intelligence)
pip install markitdown[all]
The [pdf] extra pulls in pdfminer.six for text-based PDF extraction. If you need image OCR within PDFs, you will also need an LLM plugin (covered in the advanced section). For most document-to-Markdown pipelines the base install is all you need — it handles DOCX, PPTX, XLSX, HTML, CSV, JSON, and EPUB without any extras.
One API to rule them all. Finally.
Converting Files, URLs, and Streams
The MarkItDown class is the main entry point. It auto-detects the file format based on extension or MIME type, so you call the same method regardless of what you are converting.
Converting a Local File
Pass any local file path as a string. MarkItDown detects the format automatically and returns a DocumentConverterResult.
# convert_file.py
from markitdown import MarkItDown

md = MarkItDown()

# Convert a DOCX file
result = md.convert("report.docx")
print(f"Title: {result.title}")
print(f"Characters: {len(result.text_content)}")
print()
print(result.text_content[:300])
Output:
Title: Q3 Sales Report
Characters: 4821

# Q3 Sales Report

**Prepared by:** Finance Team
**Date:** September 30, 2025

## Executive Summary

Revenue grew 12% year-over-year driven by the enterprise segment...
The result.title property extracts the document title from metadata where available (DOCX, PDF). The text_content property always holds the full Markdown string. Notice that the headings from the Word document are preserved as Markdown heading levels — this is exactly the structural information that LLMs use to understand document hierarchy.
Converting a URL
Pass a URL string and MarkItDown fetches the page and converts the HTML to Markdown. This works especially well for documentation pages, Wikipedia articles, and any page with semantic HTML structure.
# convert_url.py
from markitdown import MarkItDown

md = MarkItDown()
result = md.convert("https://docs.python.org/3/library/json.html")

print(result.text_content[:600])
Output:
json --- JSON encoder and decoder
=================================

**Source code:** [Lib/json/__init__.py](https://github.com/python/cpython/tree/3.13/Lib/json/__init__.py)

JSON (JavaScript Object Notation), specified by [RFC 7159](https://datatracker.ietf.org/doc/html/rfc7159.html)...

## json.dumps(obj, *, skipkeys=False, ...)

Serialize obj to a JSON formatted str...
Navigation menus, footers, and sidebars are typically stripped out, leaving the actual content. This makes URL conversion a fast way to pull documentation into a RAG corpus without building a custom scraper for every site.
Converting from a File-Like Object
When you receive a file as bytes (from an API response, an email attachment, or a web upload), you can convert it directly from a BytesIO object without writing it to disk first.
# convert_stream.py
import io
from markitdown import MarkItDown
import requests

md = MarkItDown()

# Download a PDF into memory and convert without saving to disk
response = requests.get("https://www.w3.org/WAI/WCAG21/wcag21.pdf")
pdf_stream = io.BytesIO(response.content)

# Must pass extension hint when using streams -- no filename to detect from
result = md.convert(pdf_stream, file_extension=".pdf")
print(f"Converted {len(result.text_content)} characters from in-memory PDF")
print(result.text_content[:400])
Output:
Converted 87432 characters from in-memory PDF

Web Content Accessibility Guidelines (WCAG) 2.1
================================================

W3C Recommendation 05 June 2018

Abstract
--------

Web Content Accessibility Guidelines (WCAG) 2.1 covers a wide range of...
The file_extension parameter is required when passing a stream because there is no filename to inspect. Always include it for streams to ensure the correct converter is selected.
BytesIO: no temp files, no disk I/O, no drama.
Format-Specific Conversion Options
Most formats work out of the box, but a few have options worth knowing about. PowerPoint files get per-slide conversion, Excel files convert to Markdown tables, and PDFs expose page-level control.
Excel and CSV to Markdown Tables
Excel sheets are converted to Markdown tables — one table per worksheet. This is particularly useful when feeding structured data to LLMs that need to reason about tabular information.
# convert_excel.py
from markitdown import MarkItDown

md = MarkItDown()
result = md.convert("sales_data.xlsx")
print(result.text_content)
Output (example with a two-sheet workbook):
## Sheet1

| Month | Revenue | Units |
|-------|---------|-------|
| Jan   | 84000   | 420   |
| Feb   | 91200   | 456   |
| Mar   | 78500   | 392   |

## Sheet2

| Region | Manager | Target |
|--------|---------|--------|
| East   | Alice   | 100000 |
| West   | Bob     | 95000  |
Each worksheet becomes an H2 section followed by a Markdown table. LLMs handle this format well for question-answering tasks — the model can identify column headers, filter by region, and compute simple aggregations when the data is in this structured Markdown table format rather than raw CSV text.
PowerPoint Slide Extraction
PPTX files are converted slide by slide. Each slide becomes a section with its title as a heading and the body text extracted below it. Speaker notes are included when present.
# convert_pptx.py
from markitdown import MarkItDown

md = MarkItDown()
result = md.convert("product_roadmap.pptx")

# Show first 500 chars to see the structure
print(result.text_content[:500])
Output:
## Slide 1: Product Roadmap 2026

Vision: Ship the AI-native workflow layer by Q3.

- Q1: Core infrastructure and auth
- Q2: Integration layer + partner APIs
- Q3: Public launch
- Q4: Enterprise tier

**Notes:** Emphasize the partnership angle -- this is key differentiator vs competitors.

## Slide 2: Q1 Milestones

- Authentication service -- 95% complete
- Database migration -- in progress
...
Speaker notes appear as bold “Notes:” blocks after each slide’s content. For meeting-notes pipelines or sales-deck summarizers this is especially useful — you get the full context that the presenter intended to convey, not just the bullet points on the slide.
Speaker notes included. Your LLM finally hears what the presenter was thinking.
Batch Converting a Directory
Real pipelines rarely deal with a single file. Here is a pattern to convert every supported file in a directory, log any failures, and save all results to a single Markdown file for easy embedding.
# batch_convert.py
import os
from pathlib import Path
from markitdown import MarkItDown

SUPPORTED = {".pdf", ".docx", ".pptx", ".xlsx", ".html", ".csv", ".json", ".epub"}

def batch_convert(input_dir: str, output_path: str) -> dict:
    """Convert all supported files in input_dir to a single Markdown file."""
    md = MarkItDown()
    results = {"success": [], "failed": []}
    output_parts = []

    for fpath in sorted(Path(input_dir).rglob("*")):
        if fpath.suffix.lower() not in SUPPORTED:
            continue

        print(f"Converting: {fpath.name}")
        try:
            result = md.convert(str(fpath))
            # Separate each document with a clear section header
            section = f"\n\n---\n## Document: {fpath.name}\n\n{result.text_content}"
            output_parts.append(section)
            results["success"].append(str(fpath))
        except Exception as exc:
            print(f"  FAILED: {exc}")
            results["failed"].append({"file": str(fpath), "error": str(exc)})

    with open(output_path, "w", encoding="utf-8") as f:
        f.write("# Document Corpus\n")
        f.write(f"Converted {len(results['success'])} documents.\n")
        f.write("".join(output_parts))

    return results


if __name__ == "__main__":
    stats = batch_convert("./docs", "corpus.md")
    print(f"\nDone: {len(stats['success'])} converted, {len(stats['failed'])} failed")
Output:
Converting: annual_report.pdf
Converting: onboarding.docx
Converting: roadmap.pptx
Converting: q3_data.xlsx
  FAILED: File appears to be encrypted

Done: 3 converted, 1 failed
The try/except around each conversion is essential — encrypted PDFs, corrupted files, or unsupported subtypes will raise exceptions rather than silently producing empty output. The pattern above logs the failure and continues with the rest of the batch, which is the right behavior for any automated pipeline. The output corpus.md contains all documents separated by clear section dividers that chunk-based RAG systems can split on.
Using MarkItDown with LLM Pipelines
The most common use case is feeding converted documents into an LLM. Here is how to wire MarkItDown into an OpenAI-compatible pipeline for a simple document Q&A pattern.
# doc_qa.py
from markitdown import MarkItDown
from openai import OpenAI

def answer_from_document(file_path: str, question: str, api_key: str) -> str:
    """Convert a document to Markdown and answer a question about it."""
    md = MarkItDown()
    result = md.convert(file_path)
    doc_text = result.text_content

    # Truncate if the document exceeds a safe context window size
    max_chars = 80000  # ~20K tokens for most models
    if len(doc_text) > max_chars:
        doc_text = doc_text[:max_chars] + "\n\n[Document truncated...]"

    client = OpenAI(api_key=api_key)
    response = client.chat.completions.create(
        model="gpt-4o-mini",
        messages=[
            {
                "role": "system",
                "content": "You are a document analyst. Answer questions based only on the provided document.",
            },
            {
                "role": "user",
                "content": f"Document:\n\n{doc_text}\n\nQuestion: {question}",
            },
        ],
    )
    return response.choices[0].message.content


# Example usage
answer = answer_from_document(
    "contract.pdf",
    "What is the termination clause?",
    api_key="your-openai-api-key"
)
print(answer)
Output:
Section 12.3 of the contract states that either party may terminate this agreement
with 30 days written notice. Termination for cause requires only 5 business days
notice and must be accompanied by written documentation of the breach.
This pattern works with any OpenAI-compatible API — swap the base URL and API key for Anthropic, Gemini, or a local Ollama endpoint and the pattern is identical. The key insight is that MarkItDown’s Markdown output is substantially better context than raw extracted text because the model can use heading levels and table structure to locate specific sections of long documents.
Raw PDF to LLM: garbled. Markdown to LLM: actually works.
Real-Life Example: Building a Document Corpus Preparer for RAG
This project ties together everything from this article. It accepts a folder of mixed-format documents, converts all of them to Markdown, chunks the output into LLM-ready segments, and saves a JSON file that a vector database like Chroma or Pinecone can ingest directly.
# rag_preparer.py
import json
import os
from pathlib import Path
from markitdown import MarkItDown

SUPPORTED = {".pdf", ".docx", ".pptx", ".xlsx", ".html", ".csv", ".epub"}
CHUNK_SIZE = 1500   # characters per chunk (~375 tokens)
CHUNK_OVERLAP = 150 # overlap so context is not lost at boundaries


def chunk_text(text: str, size: int = CHUNK_SIZE, overlap: int = CHUNK_OVERLAP) -> list:
    """Split text into overlapping chunks."""
    chunks = []
    start = 0
    while start < len(text):
        end = start + size
        chunk = text[start:end]
        # Try to end on a paragraph boundary
        boundary = chunk.rfind("\n\n")
        if boundary > size // 2:
            chunk = chunk[:boundary]
        chunks.append(chunk.strip())
        start += len(chunk) - overlap
    return [c for c in chunks if len(c) > 50]  # drop tiny trailing chunks


def prepare_rag_corpus(docs_dir: str, output_path: str) -> None:
    md = MarkItDown()
    corpus = []
    chunk_id = 0

    for fpath in sorted(Path(docs_dir).rglob("*")):
        if fpath.suffix.lower() not in SUPPORTED:
            continue

        print(f"Processing: {fpath.name}")
        try:
            result = md.convert(str(fpath))
            chunks = chunk_text(result.text_content)
            for i, chunk in enumerate(chunks):
                corpus.append({
                    "id": f"chunk_{chunk_id:05d}",
                    "source_file": fpath.name,
                    "source_title": result.title or fpath.stem,
                    "chunk_index": i,
                    "total_chunks": len(chunks),
                    "text": chunk,
                })
                chunk_id += 1
            print(f"  -> {len(chunks)} chunks")
        except Exception as exc:
            print(f"  FAILED: {exc}")

    with open(output_path, "w", encoding="utf-8") as f:
        json.dump(corpus, f, indent=2, ensure_ascii=False)

    print(f"\nCorpus saved: {len(corpus)} chunks from {chunk_id} total across all docs")
    print(f"Output: {output_path}")


if __name__ == "__main__":
    prepare_rag_corpus("./knowledge_base", "rag_corpus.json")
Output:
Processing: company_handbook.pdf
  -> 47 chunks
Processing: product_specs.docx
  -> 18 chunks
Processing: roadmap_2026.pptx
  -> 9 chunks
Processing: pricing.xlsx
  -> 3 chunks

Corpus saved: 77 chunks from 77 total across all docs
Output: rag_corpus.json
The output rag_corpus.json is ready to embed. Each chunk carries its source file and title as metadata, so your vector database can filter by document when answering queries that should be scoped to a specific source. The overlapping chunks prevent context loss at boundaries — a sentence that straddles a chunk boundary will appear in both adjacent chunks, so the model always sees complete context around any retrieved passage. To extend this project, add an embedding step using sentence-transformers or the OpenAI Embeddings API and pipe the corpus directly into your vector store of choice.
Frequently Asked Questions
Can MarkItDown convert password-protected PDFs?
No — password-protected PDFs raise an exception during conversion because the underlying pdfminer.six library cannot read encrypted content without the password. You will see a PDFPasswordIncorrect or PDFEncryptionError. The fix is to pre-decrypt the PDF before conversion using a library like pikepdf: open with the password and save a decrypted copy, then convert the decrypted file. Always wrap conversion in try/except in batch pipelines so a single locked file does not abort the entire run.
Does MarkItDown extract images from PDFs?
With the base install, MarkItDown extracts text from PDFs but skips embedded images. If your PDFs are scanned documents (images of text, not actual text layers), the base converter will return little or no content. For scanned PDFs you need to add an LLM plugin — MarkItDown supports Azure Document Intelligence and OpenAI Vision as optional backends that can OCR images within documents. Pass an llm_client and llm_model to the MarkItDown constructor to enable this. The optional dependency install is pip install markitdown[all].
How should I handle very large documents?
For documents that produce more than 100,000 characters of Markdown, pass the whole text to an LLM in a single call only if your model supports a large context window (128K+). Otherwise, use the chunking pattern from the real-life example above — split the Markdown at paragraph boundaries with a 10% overlap and embed the chunks rather than the whole document. MarkItDown itself handles arbitrarily large files without issue; the bottleneck is always the downstream LLM context window, not the conversion step.
How well does MarkItDown handle complex tables?
Simple flat tables — with consistent column counts and no merged cells — convert reliably to Markdown tables. Complex tables with merged headers, multi-row cells, or heavily styled cells may produce irregular Markdown. Excel files generally convert better than Word or PDF tables because the underlying data is already structured. If you find table output unreliable for a specific document type, consider using openpyxl or python-docx for that format and MarkItDown for everything else in the same pipeline.
Can I stream the conversion output?
MarkItDown does not support streaming output — the convert() call blocks until the full document is converted and returns the complete result. For large documents this can take several seconds, especially for multi-hundred-page PDFs. If you need non-blocking behavior in an async pipeline, wrap the conversion in asyncio.run_in_executor() to run it in a thread pool and await the result without blocking your event loop.
Can I add a custom converter for a format MarkItDown does not support?
Yes — MarkItDown has a plugin system. You can register a custom DocumentConverter subclass for any file extension. Implement the convert() method that accepts a file path and returns a DocumentConverterResult, then register it via md.register_converter(MyConverter()). This is useful for proprietary formats specific to your industry — medical records in HL7, CAD files, or internal XML schemas — where you have the parsing logic but need to plug it into the same batch pipeline that handles standard formats.
Conclusion
MarkItDown removes the most painful part of building LLM document pipelines: writing and maintaining a different parser for every file format. A single MarkItDown().convert() call handles PDFs, DOCX, PPTX, XLSX, HTML, CSV, EPUB, and more, returning clean Markdown that LLMs can reason over rather than raw binary or poorly-structured text. The real-life example above gives you a complete RAG corpus preparer that you can extend — add an embedding step, plug in a vector store, or swap in a different chunking strategy depending on your document types.
The next step is to test it on your actual document set. Run the batch converter, inspect the output Markdown for any formatting issues specific to your files, and tune the chunk size to match your embedding model’s token limit. For OCR-heavy or audio transcription pipelines, explore the optional llm_client parameter to unlock MarkItDown’s full feature set.
In the previous section we created an asynchronous version manually. Here’s the same outcome but written with the async await syntax. As you’ll notice it is very similar to the original synchronous version:
import time, datetime, time
import asyncio

import time, datetime, timeit

customer_queue = [ "C1", "C2", "C3"  ]

def get_next_customer():
    return customer_queue.pop(0)    #Get the first customer from list

async def cook_hamburger(customer):
    start_customer_timer = timeit.default_timer()
    print( f"[{customer}]: Start cooking hamberger for customer")
    await asyncio.sleep(2)   # Sleep but release control
    end_customer_timer = timeit.default_timer()
    print( f"[{customer}]: Finish cooking hamberger for customer.  Total {end_customer_timer-start_customer_timer} seconds\n")

async def run_shop():
    cooking_queue = []

    while customer_queue:
        curr_customer = get_next_customer()
        cooking_queue.append(  cook_hamburger(curr_customer)  )   #this returns a task only

    #cooking_queue[] has all the async tasks
    await asyncio.gather( *cooking_queue )      #Run all in parallel

def main():
    print('Hamburger Shop')
    start = timeit.default_timer()

    asyncio.run( run_shop() )           #Start the event loop

    stop = timeit.default_timer()
    print(f"** Total runtime: {stop-start} seconds ***")

if __name__ == '__main__':
    main()
Output as follows:
Let’s walk through the code:
Firstly, the async await is available from the library asyncio hence the import asyncio
There’s funny set of async keywords which precede the def run_shop() and the def cook_hamburger(customer) functions. In addition the run_shop() is no longer called directly, instead it is called with a asyncio.run( run_shop() ) function call. So here’s what is happening:
The asyncio.run() function is the trigger for the so-called event loop. It continues to run forever until all the tasks given to it are completed. You must pass it a function with the async def... prefix hence why run_shop() has the async prefix
In the async def run_shop() function call, the code iterates while there are customers in the queue to process, and then there’s a call to cook_hamburger(curr_customer) for each customer. A direct call to the customer does not actually call the function but instead creates a task to execute this. That is what the async tells the compiler – that when called directly, return a task.
At the end of the function code in def run_shop() there’s a call to function await asyncio.gather( *cooking_queue). There’s a few things going on here:
The await keywords indicates that you need wait for the work to complete but python can do something else in the meantime
The call to gather() actually executes all the tasks given to it as a parameter collectively as a group and then returns the results sequentially (please note that the order of the tasks being executed may be random)
The *customer_queue simply expands the list into a list of parameter items. So for example if customer_queue[] == [ '1', '2', '3'] then the gather( *customer_queue) would be the same as gather( '1', '2', '3').
When the await asyncio.gather( *customer_queue ) is called, the await keyword releases control to any activities that are pending and one of them would be to the calls to function cook_hamburger() which was added to the customer_queue list. Hence calls to cook_hamburger() would be triggered.
Within cook_hamburger() there is also an await asyncio.sleep(2). This simply waits for 2 seconds, however, it does not force the program to wait for the 2 seconds to complete, instead the await keyword releases python to do something else in the meantime. This is similar to step 3 in Figure 2 where the chef/waiter puts the hamburger on the grill, but then doesn’t wait for the 2 second but instead does something else (i.e. serve the next customer)
The asyncio.run() are new keywords as part of python 3.7. In older versions of python you may see the following but it is the same as simply running asyncio.run( run_shop() ) :
loop = asyncio.get_event_loop()
loop.run_until_complete(run_shop())
loop.close()
As you will notice, this is very similar to the synchronous code that covers Figure 1 above. This is the beauty of async/await
So remember, whenever there’s an await then that means python pauses at that point for that task to complete but then also releases python to do something else. That’s how the performance improvement occurs. In this example, the runtime of this is 2 seconds instead of the sequential 6 seconds!
Async Asynchronous Calling Another Async Function Code Example
Suppose you want t also call another async function once your first async function is completed – how do you go about this? Remember the rule, if you want to run something asynchronously, you have to use the await keyword, and that the function you’re calling has to be defined with async def ...
To continue with the restaurant theme, suppose that after the hamburger is cooked you ask an assistant to put the hamburger into a takeaway bag which takes 1 second. This is also another task that you need not ‘block’ and wait for it to complete. Hence, this action can be put into a function which is defined as an async. Here’s what the code can look like:
import time, datetime, time
import asyncio

customer_queue = [ "C1", "C2", "C3" ]

def get_next_customer():
    return customer_queue.pop(0)    #Get the first customer from list

async def cook_hamburger(customer):
    start_customer_timer = timeit.default_timer()
    print( f"[{customer}]: Start cooking hamberger for customer")
    await asyncio.sleep(2)   # Sleep but release control
    end_customer_timer = timeit.default_timer()
    print( f"[{customer}]: Finish cooking hamberger for customer.  Total {end_customer_timer-start_customer_timer} seconds")
    await put_hamburger_in_takeaway_bag( customer )

async def put_hamburger_in_takeaway_bag( customer):
    start_customer_timer = timeit.default_timer()
    print( f"[{customer}]: Start packing hamberger")
    await asyncio.sleep(1)   # It takes 2 seconds to cook the hamburger
    end_customer_timer = timeit.default_timer()
    print( f"[{customer}]: Finish packing hamberger.  Total {end_customer_timer-start_customer_timer} seconds\n")

async def run_shop():
    cooking_queue = []

    while customer_queue:
        curr_customer = get_next_customer()
        cooking_queue.append( cook_hamburger(curr_customer) )   #Get each of the event loops
    await asyncio.gather( *cooking_queue )      #Run all in parallel

def main():
    print('Hamburger Shop')
    start = timeit.default_timer()
    asyncio.run( run_shop() )           #Start the event loop
    stop = timeit.default_timer()
    print(f"** Total runtime: {stop-start} seconds ***")

if __name__ == '__main__':
    main()
The output would be:
See how once the hamburger is cooked (e.g. [C1]: Finish cooking hamburger for customer. Total 2.000924572115764 seconds), then immediately afterwards you have the [C1]: Start packing hamburger step but also gets called asynchronously.
Async Await Real World Example With Web Crawler in Python
One difficulty in learning Async / Await is that many examples provided simply provide the asyncio.sleep() as an example which is helpful to understand the concept, but not very helpful when you want to make something more useful. Let’s try a more complex example where you want to get some stock data from finance.yahoo.com and then, for that same stock, you also get the first 3 newspaper articles from news.google.com in the last 24 hours.
Now one thing you will realise is that await only works with functions that are defined as async. So you cannot call any function with await. Why? Well recall that when you call await you are expecting a function to return a task and not actually call the function, hence that function needs to be defined as async in order to tell python that it returns a task to be executed at the next available time.
Let’s see the synchronous version of the code:
import asyncio, requests, timeit
from bs4 import BeautifulSoup
from pygooglenews import GoogleNews

stock_list = [ "TSLA", "AAPL"]

def get_stock_price_data(stock):
    print(f"-- getting stock data for {stock}")
    data = {"stock":stock, "price_open":0, "price_close":0 }
    stock_page = requests.get( 'https://finance.yahoo.com/quote/' + stock, headers={'Cache-Control': 'no-cache',  "Pragma": "no-cache"})

    soup = BeautifulSoup(stock_page.text, 'html.parser')
    #<fin-streamer active="" class="Fw(b) Fz(36px) Mb(-4px) D(ib)" data-field="regularMarketPrice" data-pricehint="2" data-symbol="TSLA" data-test="qsp-price" data-trend="none" value="759.63">759.63</fin-streamer>
    data['price_close'] = soup.find('fin-streamer', attrs={"data-symbol":stock, "data-field":"regularMarketPrice"} ).text

    #<td class="Ta(end) Fw(600) Lh(14px)" data-test="OPEN-value">723.25</td>
    data['price_open'] = soup.find( attrs={"data-test":"OPEN-value"}).text

    return data

def get_recent_news(stock):
    print(f"-- getting news data for {stock}")
    gn = GoogleNews()
    search = gn.search(f"stocks {stock}", when = '24h')
    news = search['entries'][0:3]
    return news

def print_stock_update(stock, data, news):
    print(f"Stock:{ stock }")
    price_change = 0
    if int(float(data['price_open'])) != 0: price_change = round( 100 * ( float( data['price_close'])/float(data['price_open'])-1), 2)
    print(f"Open Price:{data['price_open']} Close Price:{data['price_close']} Change:{price_change}% ")
    print("Latest News:")
    for news_item in news:
        print( f"{news_item.published}:{news_item.source.title} - {news_item.title}" )
    print("\n")

def process_stocks():
    for stock in stock_list:
        data = get_stock_price_data( stock )
        news=[]
        news = get_recent_news( stock )
        print_stock_update(stock, data, news)

if __name__ == '__main__':
    start_timer = timeit.default_timer()
    process_stocks()
    end_timer = timeit.default_timer()

    print(f"** Total runtime: {end_timer-start_timer} seconds ***")
Output as follows:
So what’s happening here. Well, you are looping through two stocks TSLA and AAPL, and for each stock the following happens sequentially:
A call to data = get_stock_price_data( stock ) occurs in order to make a call to requests.get( 'https://finance.yahoo.com/quote/' + stock) to get the HTML page for the TSLA stock. Effectively, this page: https://finance.yahoo.com/quote/TSLA
Next we use BeautifulSoup() in order to find the HTML snippet that contains the stock price data for the opening price and the closing price:
After the call to yahoo is complete, then there’s a call to news = get_recent_news( stock ) which uses the module pygooglenews to get the latest google news. In fact we have used this function in our previous Twitter Botarticle.
Once this is all done, that output is printed out with the call to print_stock_update(stock, data, news)
Clearly this could be called asynchronously as we are looping each time for each stock, and then also the call to get the stock data is independent to getting the news data. However, one thing has to happen sequentially is the print_stock_update(stock, data, news) which has to wait for both the async calls to complete.
One wait to try is to simply call the website download with:
The reason is, as you may have guessed, is that the requests.get() is not created with the async def... construct and hence cannot be called asynchronously.
What you can do however is to use another ‘get’ web page module called httpx. This function is defined with async def... and can be called similar to requests. That same line would be re-written as:
Ok, that works well. However, but what about the GoogleNews() code. There is no such async version of this function, so how can this be called asynchronously? Well for this, you can actually wrap it around a new thread. A ‘thread’ is way to run a piece of code under the same CPU process but in a parallel. It warrants a whole separate article but for now you can think of it as finding a separate space to execute this independent of the current execution path. However, to execute this in a separate thread, there’s a bit more involved.
The code looks like the following:
### Original Version
def get_recent_news(stock):
    print(f"-- stock news:getting stock data for {stock}")
    gn = GoogleNews()
    search = gn.search(f"stocks {stock}", '24h') #Slow code to run asynchronously
    news = search['entries'][0:3]
    print(f"-- stock news:done {stock}")
    return news

### Asynchronous Version
async def get_recent_news(stock):
    print(f"-- stock news:getting stock data for {stock}")
    gn = GoogleNews()
    search = await asyncio.get_event_loop().run_in_executor( None, gn.search, f"stocks {stock}", '24h')
    news = search['entries'][0:3]
    print(f"-- stock news:done {stock}")
    return news
Here what’s happening is that firstly we are using the await keyword to call the gn.search() function which is now being called through this asyncio.get_event_loop().run_in_executor( .. ) function call. What’s happening here is that we are asking the asyncio module to get access to the event loop (that piece of code that continuously checks for tasks to be done) and then to run in a separate thread. The way it is called is that the parameters must be passed in separate to the function call and hence why the parameters are to be passed in after the function name itself. You will also notice that the whole function can now be defined as async def get_recent_news(stock)
How To Mix Asynchronous And Synchronous Code With Await Async in Python
Now the final problem to be solved is how do we call the two functions of get_stock_price_data( stock ) and get_recent_news(stock) to be run asynchronously, but then wait for both to finish, and THEN run the print. This is where these steps should all be grouped under one function. This is the trick to mix asynchronous and synchronous code.
In order to run a group of tasks in parallel as a group you use asyncio.gather(). However, if you want to execute a synchronous function when ALL tasks that were given to asyncio.gather() is complete, then you should wrap it in another asyncio.gather()
What is encouraging with this code, is that even though the call to get_web_data_A() and get_web_data_B() both sleep for 1 second, since they were doing that asynchronously, then the total runtime is still just a little over 1 second. This can be shown by the Calculate [0]... output. However, the problem is that the code still iterates each index sequentially, meaning, that index 0 is processed completely first, and once that’s done, then index 1 is processed. What we want instead is to run all the slow get_web_data_A() and get_web_data_B() first, and then run the code to calculate afterwards. This is where you need to first create the tasks for ALL the iterations, and then call gather() on all the tasks. See the following code:
Here, in the function async def run_all_2() when we loop, we do not call the blocking code await asyncio.gather... inside the for loop. Instead, we are adding all the tasks to call process(..) into a list called task_queue[], and then at the end of the for loop we are calling await asyncio.gather( *task_queue ) on all tasks in one go. Hence, the output is as follows:
You’ll notice that ALL the get_web_data_A() and get_web_data_B() are being called asynchronously, and then the calculate function is called on all the available data. Hence, the elapsed time for all the iterations is only 1 second, compared to the previous 2 seconds.
So what does this mean for our real world example for getting stock data from Yahoo and then calling Google News asynchronously, and then only printing the data once both are done? Well, the same principle applies. The code is as follows:
The key bit of code is in the async def process_stocks() which now iterates over each of the stocks, creates tasks, and then calls await asyncio.gather( *run_stock_list ) on all the stocks in one go, and then in the function process_stock_batch(stock) we have the asynchronous call to (data, news) = await asyncio.gather( get_stock_price_data( stock ), and then the synchronous call to print_stock_update(stock, data, news) once both web data is complete.
Conclusion
The await and async function is an incredibly useful feature of python which takes a bit of getting used to in order to understand the concept, but once you’ve got the hang of it, it can be incredibly useful to get an improve of the performance of your code by leveraging idle time where you are waiting for a task to complete. Remember to be sure about the sequencing and being mindful of whether you care to have a follow-up activity once that task is completed, or you can simply continue to execute.
This not easy to grasp as a beginner, but follow the example code above, and if you get stuck feel free to reach out through our email list below.
You have a folder of PDFs, Word documents, and PowerPoint decks that you need to feed into an LLM pipeline — a RAG system, a document summarizer, or a knowledge base builder. The problem is that LLMs work best with plain text, and most documents are packed with binary formatting, embedded fonts, and layout metadata that the model cannot interpret. Sending a raw PDF to an LLM is like handing someone a ZIP file and asking them to read it.
Microsoft’s markitdown library solves this by converting dozens of file formats — PDF, DOCX, PPTX, XLSX, HTML, CSV, EPUB, images, and audio — into clean Markdown that any LLM can process. It is a single pip install, works from Python code or the command line, and handles the conversion pipeline so your code does not have to. The Markdown output preserves headings, tables, and code blocks in a structured format that models handle especially well.
This article covers everything you need to get documents into your AI pipelines with MarkItDown. You will learn how to install it, convert individual files and entire directories, work with the Python API, handle different file types, and build a real document-processing pipeline that prepares files for a RAG system. By the end you will have a working utility that accepts any folder of mixed-format documents and outputs a structured Markdown dataset ready for embedding.
MarkItDown: Quick Example
Before diving into the details, here is the fastest path from a file to Markdown text you can feed into an LLM. This example converts an HTML page to Markdown in four lines of Python.
# quick_markitdown.py
from markitdown import MarkItDown

md = MarkItDown()
result = md.convert("https://example.com")
print(result.text_content[:500])
Output:
Example Domain
==============

This domain is for use in illustrative examples in documents. You may use this
domain in literature without prior coordination or asking for permission.

[More information...](https://www.iana.org/domains/reserved)
The MarkItDown() constructor creates a converter instance, and convert() accepts a file path, a URL, or a file-like object. The result is a DocumentConverterResult object — result.text_content holds the clean Markdown string ready to pass into any LLM or text processing pipeline.
The real power emerges when you need to handle PDFs, Office files, and mixed directories at scale. The sections below cover all of that, starting with installation.
What Is MarkItDown and Why Use It?
MarkItDown is an open-source Python library from Microsoft that acts as a universal document-to-Markdown converter. Think of it as a universal adapter — on one end you plug in a document in almost any format, and on the other end you get clean, structured Markdown text. The library was built specifically with LLM use cases in mind: the Markdown output is structured in a way that helps models understand document hierarchy (headings, tables, code blocks) rather than receiving a flat blob of text.
The key difference from alternatives like pypdf2 or python-docx is breadth and consistency. Those libraries require a different API for each format, handle only one format each, and return raw extracted text with no structure. MarkItDown gives you one API that handles all formats and preserves semantic structure as Markdown.
Format
MarkItDown
pypdf2 / python-docx / openpyxl
PDF
Yes
pypdf2 only
DOCX
Yes
python-docx only
PPTX
Yes
python-pptx only
XLSX
Yes
openpyxl only
HTML / URL
Yes
No
EPUB
Yes
No
CSV / JSON
Yes
No
Images (OCR)
Yes (optional)
No
Audio (transcription)
Yes (optional)
No
Unified output format
Markdown
Raw text / format-specific objects
The optional image OCR and audio transcription require extra dependencies (and an LLM API key for the best results), but the core document converters — PDF, Office, HTML — work completely offline with no API key required. That makes MarkItDown an excellent fit for any pipeline where you control the infrastructure.
Installing MarkItDown
MarkItDown is on PyPI. A basic install that handles PDFs, Office documents, and HTML covers most use cases and has minimal dependencies.
# Install the base package
pip install markitdown

# For PDF support (pdfminer.six is included in most installs)
pip install markitdown[pdf]

# For all optional extras (OCR, audio, Azure Document Intelligence)
pip install markitdown[all]
The [pdf] extra pulls in pdfminer.six for text-based PDF extraction. If you need image OCR within PDFs, you will also need an LLM plugin (covered in the advanced section). For most document-to-Markdown pipelines the base install is all you need — it handles DOCX, PPTX, XLSX, HTML, CSV, JSON, and EPUB without any extras.
One API to rule them all. Finally.
Converting Files, URLs, and Streams
The MarkItDown class is the main entry point. It auto-detects the file format based on extension or MIME type, so you call the same method regardless of what you are converting.
Converting a Local File
Pass any local file path as a string. MarkItDown detects the format automatically and returns a DocumentConverterResult.
# convert_file.py
from markitdown import MarkItDown

md = MarkItDown()

# Convert a DOCX file
result = md.convert("report.docx")
print(f"Title: {result.title}")
print(f"Characters: {len(result.text_content)}")
print()
print(result.text_content[:300])
Output:
Title: Q3 Sales Report
Characters: 4821

# Q3 Sales Report

**Prepared by:** Finance Team
**Date:** September 30, 2025

## Executive Summary

Revenue grew 12% year-over-year driven by the enterprise segment...
The result.title property extracts the document title from metadata where available (DOCX, PDF). The text_content property always holds the full Markdown string. Notice that the headings from the Word document are preserved as Markdown heading levels — this is exactly the structural information that LLMs use to understand document hierarchy.
Converting a URL
Pass a URL string and MarkItDown fetches the page and converts the HTML to Markdown. This works especially well for documentation pages, Wikipedia articles, and any page with semantic HTML structure.
# convert_url.py
from markitdown import MarkItDown

md = MarkItDown()
result = md.convert("https://docs.python.org/3/library/json.html")

print(result.text_content[:600])
Output:
json --- JSON encoder and decoder
=================================

**Source code:** [Lib/json/__init__.py](https://github.com/python/cpython/tree/3.13/Lib/json/__init__.py)

JSON (JavaScript Object Notation), specified by [RFC 7159](https://datatracker.ietf.org/doc/html/rfc7159.html)...

## json.dumps(obj, *, skipkeys=False, ...)

Serialize obj to a JSON formatted str...
Navigation menus, footers, and sidebars are typically stripped out, leaving the actual content. This makes URL conversion a fast way to pull documentation into a RAG corpus without building a custom scraper for every site.
Converting from a File-Like Object
When you receive a file as bytes (from an API response, an email attachment, or a web upload), you can convert it directly from a BytesIO object without writing it to disk first.
# convert_stream.py
import io
from markitdown import MarkItDown
import requests

md = MarkItDown()

# Download a PDF into memory and convert without saving to disk
response = requests.get("https://www.w3.org/WAI/WCAG21/wcag21.pdf")
pdf_stream = io.BytesIO(response.content)

# Must pass extension hint when using streams -- no filename to detect from
result = md.convert(pdf_stream, file_extension=".pdf")
print(f"Converted {len(result.text_content)} characters from in-memory PDF")
print(result.text_content[:400])
Output:
Converted 87432 characters from in-memory PDF

Web Content Accessibility Guidelines (WCAG) 2.1
================================================

W3C Recommendation 05 June 2018

Abstract
--------

Web Content Accessibility Guidelines (WCAG) 2.1 covers a wide range of...
The file_extension parameter is required when passing a stream because there is no filename to inspect. Always include it for streams to ensure the correct converter is selected.
BytesIO: no temp files, no disk I/O, no drama.
Format-Specific Conversion Options
Most formats work out of the box, but a few have options worth knowing about. PowerPoint files get per-slide conversion, Excel files convert to Markdown tables, and PDFs expose page-level control.
Excel and CSV to Markdown Tables
Excel sheets are converted to Markdown tables — one table per worksheet. This is particularly useful when feeding structured data to LLMs that need to reason about tabular information.
# convert_excel.py
from markitdown import MarkItDown

md = MarkItDown()
result = md.convert("sales_data.xlsx")
print(result.text_content)
Output (example with a two-sheet workbook):
## Sheet1

| Month | Revenue | Units |
|-------|---------|-------|
| Jan   | 84000   | 420   |
| Feb   | 91200   | 456   |
| Mar   | 78500   | 392   |

## Sheet2

| Region | Manager | Target |
|--------|---------|--------|
| East   | Alice   | 100000 |
| West   | Bob     | 95000  |
Each worksheet becomes an H2 section followed by a Markdown table. LLMs handle this format well for question-answering tasks — the model can identify column headers, filter by region, and compute simple aggregations when the data is in this structured Markdown table format rather than raw CSV text.
PowerPoint Slide Extraction
PPTX files are converted slide by slide. Each slide becomes a section with its title as a heading and the body text extracted below it. Speaker notes are included when present.
# convert_pptx.py
from markitdown import MarkItDown

md = MarkItDown()
result = md.convert("product_roadmap.pptx")

# Show first 500 chars to see the structure
print(result.text_content[:500])
Output:
## Slide 1: Product Roadmap 2026

Vision: Ship the AI-native workflow layer by Q3.

- Q1: Core infrastructure and auth
- Q2: Integration layer + partner APIs
- Q3: Public launch
- Q4: Enterprise tier

**Notes:** Emphasize the partnership angle -- this is key differentiator vs competitors.

## Slide 2: Q1 Milestones

- Authentication service -- 95% complete
- Database migration -- in progress
...
Speaker notes appear as bold “Notes:” blocks after each slide’s content. For meeting-notes pipelines or sales-deck summarizers this is especially useful — you get the full context that the presenter intended to convey, not just the bullet points on the slide.
Speaker notes included. Your LLM finally hears what the presenter was thinking.
Batch Converting a Directory
Real pipelines rarely deal with a single file. Here is a pattern to convert every supported file in a directory, log any failures, and save all results to a single Markdown file for easy embedding.
# batch_convert.py
import os
from pathlib import Path
from markitdown import MarkItDown

SUPPORTED = {".pdf", ".docx", ".pptx", ".xlsx", ".html", ".csv", ".json", ".epub"}

def batch_convert(input_dir: str, output_path: str) -> dict:
    """Convert all supported files in input_dir to a single Markdown file."""
    md = MarkItDown()
    results = {"success": [], "failed": []}
    output_parts = []

    for fpath in sorted(Path(input_dir).rglob("*")):
        if fpath.suffix.lower() not in SUPPORTED:
            continue

        print(f"Converting: {fpath.name}")
        try:
            result = md.convert(str(fpath))
            # Separate each document with a clear section header
            section = f"\n\n---\n## Document: {fpath.name}\n\n{result.text_content}"
            output_parts.append(section)
            results["success"].append(str(fpath))
        except Exception as exc:
            print(f"  FAILED: {exc}")
            results["failed"].append({"file": str(fpath), "error": str(exc)})

    with open(output_path, "w", encoding="utf-8") as f:
        f.write("# Document Corpus\n")
        f.write(f"Converted {len(results['success'])} documents.\n")
        f.write("".join(output_parts))

    return results


if __name__ == "__main__":
    stats = batch_convert("./docs", "corpus.md")
    print(f"\nDone: {len(stats['success'])} converted, {len(stats['failed'])} failed")
Output:
Converting: annual_report.pdf
Converting: onboarding.docx
Converting: roadmap.pptx
Converting: q3_data.xlsx
  FAILED: File appears to be encrypted

Done: 3 converted, 1 failed
The try/except around each conversion is essential — encrypted PDFs, corrupted files, or unsupported subtypes will raise exceptions rather than silently producing empty output. The pattern above logs the failure and continues with the rest of the batch, which is the right behavior for any automated pipeline. The output corpus.md contains all documents separated by clear section dividers that chunk-based RAG systems can split on.
Using MarkItDown with LLM Pipelines
The most common use case is feeding converted documents into an LLM. Here is how to wire MarkItDown into an OpenAI-compatible pipeline for a simple document Q&A pattern.
# doc_qa.py
from markitdown import MarkItDown
from openai import OpenAI

def answer_from_document(file_path: str, question: str, api_key: str) -> str:
    """Convert a document to Markdown and answer a question about it."""
    md = MarkItDown()
    result = md.convert(file_path)
    doc_text = result.text_content

    # Truncate if the document exceeds a safe context window size
    max_chars = 80000  # ~20K tokens for most models
    if len(doc_text) > max_chars:
        doc_text = doc_text[:max_chars] + "\n\n[Document truncated...]"

    client = OpenAI(api_key=api_key)
    response = client.chat.completions.create(
        model="gpt-4o-mini",
        messages=[
            {
                "role": "system",
                "content": "You are a document analyst. Answer questions based only on the provided document.",
            },
            {
                "role": "user",
                "content": f"Document:\n\n{doc_text}\n\nQuestion: {question}",
            },
        ],
    )
    return response.choices[0].message.content


# Example usage
answer = answer_from_document(
    "contract.pdf",
    "What is the termination clause?",
    api_key="your-openai-api-key"
)
print(answer)
Output:
Section 12.3 of the contract states that either party may terminate this agreement
with 30 days written notice. Termination for cause requires only 5 business days
notice and must be accompanied by written documentation of the breach.
This pattern works with any OpenAI-compatible API — swap the base URL and API key for Anthropic, Gemini, or a local Ollama endpoint and the pattern is identical. The key insight is that MarkItDown’s Markdown output is substantially better context than raw extracted text because the model can use heading levels and table structure to locate specific sections of long documents.
Raw PDF to LLM: garbled. Markdown to LLM: actually works.
Real-Life Example: Building a Document Corpus Preparer for RAG
This project ties together everything from this article. It accepts a folder of mixed-format documents, converts all of them to Markdown, chunks the output into LLM-ready segments, and saves a JSON file that a vector database like Chroma or Pinecone can ingest directly.
# rag_preparer.py
import json
import os
from pathlib import Path
from markitdown import MarkItDown

SUPPORTED = {".pdf", ".docx", ".pptx", ".xlsx", ".html", ".csv", ".epub"}
CHUNK_SIZE = 1500   # characters per chunk (~375 tokens)
CHUNK_OVERLAP = 150 # overlap so context is not lost at boundaries


def chunk_text(text: str, size: int = CHUNK_SIZE, overlap: int = CHUNK_OVERLAP) -> list:
    """Split text into overlapping chunks."""
    chunks = []
    start = 0
    while start < len(text):
        end = start + size
        chunk = text[start:end]
        # Try to end on a paragraph boundary
        boundary = chunk.rfind("\n\n")
        if boundary > size // 2:
            chunk = chunk[:boundary]
        chunks.append(chunk.strip())
        start += len(chunk) - overlap
    return [c for c in chunks if len(c) > 50]  # drop tiny trailing chunks


def prepare_rag_corpus(docs_dir: str, output_path: str) -> None:
    md = MarkItDown()
    corpus = []
    chunk_id = 0

    for fpath in sorted(Path(docs_dir).rglob("*")):
        if fpath.suffix.lower() not in SUPPORTED:
            continue

        print(f"Processing: {fpath.name}")
        try:
            result = md.convert(str(fpath))
            chunks = chunk_text(result.text_content)
            for i, chunk in enumerate(chunks):
                corpus.append({
                    "id": f"chunk_{chunk_id:05d}",
                    "source_file": fpath.name,
                    "source_title": result.title or fpath.stem,
                    "chunk_index": i,
                    "total_chunks": len(chunks),
                    "text": chunk,
                })
                chunk_id += 1
            print(f"  -> {len(chunks)} chunks")
        except Exception as exc:
            print(f"  FAILED: {exc}")

    with open(output_path, "w", encoding="utf-8") as f:
        json.dump(corpus, f, indent=2, ensure_ascii=False)

    print(f"\nCorpus saved: {len(corpus)} chunks from {chunk_id} total across all docs")
    print(f"Output: {output_path}")


if __name__ == "__main__":
    prepare_rag_corpus("./knowledge_base", "rag_corpus.json")
Output:
Processing: company_handbook.pdf
  -> 47 chunks
Processing: product_specs.docx
  -> 18 chunks
Processing: roadmap_2026.pptx
  -> 9 chunks
Processing: pricing.xlsx
  -> 3 chunks

Corpus saved: 77 chunks from 77 total across all docs
Output: rag_corpus.json
The output rag_corpus.json is ready to embed. Each chunk carries its source file and title as metadata, so your vector database can filter by document when answering queries that should be scoped to a specific source. The overlapping chunks prevent context loss at boundaries — a sentence that straddles a chunk boundary will appear in both adjacent chunks, so the model always sees complete context around any retrieved passage. To extend this project, add an embedding step using sentence-transformers or the OpenAI Embeddings API and pipe the corpus directly into your vector store of choice.
Frequently Asked Questions
Can MarkItDown convert password-protected PDFs?
No — password-protected PDFs raise an exception during conversion because the underlying pdfminer.six library cannot read encrypted content without the password. You will see a PDFPasswordIncorrect or PDFEncryptionError. The fix is to pre-decrypt the PDF before conversion using a library like pikepdf: open with the password and save a decrypted copy, then convert the decrypted file. Always wrap conversion in try/except in batch pipelines so a single locked file does not abort the entire run.
Does MarkItDown extract images from PDFs?
With the base install, MarkItDown extracts text from PDFs but skips embedded images. If your PDFs are scanned documents (images of text, not actual text layers), the base converter will return little or no content. For scanned PDFs you need to add an LLM plugin — MarkItDown supports Azure Document Intelligence and OpenAI Vision as optional backends that can OCR images within documents. Pass an llm_client and llm_model to the MarkItDown constructor to enable this. The optional dependency install is pip install markitdown[all].
How should I handle very large documents?
For documents that produce more than 100,000 characters of Markdown, pass the whole text to an LLM in a single call only if your model supports a large context window (128K+). Otherwise, use the chunking pattern from the real-life example above — split the Markdown at paragraph boundaries with a 10% overlap and embed the chunks rather than the whole document. MarkItDown itself handles arbitrarily large files without issue; the bottleneck is always the downstream LLM context window, not the conversion step.
How well does MarkItDown handle complex tables?
Simple flat tables — with consistent column counts and no merged cells — convert reliably to Markdown tables. Complex tables with merged headers, multi-row cells, or heavily styled cells may produce irregular Markdown. Excel files generally convert better than Word or PDF tables because the underlying data is already structured. If you find table output unreliable for a specific document type, consider using openpyxl or python-docx for that format and MarkItDown for everything else in the same pipeline.
Can I stream the conversion output?
MarkItDown does not support streaming output — the convert() call blocks until the full document is converted and returns the complete result. For large documents this can take several seconds, especially for multi-hundred-page PDFs. If you need non-blocking behavior in an async pipeline, wrap the conversion in asyncio.run_in_executor() to run it in a thread pool and await the result without blocking your event loop.
Can I add a custom converter for a format MarkItDown does not support?
Yes — MarkItDown has a plugin system. You can register a custom DocumentConverter subclass for any file extension. Implement the convert() method that accepts a file path and returns a DocumentConverterResult, then register it via md.register_converter(MyConverter()). This is useful for proprietary formats specific to your industry — medical records in HL7, CAD files, or internal XML schemas — where you have the parsing logic but need to plug it into the same batch pipeline that handles standard formats.
Conclusion
MarkItDown removes the most painful part of building LLM document pipelines: writing and maintaining a different parser for every file format. A single MarkItDown().convert() call handles PDFs, DOCX, PPTX, XLSX, HTML, CSV, EPUB, and more, returning clean Markdown that LLMs can reason over rather than raw binary or poorly-structured text. The real-life example above gives you a complete RAG corpus preparer that you can extend — add an embedding step, plug in a vector store, or swap in a different chunking strategy depending on your document types.
The next step is to test it on your actual document set. Run the batch converter, inspect the output Markdown for any formatting issues specific to your files, and tune the chunk size to match your embedding model’s token limit. For OCR-heavy or audio transcription pipelines, explore the optional llm_client parameter to unlock MarkItDown’s full feature set.
async def defines a coroutine function and await pauses execution until an asynchronous operation completes. This enables concurrent I/O operations without threading, using the asyncio event loop.
When should I use async/await instead of threading?
Use async/await for I/O-bound tasks like network requests and database queries with many concurrent connections. Use threading for CPU-bound tasks or libraries that do not support async.
How do I run multiple async tasks concurrently?
Use asyncio.gather(task1(), task2()) to run multiple coroutines concurrently. Use asyncio.create_task() to schedule without immediately waiting.
What does ‘coroutine was never awaited’ mean?
You called an async function without await. Async functions return coroutine objects that must be awaited. Add await before the call or use asyncio.run() from synchronous code.
Can I mix synchronous and asynchronous code?
Yes. Use asyncio.run() to call async from sync. Use loop.run_in_executor() to run blocking functions inside async code without blocking the event loop.
Twitter Bots can be super useful to help automate some of the interactions on social media in order to build and grow engagement but also automate some tasks. There has been many changes on the twitter developer account and sometimes it’s uncertain how to even create a tweet bot. This article will walk through step bey step on how to create a twitter bot with the latest Twitter API v2 and also provide some code you can copy and paste in your next project. We also end with how to create a more useful bot that can post some articles about python automatically.
In a nutshell, how a twitter bot works is that you will need to run your code for a twitter bot in your own compute that can be triggered from a Twitter webhook (not covered) which is called by twitter based on a given event, or by having your program run periodically to read and send tweets (covered in this article). Either way, there are some commonalities and in this article we will walk through how to read tweets, and then to send tweets which are from google news related to python!
Written by Pubs
Python developer and educator with 15+ years building production systems across data engineering, web APIs, and AI tooling. Founder of Python How To Program — 270+ in-depth tutorials covering the modern Python stack.
If you haven’t already you will need to either sign in or sign up for a twitter account through twitter.com. Make sure your twitter account has an email address allocated to it (if you’re not aware, you can create a twitter account with just your mobile phone number)
Next go to developer.twitter.com and sign up for the developer program (yes, you need to sign up for a second time). This enables you to create applications.
First you’ll need to answer some questions on purpose of the developer account. You can chose “Make a Bot”
Next you will need to agree to the terms and conditions, and then a verification email will be sent to your email address from your twitter account.
When you click on the email to verify your account, you can then enter your app name. This is an internal name and something that will make it easy for you to reference.
Once you click on keys, you will then be given a set of security token keys like below. Please copy them in a safe place as your python code will need to use them to access your specific bot. If you do lose your keys, or someone gets access to them for some reason, you can generate new keys from your developer.twitter.com console.
There are two keys which you will need to use:
API Key (think of this like a username)
API Key Secret (think of this like a password)
Bearer Token (used for read queries such as getting latest tweets)
There is also a third key, a Bearer Token, but this you can ignore. It is for certain types of requests
At the bottom of the screen you’ll see a “Skip to Dashboard”, when you click on that you’ll then see the overview of your API metrics.
Within this screen you can see the limits of the number of calls per month for example and how much you have already consumed.
Next, click on the project and we have to generate the access tokens. Currently with the previous keys you can only read tweets, you cannot create ones as yet.
After clicking on the project, chose the “keys and tokens” tab and at the bottom you can generate the “Access Tokens”. In this screen you can also re-generate the API Keys and Bearer Token you just created before in case your keys were compromised or you forgot them.
Just like before, generate the keys and copy them.
By now, you have 5 security toknes:
API Key – also known as the Consumer Key (think of this like a username)
API Key Secret – also known as the Consumer Secret (think of this like a password)
Bearer Token (used for read queries such as getting latest tweets)
Access Token (‘username’ to allow you to create tweets)
Access Token Secret (‘password’ to allow you to create tweets)
Step 2: Test your twitter API query
Now that you have the API keys, you can do some tests. If you are using a linux based machine you can use the curl command to do a query. Otherwise, you can use a site such as https://reqbin.com/curl to do an online curl request.
Here’s a simple example to get the most recent tweets. It uses the API https://api.twitter.com/2/tweets/search/recent which must include the query keyword which includes a range of parameter options (find out the list in the twitter query documentation).
curl --request GET 'https://api.twitter.com/2/tweets/search/recent?query=from:pythonhowtocode' --header 'Authorization: Bearer <your bearer token from step 1>'
The output is as follows:
{
    "data": [{
        "id": "1523251860110405633",
        "text": "See our latest article on THE complete beginner guide on creating a #discord #bot in #python \n\nEasily add this to your #100DaysOfCode  #100daysofcodechallenge #100daysofpython \n\nhttps://t.co/4WKvDVh1g9"
    }],
    "meta": {
        "newest_id": "1523251860110405633",
        "oldest_id": "1523251860110405633",
        "result_count": 1
    }
}
Here’s a much more complex example. This includes the following parameters:
%23 – which is the escape characters for # and searches for hashtags. Below example is hashtag #python (case insensitive)
%20 – this is an escape character for a space and separates different filters with an AND operation
-is:retweet – this excludes retweets. The ‘-‘ sign preceding the is negates the actual filter
-is:reply – this excludes replies. The ‘-‘ sign preceding the is negates the actual filter
max_results=20 – an integer that defines the maximum number of return results and in this case 20 results
expansions=author_id – this makes sure to include the username internal twitter id and also the actual username under an includes section at the bottom of the returned JSON
tweet.fields=public_metrics,created_at – returns the interaction metrics such as number of likes, number of retweets, etc as well as the time (in GMT timezone) when the tweet was created
user.fields=created_at,location – this returns when the user account was created and the user self-reported location in their profile.
curl --request GET 'https://api.twitter.com/2/tweets/search/recent?query=%23python%20-is:retweet%20-is:reply&max_results=20&expansions=author_id&tweet.fields=public_metrics,created_at&user.fields=created_at,location' --header 'Authorization: Bearer <Your Bearer Token from Step 1>'
Result of this looks like the following – notice that the username details is in the includes section below where you can link the tweet with the username with the author_id field.
Building on top of the tests conducted on Step 2, it is a simple extra step in order to convert this to python code using the requests module which we’ll show first and after show a simpler way with the library tweepy. You can simply use the library to convert the curl command into a bit of python code. Here’s a structured version of this code where the logic is encapsulated in a class.
import requests, json
from  urllib.parse import quote
from pprint import pprint

class TwitterBot():
    URL_SEARCH_RECENT = 'https://api.twitter.com/2/tweets/search/recent'
    def __init__(self, bearer_key):
        self.bearer_key = bearer_key

    def search_recent(self, query, include_retweets=False, include_replies=False):
        url = self.URL_SEARCH_RECENT + "?query=" + quote(query)
        if not include_retweets: url += quote(' ')+'-is:retweet'
        if not include_replies: url += quote(' ')+'-is:reply'

        url += '&max_results=20&expansions=author_id&tweet.fields=public_metrics,created_at&user.fields=created_at,location'

        headers = {'Authorization': 'Bearer ' + self.bearer_key }

        r = requests.get(url, headers = headers)
        r.encoding = r.apparent_encoding.  #Ensure to use UTF-8 if unicode characters
        return json.loads(r.text)

#create an instance and pass in your Bearer Token
t = TwitterBot('<Insert your Bearer Token from Step 1>')
pprint( t.search_recent( '#python') )
The above code is fairly straightforward and does the following:
TwitterBot class – this class encapsulates the logic to send the API requests
TwitterBot.search_recent – this method takes in the query string, then escapes any special characters, then calls the requests.get() to call the https://api.twitter.com/2/tweets/search/recent API call
pprint() – this simply prints the output in a more readable format
This is the output:
However, there is a simpler way which is to use tweepy.
pip install tweepy
Next you can use the tweepy module to search recent tweets:
import tweepy

client = tweepy.Client(bearer_token='<insert your token here from previous step>')

query = '#python -is:retweet -is:reply' #exclude retweets and replies with '-'
tweets = client.search_recent_tweets(   query=query,
                                        tweet_fields=['public_metrics', 'context_annotations', 'created_at'],
                                        user_fields=['username','created_at','location'],
                                        expansions=['entities.mentions.username','author_id'],
                                        max_results=10)
#The details of the users is in the 'includes' list
user_data = {}
for raw_user in tweets.includes['users']:
    user_data[ raw_user.id ] = raw_user

for index, tweet in enumerate(tweets.data):
    print(f"[{index}]::@{user_data[tweet.author_id]['username']}::{tweet.created_at}::{tweet.text.strip()}\n")
    print("------------------------------------------------------------------------------")
Output as follows:
Please note, that after calling the API a few times your number of tweets consumed will have increased and may have hit the limit. You can always visit the dashboard at https://developer.twitter.com/en/portal/dashboard to see how many requests have been consumed. Notice, that this does not count the number of actual API calls but the actual number of tweets. So it can get consumed pretty quickly.
Step 4: Sending out a tweet
So far we’ve only been reading tweets. In order to send a tweet you can use the create_tweet() function of tweepy.
client = tweepy.Client( consumer_key= "<API key from above - see step 1>",
                        consumer_secret= "<API Key secret - see step 1>",
                        access_token= "<Access Token - see step 1>",
                        access_token_secret= "<Access Token Secret - see step 1>")


# Replace the text with whatever you want to Tweet about
response = client.create_tweet(text='A little girl walks into a pet shop and asks for a bunny. The worker says” the fluffy white one or the fluffy brown one”? The girl then says, I don’t think my python really cares.')

print(response)
Output from Console:
Output from Twitter:
How to Send Automated Tweets About the Latest News
To make this a bit more of a useful bot rather than simply tweet out static text, we’ll make it tweet about the latest things happened in the news about python.
In order to search for news information, you can use the python library pygooglenews
pip install pygooglenews
The library searches Google news RSS feed and was developed by Artem Bugara. You can see the full article of he developed the Google News library. You can put in a keyword and also time horizon to make it work. Here’s an example to find the latest python articles in last 24 hours.
from pygooglenews import GoogleNews
gn = GoogleNews()
search = gn.search('python programming', when = '12h')

for article in search['entries']:
    print(article.title)
    print(article.published)
    print(article.source.title)
    print('-'*80)  #string multiplier - show '-' 80 times
Here’s the output:
So, the idea would be to show a random article on the twitter bot which is related to python programming. The gn.search() functions returns a list of all the articles under the entries dictionary item which has a list of those articles. We will simply pick a random one and construct the tweet with the article title and the link to the article.
import tweepy
from pygooglenews import GoogleNews
from random import randint

client = tweepy.Client( consumer_key= "<your consumer/API key - see step 1>",
                        consumer_secret= "<your consumer/API secret - see step 1>",
                        access_token= "<your access token key - see step 1>",
                        access_token_secret= "<your access token secret - see step 1>")

gn = GoogleNews()
search = gn.search('python programming', when = '24h')

#Find random article in last 24 hours using randint between index 0 and the last index
article = search['entries'][ randint( 0, len( search['entries'])-1 ) ]

#construct the tweet text
tweet_text =  f"In python news: {article.title}.  See full article: {article.link}.  #python #pythonprogramming"

#Fire off the tweet!
response = client.create_tweet( tweet_text )
print(response)
Output from the console on the return result:
And, most importantly, here’s the tweet from our @pythonhowtocode! Twitter automatically pulled the article image
This has currently been scheduled as a daily background job!
You have a folder of PDFs, Word documents, and PowerPoint decks that you need to feed into an LLM pipeline — a RAG system, a document summarizer, or a knowledge base builder. The problem is that LLMs work best with plain text, and most documents are packed with binary formatting, embedded fonts, and layout metadata that the model cannot interpret. Sending a raw PDF to an LLM is like handing someone a ZIP file and asking them to read it.
Microsoft’s markitdown library solves this by converting dozens of file formats — PDF, DOCX, PPTX, XLSX, HTML, CSV, EPUB, images, and audio — into clean Markdown that any LLM can process. It is a single pip install, works from Python code or the command line, and handles the conversion pipeline so your code does not have to. The Markdown output preserves headings, tables, and code blocks in a structured format that models handle especially well.
This article covers everything you need to get documents into your AI pipelines with MarkItDown. You will learn how to install it, convert individual files and entire directories, work with the Python API, handle different file types, and build a real document-processing pipeline that prepares files for a RAG system. By the end you will have a working utility that accepts any folder of mixed-format documents and outputs a structured Markdown dataset ready for embedding.
MarkItDown: Quick Example
Before diving into the details, here is the fastest path from a file to Markdown text you can feed into an LLM. This example converts an HTML page to Markdown in four lines of Python.
# quick_markitdown.py
from markitdown import MarkItDown

md = MarkItDown()
result = md.convert("https://example.com")
print(result.text_content[:500])
Output:
Example Domain
==============

This domain is for use in illustrative examples in documents. You may use this
domain in literature without prior coordination or asking for permission.

[More information...](https://www.iana.org/domains/reserved)
The MarkItDown() constructor creates a converter instance, and convert() accepts a file path, a URL, or a file-like object. The result is a DocumentConverterResult object — result.text_content holds the clean Markdown string ready to pass into any LLM or text processing pipeline.
The real power emerges when you need to handle PDFs, Office files, and mixed directories at scale. The sections below cover all of that, starting with installation.
What Is MarkItDown and Why Use It?
MarkItDown is an open-source Python library from Microsoft that acts as a universal document-to-Markdown converter. Think of it as a universal adapter — on one end you plug in a document in almost any format, and on the other end you get clean, structured Markdown text. The library was built specifically with LLM use cases in mind: the Markdown output is structured in a way that helps models understand document hierarchy (headings, tables, code blocks) rather than receiving a flat blob of text.
The key difference from alternatives like pypdf2 or python-docx is breadth and consistency. Those libraries require a different API for each format, handle only one format each, and return raw extracted text with no structure. MarkItDown gives you one API that handles all formats and preserves semantic structure as Markdown.
Format
MarkItDown
pypdf2 / python-docx / openpyxl
PDF
Yes
pypdf2 only
DOCX
Yes
python-docx only
PPTX
Yes
python-pptx only
XLSX
Yes
openpyxl only
HTML / URL
Yes
No
EPUB
Yes
No
CSV / JSON
Yes
No
Images (OCR)
Yes (optional)
No
Audio (transcription)
Yes (optional)
No
Unified output format
Markdown
Raw text / format-specific objects
The optional image OCR and audio transcription require extra dependencies (and an LLM API key for the best results), but the core document converters — PDF, Office, HTML — work completely offline with no API key required. That makes MarkItDown an excellent fit for any pipeline where you control the infrastructure.
Installing MarkItDown
MarkItDown is on PyPI. A basic install that handles PDFs, Office documents, and HTML covers most use cases and has minimal dependencies.
# Install the base package
pip install markitdown

# For PDF support (pdfminer.six is included in most installs)
pip install markitdown[pdf]

# For all optional extras (OCR, audio, Azure Document Intelligence)
pip install markitdown[all]
The [pdf] extra pulls in pdfminer.six for text-based PDF extraction. If you need image OCR within PDFs, you will also need an LLM plugin (covered in the advanced section). For most document-to-Markdown pipelines the base install is all you need — it handles DOCX, PPTX, XLSX, HTML, CSV, JSON, and EPUB without any extras.
One API to rule them all. Finally.
Converting Files, URLs, and Streams
The MarkItDown class is the main entry point. It auto-detects the file format based on extension or MIME type, so you call the same method regardless of what you are converting.
Converting a Local File
Pass any local file path as a string. MarkItDown detects the format automatically and returns a DocumentConverterResult.
# convert_file.py
from markitdown import MarkItDown

md = MarkItDown()

# Convert a DOCX file
result = md.convert("report.docx")
print(f"Title: {result.title}")
print(f"Characters: {len(result.text_content)}")
print()
print(result.text_content[:300])
Output:
Title: Q3 Sales Report
Characters: 4821

# Q3 Sales Report

**Prepared by:** Finance Team
**Date:** September 30, 2025

## Executive Summary

Revenue grew 12% year-over-year driven by the enterprise segment...
The result.title property extracts the document title from metadata where available (DOCX, PDF). The text_content property always holds the full Markdown string. Notice that the headings from the Word document are preserved as Markdown heading levels — this is exactly the structural information that LLMs use to understand document hierarchy.
Converting a URL
Pass a URL string and MarkItDown fetches the page and converts the HTML to Markdown. This works especially well for documentation pages, Wikipedia articles, and any page with semantic HTML structure.
# convert_url.py
from markitdown import MarkItDown

md = MarkItDown()
result = md.convert("https://docs.python.org/3/library/json.html")

print(result.text_content[:600])
Output:
json --- JSON encoder and decoder
=================================

**Source code:** [Lib/json/__init__.py](https://github.com/python/cpython/tree/3.13/Lib/json/__init__.py)

JSON (JavaScript Object Notation), specified by [RFC 7159](https://datatracker.ietf.org/doc/html/rfc7159.html)...

## json.dumps(obj, *, skipkeys=False, ...)

Serialize obj to a JSON formatted str...
Navigation menus, footers, and sidebars are typically stripped out, leaving the actual content. This makes URL conversion a fast way to pull documentation into a RAG corpus without building a custom scraper for every site.
Converting from a File-Like Object
When you receive a file as bytes (from an API response, an email attachment, or a web upload), you can convert it directly from a BytesIO object without writing it to disk first.
# convert_stream.py
import io
from markitdown import MarkItDown
import requests

md = MarkItDown()

# Download a PDF into memory and convert without saving to disk
response = requests.get("https://www.w3.org/WAI/WCAG21/wcag21.pdf")
pdf_stream = io.BytesIO(response.content)

# Must pass extension hint when using streams -- no filename to detect from
result = md.convert(pdf_stream, file_extension=".pdf")
print(f"Converted {len(result.text_content)} characters from in-memory PDF")
print(result.text_content[:400])
Output:
Converted 87432 characters from in-memory PDF

Web Content Accessibility Guidelines (WCAG) 2.1
================================================

W3C Recommendation 05 June 2018

Abstract
--------

Web Content Accessibility Guidelines (WCAG) 2.1 covers a wide range of...
The file_extension parameter is required when passing a stream because there is no filename to inspect. Always include it for streams to ensure the correct converter is selected.
BytesIO: no temp files, no disk I/O, no drama.
Format-Specific Conversion Options
Most formats work out of the box, but a few have options worth knowing about. PowerPoint files get per-slide conversion, Excel files convert to Markdown tables, and PDFs expose page-level control.
Excel and CSV to Markdown Tables
Excel sheets are converted to Markdown tables — one table per worksheet. This is particularly useful when feeding structured data to LLMs that need to reason about tabular information.
# convert_excel.py
from markitdown import MarkItDown

md = MarkItDown()
result = md.convert("sales_data.xlsx")
print(result.text_content)
Output (example with a two-sheet workbook):
## Sheet1

| Month | Revenue | Units |
|-------|---------|-------|
| Jan   | 84000   | 420   |
| Feb   | 91200   | 456   |
| Mar   | 78500   | 392   |

## Sheet2

| Region | Manager | Target |
|--------|---------|--------|
| East   | Alice   | 100000 |
| West   | Bob     | 95000  |
Each worksheet becomes an H2 section followed by a Markdown table. LLMs handle this format well for question-answering tasks — the model can identify column headers, filter by region, and compute simple aggregations when the data is in this structured Markdown table format rather than raw CSV text.
PowerPoint Slide Extraction
PPTX files are converted slide by slide. Each slide becomes a section with its title as a heading and the body text extracted below it. Speaker notes are included when present.
# convert_pptx.py
from markitdown import MarkItDown

md = MarkItDown()
result = md.convert("product_roadmap.pptx")

# Show first 500 chars to see the structure
print(result.text_content[:500])
Output:
## Slide 1: Product Roadmap 2026

Vision: Ship the AI-native workflow layer by Q3.

- Q1: Core infrastructure and auth
- Q2: Integration layer + partner APIs
- Q3: Public launch
- Q4: Enterprise tier

**Notes:** Emphasize the partnership angle -- this is key differentiator vs competitors.

## Slide 2: Q1 Milestones

- Authentication service -- 95% complete
- Database migration -- in progress
...
Speaker notes appear as bold “Notes:” blocks after each slide’s content. For meeting-notes pipelines or sales-deck summarizers this is especially useful — you get the full context that the presenter intended to convey, not just the bullet points on the slide.
Speaker notes included. Your LLM finally hears what the presenter was thinking.
Batch Converting a Directory
Real pipelines rarely deal with a single file. Here is a pattern to convert every supported file in a directory, log any failures, and save all results to a single Markdown file for easy embedding.
# batch_convert.py
import os
from pathlib import Path
from markitdown import MarkItDown

SUPPORTED = {".pdf", ".docx", ".pptx", ".xlsx", ".html", ".csv", ".json", ".epub"}

def batch_convert(input_dir: str, output_path: str) -> dict:
    """Convert all supported files in input_dir to a single Markdown file."""
    md = MarkItDown()
    results = {"success": [], "failed": []}
    output_parts = []

    for fpath in sorted(Path(input_dir).rglob("*")):
        if fpath.suffix.lower() not in SUPPORTED:
            continue

        print(f"Converting: {fpath.name}")
        try:
            result = md.convert(str(fpath))
            # Separate each document with a clear section header
            section = f"\n\n---\n## Document: {fpath.name}\n\n{result.text_content}"
            output_parts.append(section)
            results["success"].append(str(fpath))
        except Exception as exc:
            print(f"  FAILED: {exc}")
            results["failed"].append({"file": str(fpath), "error": str(exc)})

    with open(output_path, "w", encoding="utf-8") as f:
        f.write("# Document Corpus\n")
        f.write(f"Converted {len(results['success'])} documents.\n")
        f.write("".join(output_parts))

    return results


if __name__ == "__main__":
    stats = batch_convert("./docs", "corpus.md")
    print(f"\nDone: {len(stats['success'])} converted, {len(stats['failed'])} failed")
Output:
Converting: annual_report.pdf
Converting: onboarding.docx
Converting: roadmap.pptx
Converting: q3_data.xlsx
  FAILED: File appears to be encrypted

Done: 3 converted, 1 failed
The try/except around each conversion is essential — encrypted PDFs, corrupted files, or unsupported subtypes will raise exceptions rather than silently producing empty output. The pattern above logs the failure and continues with the rest of the batch, which is the right behavior for any automated pipeline. The output corpus.md contains all documents separated by clear section dividers that chunk-based RAG systems can split on.
Using MarkItDown with LLM Pipelines
The most common use case is feeding converted documents into an LLM. Here is how to wire MarkItDown into an OpenAI-compatible pipeline for a simple document Q&A pattern.
# doc_qa.py
from markitdown import MarkItDown
from openai import OpenAI

def answer_from_document(file_path: str, question: str, api_key: str) -> str:
    """Convert a document to Markdown and answer a question about it."""
    md = MarkItDown()
    result = md.convert(file_path)
    doc_text = result.text_content

    # Truncate if the document exceeds a safe context window size
    max_chars = 80000  # ~20K tokens for most models
    if len(doc_text) > max_chars:
        doc_text = doc_text[:max_chars] + "\n\n[Document truncated...]"

    client = OpenAI(api_key=api_key)
    response = client.chat.completions.create(
        model="gpt-4o-mini",
        messages=[
            {
                "role": "system",
                "content": "You are a document analyst. Answer questions based only on the provided document.",
            },
            {
                "role": "user",
                "content": f"Document:\n\n{doc_text}\n\nQuestion: {question}",
            },
        ],
    )
    return response.choices[0].message.content


# Example usage
answer = answer_from_document(
    "contract.pdf",
    "What is the termination clause?",
    api_key="your-openai-api-key"
)
print(answer)
Output:
Section 12.3 of the contract states that either party may terminate this agreement
with 30 days written notice. Termination for cause requires only 5 business days
notice and must be accompanied by written documentation of the breach.
This pattern works with any OpenAI-compatible API — swap the base URL and API key for Anthropic, Gemini, or a local Ollama endpoint and the pattern is identical. The key insight is that MarkItDown’s Markdown output is substantially better context than raw extracted text because the model can use heading levels and table structure to locate specific sections of long documents.
Raw PDF to LLM: garbled. Markdown to LLM: actually works.
Real-Life Example: Building a Document Corpus Preparer for RAG
This project ties together everything from this article. It accepts a folder of mixed-format documents, converts all of them to Markdown, chunks the output into LLM-ready segments, and saves a JSON file that a vector database like Chroma or Pinecone can ingest directly.
# rag_preparer.py
import json
import os
from pathlib import Path
from markitdown import MarkItDown

SUPPORTED = {".pdf", ".docx", ".pptx", ".xlsx", ".html", ".csv", ".epub"}
CHUNK_SIZE = 1500   # characters per chunk (~375 tokens)
CHUNK_OVERLAP = 150 # overlap so context is not lost at boundaries


def chunk_text(text: str, size: int = CHUNK_SIZE, overlap: int = CHUNK_OVERLAP) -> list:
    """Split text into overlapping chunks."""
    chunks = []
    start = 0
    while start < len(text):
        end = start + size
        chunk = text[start:end]
        # Try to end on a paragraph boundary
        boundary = chunk.rfind("\n\n")
        if boundary > size // 2:
            chunk = chunk[:boundary]
        chunks.append(chunk.strip())
        start += len(chunk) - overlap
    return [c for c in chunks if len(c) > 50]  # drop tiny trailing chunks


def prepare_rag_corpus(docs_dir: str, output_path: str) -> None:
    md = MarkItDown()
    corpus = []
    chunk_id = 0

    for fpath in sorted(Path(docs_dir).rglob("*")):
        if fpath.suffix.lower() not in SUPPORTED:
            continue

        print(f"Processing: {fpath.name}")
        try:
            result = md.convert(str(fpath))
            chunks = chunk_text(result.text_content)
            for i, chunk in enumerate(chunks):
                corpus.append({
                    "id": f"chunk_{chunk_id:05d}",
                    "source_file": fpath.name,
                    "source_title": result.title or fpath.stem,
                    "chunk_index": i,
                    "total_chunks": len(chunks),
                    "text": chunk,
                })
                chunk_id += 1
            print(f"  -> {len(chunks)} chunks")
        except Exception as exc:
            print(f"  FAILED: {exc}")

    with open(output_path, "w", encoding="utf-8") as f:
        json.dump(corpus, f, indent=2, ensure_ascii=False)

    print(f"\nCorpus saved: {len(corpus)} chunks from {chunk_id} total across all docs")
    print(f"Output: {output_path}")


if __name__ == "__main__":
    prepare_rag_corpus("./knowledge_base", "rag_corpus.json")
Output:
Processing: company_handbook.pdf
  -> 47 chunks
Processing: product_specs.docx
  -> 18 chunks
Processing: roadmap_2026.pptx
  -> 9 chunks
Processing: pricing.xlsx
  -> 3 chunks

Corpus saved: 77 chunks from 77 total across all docs
Output: rag_corpus.json
The output rag_corpus.json is ready to embed. Each chunk carries its source file and title as metadata, so your vector database can filter by document when answering queries that should be scoped to a specific source. The overlapping chunks prevent context loss at boundaries — a sentence that straddles a chunk boundary will appear in both adjacent chunks, so the model always sees complete context around any retrieved passage. To extend this project, add an embedding step using sentence-transformers or the OpenAI Embeddings API and pipe the corpus directly into your vector store of choice.
Frequently Asked Questions
Can MarkItDown convert password-protected PDFs?
No — password-protected PDFs raise an exception during conversion because the underlying pdfminer.six library cannot read encrypted content without the password. You will see a PDFPasswordIncorrect or PDFEncryptionError. The fix is to pre-decrypt the PDF before conversion using a library like pikepdf: open with the password and save a decrypted copy, then convert the decrypted file. Always wrap conversion in try/except in batch pipelines so a single locked file does not abort the entire run.
Does MarkItDown extract images from PDFs?
With the base install, MarkItDown extracts text from PDFs but skips embedded images. If your PDFs are scanned documents (images of text, not actual text layers), the base converter will return little or no content. For scanned PDFs you need to add an LLM plugin — MarkItDown supports Azure Document Intelligence and OpenAI Vision as optional backends that can OCR images within documents. Pass an llm_client and llm_model to the MarkItDown constructor to enable this. The optional dependency install is pip install markitdown[all].
How should I handle very large documents?
For documents that produce more than 100,000 characters of Markdown, pass the whole text to an LLM in a single call only if your model supports a large context window (128K+). Otherwise, use the chunking pattern from the real-life example above — split the Markdown at paragraph boundaries with a 10% overlap and embed the chunks rather than the whole document. MarkItDown itself handles arbitrarily large files without issue; the bottleneck is always the downstream LLM context window, not the conversion step.
How well does MarkItDown handle complex tables?
Simple flat tables — with consistent column counts and no merged cells — convert reliably to Markdown tables. Complex tables with merged headers, multi-row cells, or heavily styled cells may produce irregular Markdown. Excel files generally convert better than Word or PDF tables because the underlying data is already structured. If you find table output unreliable for a specific document type, consider using openpyxl or python-docx for that format and MarkItDown for everything else in the same pipeline.
Can I stream the conversion output?
MarkItDown does not support streaming output — the convert() call blocks until the full document is converted and returns the complete result. For large documents this can take several seconds, especially for multi-hundred-page PDFs. If you need non-blocking behavior in an async pipeline, wrap the conversion in asyncio.run_in_executor() to run it in a thread pool and await the result without blocking your event loop.
Can I add a custom converter for a format MarkItDown does not support?
Yes — MarkItDown has a plugin system. You can register a custom DocumentConverter subclass for any file extension. Implement the convert() method that accepts a file path and returns a DocumentConverterResult, then register it via md.register_converter(MyConverter()). This is useful for proprietary formats specific to your industry — medical records in HL7, CAD files, or internal XML schemas — where you have the parsing logic but need to plug it into the same batch pipeline that handles standard formats.
Conclusion
MarkItDown removes the most painful part of building LLM document pipelines: writing and maintaining a different parser for every file format. A single MarkItDown().convert() call handles PDFs, DOCX, PPTX, XLSX, HTML, CSV, EPUB, and more, returning clean Markdown that LLMs can reason over rather than raw binary or poorly-structured text. The real-life example above gives you a complete RAG corpus preparer that you can extend — add an embedding step, plug in a vector store, or swap in a different chunking strategy depending on your document types.
The next step is to test it on your actual document set. Run the batch converter, inspect the output Markdown for any formatting issues specific to your files, and tune the chunk size to match your embedding model’s token limit. For OCR-heavy or audio transcription pipelines, explore the optional llm_client parameter to unlock MarkItDown’s full feature set.
The Twitter API enforces strict rate limits. Instead of crashing when you hit one, implement exponential backoff to retry gracefully. Wrap your API calls in a retry function that doubles the wait time after each failed attempt, starting from 1 second up to a maximum of 64 seconds. This keeps your bot running reliably without getting your credentials revoked.
Store your API credentials in environment variables or a .env file, never in your source code. If you accidentally push hardcoded keys to a public GitHub repo, bots will find and abuse them within minutes. Use the python-dotenv library to load credentials from a .env file that you add to your .gitignore.
# secure_credentials.py
import os
from dotenv import load_dotenv

load_dotenv()

BEARER_TOKEN = os.getenv("TWITTER_BEARER_TOKEN")
API_KEY = os.getenv("TWITTER_API_KEY")
API_SECRET = os.getenv("TWITTER_API_SECRET")

if not BEARER_TOKEN:
    raise ValueError("TWITTER_BEARER_TOKEN not set in .env file")
3. Add Logging Instead of Print Statements
Replace print() calls with Python’s built-in logging module. Logging gives you timestamps, severity levels, and the ability to write to files — essential for debugging a bot that runs unattended. When your bot tweets something unexpected at 3 AM, logs are the only way to figure out what happened.
2026-03-26 10:15:30 [INFO] Bot started successfully
2026-03-26 10:15:31 [WARNING] Approaching rate limit: 14/15 requests used
2026-03-26 10:15:32 [ERROR] Failed to post tweet: 403 Forbidden
4. Track Posted Content to Avoid Duplicates
Bots that post the same content repeatedly get flagged and suspended. Keep a simple record of what you have already tweeted using a JSON file or SQLite database. Before posting, check if the content has been posted before. This is especially important for news bots that might encounter the same story from multiple sources.
5. Use a Scheduler for Consistent Posting
Instead of running your bot in a loop with time.sleep(), use a proper scheduler like schedule or APScheduler. Schedulers handle timing more reliably, support cron-like expressions, and make it easy to run different tasks at different intervals. For production bots, consider using system-level scheduling with cron (Linux) or Task Scheduler (Windows).
Frequently Asked Questions
Can I still build a Twitter bot with the API?
Yes, but access has changed. The free tier of the X (formerly Twitter) API v2 allows basic posting. For reading tweets or higher volume, you need a paid plan. Check current pricing at developer.x.com.
What Python library should I use for the Twitter/X API?
Use tweepy for the most mature Python wrapper with v2 API support. It handles OAuth 2.0 authentication, rate limiting, and provides clean methods for posting, searching, and streaming.
How do I authenticate with the Twitter API v2?
Use OAuth 2.0 Bearer Token for read-only access or OAuth 1.0a for posting. Generate credentials in the X Developer Portal, then pass them to tweepy.Client().
What are the rate limits for the Twitter API?
Rate limits vary by endpoint and plan. The free tier allows 1,500 tweets per month. Always implement rate limit handling with tweepy’s wait_on_rate_limit=True.
What can a Twitter bot do?
Bots can auto-post content, reply to mentions, retweet by keyword, track hashtags, analyze sentiment, and provide automated responses. Always follow the X API terms of service.
For most serious applications, you will often have to have persistent storage (storage that still exists after your applications stops running) of some sort. For new developers, it can be quite daunting to decide which option to go for. Is a simple flat file enough? When should you use something like a database? Which database should you use? There are so many options that are available it becomes quite daunting to decide which way to go for.
This is a starting guide to provide an overview of some of the many data storage options that are available for you and how you can go about deciding. One thing to keep in mind is that if you are developing an application which is either planned or has a possibility to scale over time, your underlying database might also grow overtime. It may be quick and easy to implement a file as storage, but as your data grows it might be better to use a relational database but it will take a little bit more effort. Let’s look at this a bit deeper
Written by Pubs
Python developer and educator with 15+ years building production systems across data engineering, web APIs, and AI tooling. Founder of Python How To Program — 270+ in-depth tutorials covering the modern Python stack.
There are many methods of persistent storage that you can use (persistent storage means that after your program is finished running your data is not lost). The typical ways you can do this is either by using a file which you save data to, or by using the python pickle mechanism. Firstly I will explain what some of the persistent storage options are:
File: This is where you store the data in a text based file in format such as CSV (comma separated values), JSON, and others
Python Pickle: A python pickle is a mechanism where you can save a data structure directly to a file, and then you can retrieve the data directly from the file next time you run your program. You can do this with a library called “pickle”
Config files: config files are similar to File and Python Pickle in that the data is stored in a file format but is intended to be directly edited by a user
Database SQLite: this is a database where you can run queries to search for data, but the data is stored in a file
Database Postgres (or other SQL based database): this is a database service where there’s another program that you run to manage the database, and you call functions (or SQL queries) on the database service to get the data back in an efficient manner. SQL based databases are great for structured data – e.g. table-like/excel-like data. You would search for data by category fields as an example
Key-value database (e.g redis is one of the most famous): A key-value database is exactly that, it contains a database where you search by a key, and then it returns a value. This value can be a single value or it can be a set of fields that are associated with that value. A common use of a key-value database is for hash-based data. Meaning that you have a specific key that you want to search for, and then you get all the related fields associated with that key – much like a dictionary in python, but the benefit being its in a persistent storage
Graph Database (e.g. Neo4J): A graph database stores data which is built to navigate relationships. This is something that is rather cumbersome to do in a relational database where you need to have many intermediary tables but becomes trivial with GraphQL language
Text Search (e.g. Elastic Search): A purpose built database for text search which is extremely fast when searching for strings or long text
Time series database (e.g. influx): For IoT data where each record is stored with a timestamp key and you need to do queries in time blocks, time series databases are ideal. You can do common operations such as to aggregate, search, slice data through specific query operations
NOSQL document database (e.g. mongodb, couchdb): this is a database that also runs as a separate service but is specifically for “unstructured data” (non-table like data) such as text, images where you search for records in a free form way such as by text strings.
There is no one persistent storage mechanism that fits all, it really depends on your purpose (or “use case”) to determine which database works best for you as there are pros and cons for each.
Optional. You can create a config file before hand
Yes – you can use any text based editor
Small
Slow
Slow
No – manual
Database SQLite
None – database created automatically
No – only in python
Small-Med
Slow-Med
Slow-Med
No – manual
Relational SQL Database
Separate installation of server
Through the SQL console or other SQL clients
Large
Fast
Fast
Yes, require extra setup
NoSQL Column Database
Separate installation of server
Yes, through external client
Very large
Very fast
Very fast
Yes, inbuilt
Key-Value database
Separate installation of server
Yes, through external client
Very large
Very fast
Fast-Very Fast
Yes, require extra setup
Graph Database
Separate installation of serverSeparate installation of server
Yes, through external client
Large
Med
Med
Yes, require extra setup
Time Series Database
Separate installation of server
Yes, through external client
Very large
Very fast
Fast
Yes, require extra setup
Text Search Database
Separate installation of server
Yes, through external client
Very large
Very fast
Fast
Yes, require extra setup
NoSQL Documet DB
Separate installation of server
Yes, through external client
Very large
Very fast
Fast
Yes, require extra setup
A big disclaimer here, for some of the responses, the more accurate answer is “it depends”. For example, for redundancy for relational databases, some have it inbuilt such as Oracle RAC enterprise databases and for others you can set up redundancy where you could have an infrastructure solution. However, to provide a simpler guidance, I’ve made this a bit more prescriptive. If you would like to dive deeper, then please don’t rely purely on the table above! Look into the documentation of the particular database product you are considering or reach out to me and I’m happy to provide some advice.
Summary
There are in fact plenty of SaaS-based options for database or persistent storage that are popping up which is exciting. These newer SaaS options (for example, firebase, restdb.io, anvil.works etc) are great in that they save you time on the heavy lifting, but then there may be times you still want to manage your own database. This may be because you want to keep your data yourself, or simply because you want to save costs as you already have an environment either on your own laptop, or you’re paying a fixed price for a virtual machine. Hence, managing your own persistent storage may be more cost effective rather than paying for another SaaS. However, certainly don’t discount the SaaS options altogether, as they will at least help you with things like backups, security updates etc for you.
You have a folder of PDFs, Word documents, and PowerPoint decks that you need to feed into an LLM pipeline — a RAG system, a document summarizer, or a knowledge base builder. The problem is that LLMs work best with plain text, and most documents are packed with binary formatting, embedded fonts, and layout metadata that the model cannot interpret. Sending a raw PDF to an LLM is like handing someone a ZIP file and asking them to read it.
Microsoft’s markitdown library solves this by converting dozens of file formats — PDF, DOCX, PPTX, XLSX, HTML, CSV, EPUB, images, and audio — into clean Markdown that any LLM can process. It is a single pip install, works from Python code or the command line, and handles the conversion pipeline so your code does not have to. The Markdown output preserves headings, tables, and code blocks in a structured format that models handle especially well.
This article covers everything you need to get documents into your AI pipelines with MarkItDown. You will learn how to install it, convert individual files and entire directories, work with the Python API, handle different file types, and build a real document-processing pipeline that prepares files for a RAG system. By the end you will have a working utility that accepts any folder of mixed-format documents and outputs a structured Markdown dataset ready for embedding.
MarkItDown: Quick Example
Before diving into the details, here is the fastest path from a file to Markdown text you can feed into an LLM. This example converts an HTML page to Markdown in four lines of Python.
# quick_markitdown.py
from markitdown import MarkItDown

md = MarkItDown()
result = md.convert("https://example.com")
print(result.text_content[:500])
Output:
Example Domain
==============

This domain is for use in illustrative examples in documents. You may use this
domain in literature without prior coordination or asking for permission.

[More information...](https://www.iana.org/domains/reserved)
The MarkItDown() constructor creates a converter instance, and convert() accepts a file path, a URL, or a file-like object. The result is a DocumentConverterResult object — result.text_content holds the clean Markdown string ready to pass into any LLM or text processing pipeline.
The real power emerges when you need to handle PDFs, Office files, and mixed directories at scale. The sections below cover all of that, starting with installation.
What Is MarkItDown and Why Use It?
MarkItDown is an open-source Python library from Microsoft that acts as a universal document-to-Markdown converter. Think of it as a universal adapter — on one end you plug in a document in almost any format, and on the other end you get clean, structured Markdown text. The library was built specifically with LLM use cases in mind: the Markdown output is structured in a way that helps models understand document hierarchy (headings, tables, code blocks) rather than receiving a flat blob of text.
The key difference from alternatives like pypdf2 or python-docx is breadth and consistency. Those libraries require a different API for each format, handle only one format each, and return raw extracted text with no structure. MarkItDown gives you one API that handles all formats and preserves semantic structure as Markdown.
Format
MarkItDown
pypdf2 / python-docx / openpyxl
PDF
Yes
pypdf2 only
DOCX
Yes
python-docx only
PPTX
Yes
python-pptx only
XLSX
Yes
openpyxl only
HTML / URL
Yes
No
EPUB
Yes
No
CSV / JSON
Yes
No
Images (OCR)
Yes (optional)
No
Audio (transcription)
Yes (optional)
No
Unified output format
Markdown
Raw text / format-specific objects
The optional image OCR and audio transcription require extra dependencies (and an LLM API key for the best results), but the core document converters — PDF, Office, HTML — work completely offline with no API key required. That makes MarkItDown an excellent fit for any pipeline where you control the infrastructure.
Installing MarkItDown
MarkItDown is on PyPI. A basic install that handles PDFs, Office documents, and HTML covers most use cases and has minimal dependencies.
# Install the base package
pip install markitdown

# For PDF support (pdfminer.six is included in most installs)
pip install markitdown[pdf]

# For all optional extras (OCR, audio, Azure Document Intelligence)
pip install markitdown[all]
The [pdf] extra pulls in pdfminer.six for text-based PDF extraction. If you need image OCR within PDFs, you will also need an LLM plugin (covered in the advanced section). For most document-to-Markdown pipelines the base install is all you need — it handles DOCX, PPTX, XLSX, HTML, CSV, JSON, and EPUB without any extras.
One API to rule them all. Finally.
Converting Files, URLs, and Streams
The MarkItDown class is the main entry point. It auto-detects the file format based on extension or MIME type, so you call the same method regardless of what you are converting.
Converting a Local File
Pass any local file path as a string. MarkItDown detects the format automatically and returns a DocumentConverterResult.
# convert_file.py
from markitdown import MarkItDown

md = MarkItDown()

# Convert a DOCX file
result = md.convert("report.docx")
print(f"Title: {result.title}")
print(f"Characters: {len(result.text_content)}")
print()
print(result.text_content[:300])
Output:
Title: Q3 Sales Report
Characters: 4821

# Q3 Sales Report

**Prepared by:** Finance Team
**Date:** September 30, 2025

## Executive Summary

Revenue grew 12% year-over-year driven by the enterprise segment...
The result.title property extracts the document title from metadata where available (DOCX, PDF). The text_content property always holds the full Markdown string. Notice that the headings from the Word document are preserved as Markdown heading levels — this is exactly the structural information that LLMs use to understand document hierarchy.
Converting a URL
Pass a URL string and MarkItDown fetches the page and converts the HTML to Markdown. This works especially well for documentation pages, Wikipedia articles, and any page with semantic HTML structure.
# convert_url.py
from markitdown import MarkItDown

md = MarkItDown()
result = md.convert("https://docs.python.org/3/library/json.html")

print(result.text_content[:600])
Output:
json --- JSON encoder and decoder
=================================

**Source code:** [Lib/json/__init__.py](https://github.com/python/cpython/tree/3.13/Lib/json/__init__.py)

JSON (JavaScript Object Notation), specified by [RFC 7159](https://datatracker.ietf.org/doc/html/rfc7159.html)...

## json.dumps(obj, *, skipkeys=False, ...)

Serialize obj to a JSON formatted str...
Navigation menus, footers, and sidebars are typically stripped out, leaving the actual content. This makes URL conversion a fast way to pull documentation into a RAG corpus without building a custom scraper for every site.
Converting from a File-Like Object
When you receive a file as bytes (from an API response, an email attachment, or a web upload), you can convert it directly from a BytesIO object without writing it to disk first.
# convert_stream.py
import io
from markitdown import MarkItDown
import requests

md = MarkItDown()

# Download a PDF into memory and convert without saving to disk
response = requests.get("https://www.w3.org/WAI/WCAG21/wcag21.pdf")
pdf_stream = io.BytesIO(response.content)

# Must pass extension hint when using streams -- no filename to detect from
result = md.convert(pdf_stream, file_extension=".pdf")
print(f"Converted {len(result.text_content)} characters from in-memory PDF")
print(result.text_content[:400])
Output:
Converted 87432 characters from in-memory PDF

Web Content Accessibility Guidelines (WCAG) 2.1
================================================

W3C Recommendation 05 June 2018

Abstract
--------

Web Content Accessibility Guidelines (WCAG) 2.1 covers a wide range of...
The file_extension parameter is required when passing a stream because there is no filename to inspect. Always include it for streams to ensure the correct converter is selected.
BytesIO: no temp files, no disk I/O, no drama.
Format-Specific Conversion Options
Most formats work out of the box, but a few have options worth knowing about. PowerPoint files get per-slide conversion, Excel files convert to Markdown tables, and PDFs expose page-level control.
Excel and CSV to Markdown Tables
Excel sheets are converted to Markdown tables — one table per worksheet. This is particularly useful when feeding structured data to LLMs that need to reason about tabular information.
# convert_excel.py
from markitdown import MarkItDown

md = MarkItDown()
result = md.convert("sales_data.xlsx")
print(result.text_content)
Output (example with a two-sheet workbook):
## Sheet1

| Month | Revenue | Units |
|-------|---------|-------|
| Jan   | 84000   | 420   |
| Feb   | 91200   | 456   |
| Mar   | 78500   | 392   |

## Sheet2

| Region | Manager | Target |
|--------|---------|--------|
| East   | Alice   | 100000 |
| West   | Bob     | 95000  |
Each worksheet becomes an H2 section followed by a Markdown table. LLMs handle this format well for question-answering tasks — the model can identify column headers, filter by region, and compute simple aggregations when the data is in this structured Markdown table format rather than raw CSV text.
PowerPoint Slide Extraction
PPTX files are converted slide by slide. Each slide becomes a section with its title as a heading and the body text extracted below it. Speaker notes are included when present.
# convert_pptx.py
from markitdown import MarkItDown

md = MarkItDown()
result = md.convert("product_roadmap.pptx")

# Show first 500 chars to see the structure
print(result.text_content[:500])
Output:
## Slide 1: Product Roadmap 2026

Vision: Ship the AI-native workflow layer by Q3.

- Q1: Core infrastructure and auth
- Q2: Integration layer + partner APIs
- Q3: Public launch
- Q4: Enterprise tier

**Notes:** Emphasize the partnership angle -- this is key differentiator vs competitors.

## Slide 2: Q1 Milestones

- Authentication service -- 95% complete
- Database migration -- in progress
...
Speaker notes appear as bold “Notes:” blocks after each slide’s content. For meeting-notes pipelines or sales-deck summarizers this is especially useful — you get the full context that the presenter intended to convey, not just the bullet points on the slide.
Speaker notes included. Your LLM finally hears what the presenter was thinking.
Batch Converting a Directory
Real pipelines rarely deal with a single file. Here is a pattern to convert every supported file in a directory, log any failures, and save all results to a single Markdown file for easy embedding.
# batch_convert.py
import os
from pathlib import Path
from markitdown import MarkItDown

SUPPORTED = {".pdf", ".docx", ".pptx", ".xlsx", ".html", ".csv", ".json", ".epub"}

def batch_convert(input_dir: str, output_path: str) -> dict:
    """Convert all supported files in input_dir to a single Markdown file."""
    md = MarkItDown()
    results = {"success": [], "failed": []}
    output_parts = []

    for fpath in sorted(Path(input_dir).rglob("*")):
        if fpath.suffix.lower() not in SUPPORTED:
            continue

        print(f"Converting: {fpath.name}")
        try:
            result = md.convert(str(fpath))
            # Separate each document with a clear section header
            section = f"\n\n---\n## Document: {fpath.name}\n\n{result.text_content}"
            output_parts.append(section)
            results["success"].append(str(fpath))
        except Exception as exc:
            print(f"  FAILED: {exc}")
            results["failed"].append({"file": str(fpath), "error": str(exc)})

    with open(output_path, "w", encoding="utf-8") as f:
        f.write("# Document Corpus\n")
        f.write(f"Converted {len(results['success'])} documents.\n")
        f.write("".join(output_parts))

    return results


if __name__ == "__main__":
    stats = batch_convert("./docs", "corpus.md")
    print(f"\nDone: {len(stats['success'])} converted, {len(stats['failed'])} failed")
Output:
Converting: annual_report.pdf
Converting: onboarding.docx
Converting: roadmap.pptx
Converting: q3_data.xlsx
  FAILED: File appears to be encrypted

Done: 3 converted, 1 failed
The try/except around each conversion is essential — encrypted PDFs, corrupted files, or unsupported subtypes will raise exceptions rather than silently producing empty output. The pattern above logs the failure and continues with the rest of the batch, which is the right behavior for any automated pipeline. The output corpus.md contains all documents separated by clear section dividers that chunk-based RAG systems can split on.
Using MarkItDown with LLM Pipelines
The most common use case is feeding converted documents into an LLM. Here is how to wire MarkItDown into an OpenAI-compatible pipeline for a simple document Q&A pattern.
# doc_qa.py
from markitdown import MarkItDown
from openai import OpenAI

def answer_from_document(file_path: str, question: str, api_key: str) -> str:
    """Convert a document to Markdown and answer a question about it."""
    md = MarkItDown()
    result = md.convert(file_path)
    doc_text = result.text_content

    # Truncate if the document exceeds a safe context window size
    max_chars = 80000  # ~20K tokens for most models
    if len(doc_text) > max_chars:
        doc_text = doc_text[:max_chars] + "\n\n[Document truncated...]"

    client = OpenAI(api_key=api_key)
    response = client.chat.completions.create(
        model="gpt-4o-mini",
        messages=[
            {
                "role": "system",
                "content": "You are a document analyst. Answer questions based only on the provided document.",
            },
            {
                "role": "user",
                "content": f"Document:\n\n{doc_text}\n\nQuestion: {question}",
            },
        ],
    )
    return response.choices[0].message.content


# Example usage
answer = answer_from_document(
    "contract.pdf",
    "What is the termination clause?",
    api_key="your-openai-api-key"
)
print(answer)
Output:
Section 12.3 of the contract states that either party may terminate this agreement
with 30 days written notice. Termination for cause requires only 5 business days
notice and must be accompanied by written documentation of the breach.
This pattern works with any OpenAI-compatible API — swap the base URL and API key for Anthropic, Gemini, or a local Ollama endpoint and the pattern is identical. The key insight is that MarkItDown’s Markdown output is substantially better context than raw extracted text because the model can use heading levels and table structure to locate specific sections of long documents.
Raw PDF to LLM: garbled. Markdown to LLM: actually works.
Real-Life Example: Building a Document Corpus Preparer for RAG
This project ties together everything from this article. It accepts a folder of mixed-format documents, converts all of them to Markdown, chunks the output into LLM-ready segments, and saves a JSON file that a vector database like Chroma or Pinecone can ingest directly.
# rag_preparer.py
import json
import os
from pathlib import Path
from markitdown import MarkItDown

SUPPORTED = {".pdf", ".docx", ".pptx", ".xlsx", ".html", ".csv", ".epub"}
CHUNK_SIZE = 1500   # characters per chunk (~375 tokens)
CHUNK_OVERLAP = 150 # overlap so context is not lost at boundaries


def chunk_text(text: str, size: int = CHUNK_SIZE, overlap: int = CHUNK_OVERLAP) -> list:
    """Split text into overlapping chunks."""
    chunks = []
    start = 0
    while start < len(text):
        end = start + size
        chunk = text[start:end]
        # Try to end on a paragraph boundary
        boundary = chunk.rfind("\n\n")
        if boundary > size // 2:
            chunk = chunk[:boundary]
        chunks.append(chunk.strip())
        start += len(chunk) - overlap
    return [c for c in chunks if len(c) > 50]  # drop tiny trailing chunks


def prepare_rag_corpus(docs_dir: str, output_path: str) -> None:
    md = MarkItDown()
    corpus = []
    chunk_id = 0

    for fpath in sorted(Path(docs_dir).rglob("*")):
        if fpath.suffix.lower() not in SUPPORTED:
            continue

        print(f"Processing: {fpath.name}")
        try:
            result = md.convert(str(fpath))
            chunks = chunk_text(result.text_content)
            for i, chunk in enumerate(chunks):
                corpus.append({
                    "id": f"chunk_{chunk_id:05d}",
                    "source_file": fpath.name,
                    "source_title": result.title or fpath.stem,
                    "chunk_index": i,
                    "total_chunks": len(chunks),
                    "text": chunk,
                })
                chunk_id += 1
            print(f"  -> {len(chunks)} chunks")
        except Exception as exc:
            print(f"  FAILED: {exc}")

    with open(output_path, "w", encoding="utf-8") as f:
        json.dump(corpus, f, indent=2, ensure_ascii=False)

    print(f"\nCorpus saved: {len(corpus)} chunks from {chunk_id} total across all docs")
    print(f"Output: {output_path}")


if __name__ == "__main__":
    prepare_rag_corpus("./knowledge_base", "rag_corpus.json")
Output:
Processing: company_handbook.pdf
  -> 47 chunks
Processing: product_specs.docx
  -> 18 chunks
Processing: roadmap_2026.pptx
  -> 9 chunks
Processing: pricing.xlsx
  -> 3 chunks

Corpus saved: 77 chunks from 77 total across all docs
Output: rag_corpus.json
The output rag_corpus.json is ready to embed. Each chunk carries its source file and title as metadata, so your vector database can filter by document when answering queries that should be scoped to a specific source. The overlapping chunks prevent context loss at boundaries — a sentence that straddles a chunk boundary will appear in both adjacent chunks, so the model always sees complete context around any retrieved passage. To extend this project, add an embedding step using sentence-transformers or the OpenAI Embeddings API and pipe the corpus directly into your vector store of choice.
Frequently Asked Questions
Can MarkItDown convert password-protected PDFs?
No — password-protected PDFs raise an exception during conversion because the underlying pdfminer.six library cannot read encrypted content without the password. You will see a PDFPasswordIncorrect or PDFEncryptionError. The fix is to pre-decrypt the PDF before conversion using a library like pikepdf: open with the password and save a decrypted copy, then convert the decrypted file. Always wrap conversion in try/except in batch pipelines so a single locked file does not abort the entire run.
Does MarkItDown extract images from PDFs?
With the base install, MarkItDown extracts text from PDFs but skips embedded images. If your PDFs are scanned documents (images of text, not actual text layers), the base converter will return little or no content. For scanned PDFs you need to add an LLM plugin — MarkItDown supports Azure Document Intelligence and OpenAI Vision as optional backends that can OCR images within documents. Pass an llm_client and llm_model to the MarkItDown constructor to enable this. The optional dependency install is pip install markitdown[all].
How should I handle very large documents?
For documents that produce more than 100,000 characters of Markdown, pass the whole text to an LLM in a single call only if your model supports a large context window (128K+). Otherwise, use the chunking pattern from the real-life example above — split the Markdown at paragraph boundaries with a 10% overlap and embed the chunks rather than the whole document. MarkItDown itself handles arbitrarily large files without issue; the bottleneck is always the downstream LLM context window, not the conversion step.
How well does MarkItDown handle complex tables?
Simple flat tables — with consistent column counts and no merged cells — convert reliably to Markdown tables. Complex tables with merged headers, multi-row cells, or heavily styled cells may produce irregular Markdown. Excel files generally convert better than Word or PDF tables because the underlying data is already structured. If you find table output unreliable for a specific document type, consider using openpyxl or python-docx for that format and MarkItDown for everything else in the same pipeline.
Can I stream the conversion output?
MarkItDown does not support streaming output — the convert() call blocks until the full document is converted and returns the complete result. For large documents this can take several seconds, especially for multi-hundred-page PDFs. If you need non-blocking behavior in an async pipeline, wrap the conversion in asyncio.run_in_executor() to run it in a thread pool and await the result without blocking your event loop.
Can I add a custom converter for a format MarkItDown does not support?
Yes — MarkItDown has a plugin system. You can register a custom DocumentConverter subclass for any file extension. Implement the convert() method that accepts a file path and returns a DocumentConverterResult, then register it via md.register_converter(MyConverter()). This is useful for proprietary formats specific to your industry — medical records in HL7, CAD files, or internal XML schemas — where you have the parsing logic but need to plug it into the same batch pipeline that handles standard formats.
Conclusion
MarkItDown removes the most painful part of building LLM document pipelines: writing and maintaining a different parser for every file format. A single MarkItDown().convert() call handles PDFs, DOCX, PPTX, XLSX, HTML, CSV, EPUB, and more, returning clean Markdown that LLMs can reason over rather than raw binary or poorly-structured text. The real-life example above gives you a complete RAG corpus preparer that you can extend — add an embedding step, plug in a vector store, or swap in a different chunking strategy depending on your document types.
The next step is to test it on your actual document set. Run the batch converter, inspect the output Markdown for any formatting issues specific to your files, and tune the chunk size to match your embedding model’s token limit. For OCR-heavy or audio transcription pipelines, explore the optional llm_client parameter to unlock MarkItDown’s full feature set.
Python supports flat files (text, CSV, JSON), databases (SQLite, PostgreSQL, MySQL), key-value stores (Redis, shelve), pickle serialization, and cloud storage. The best choice depends on data size, structure, and access patterns.
When should I use SQLite vs a full database?
Use SQLite for single-user apps, prototypes, and small-to-medium datasets. Switch to PostgreSQL or MySQL for concurrent multi-user access, complex queries at scale, or production-grade reliability.
How do I save Python objects to disk?
Use pickle for Python-specific serialization, json for interoperable data, shelve for dictionary-like persistent storage, or databases for structured data. For data analysis, pandas can save to CSV, Parquet, or HDF5.
Is JSON or CSV better for storing data?
JSON handles nested, hierarchical data well. CSV is simpler for tabular, flat data. Use JSON for API data and configuration; use CSV for datasets and spreadsheet-compatible exports.
How do I choose between file storage and a database?
Use file storage for simple, single-user scenarios. Use a database when you need querying, indexing, concurrent access, or ACID transactions. SQLite bridges both worlds for simpler applications.
Python is among the top programming languages that have been used in recent years in designing high-end technologies, such as Machine Learning, artificial intelligence, and data science. Programmers also use Python as their language of choice in developing large-scale applications that scale several products and services. This is why reputed companies hire candidates with good knowledge in coding with Python and other programming skills.
However, despite all these, some python myths can be a concern for aspiring developers. Below are some of the python programming myths you can easily come across.
Written by Pubs
Python developer and educator with 15+ years building production systems across data engineering, web APIs, and AI tooling. Founder of Python How To Program — 270+ in-depth tutorials covering the modern Python stack.
While Python is admissibly slower than Java and C++, it responds faster than JavaScript, Ruby, and other languages. Python features have specific runtimes and are not slower than other languages. Therefore, using Python for complicated applications saves time, and you’ll be done in a few minutes.
Some years ago, CPUs and memory were costly. However, currently, you can buy better-performing hardware at an affordable price to support programming with Python. Python also supports several programming paradigms, making it functional and imperative.
Python is slow. Python is too pretty. Python doesn’t scale. All wrong.
2. Python is Not Compiled and Only Used for Scripting
Python is generally an interpreted coding language since it falls in this category but is also considered a compiled language like Java and other programming languages. The compiling process is automated, making it difficult to detect, and a separate compiler isn’t required. It mostly compiles on virtual machines.
Python isn’t a scripting language wholly but more of a general-purpose coding language that can be used for scripting. Like most scripting languages, Python doesn’t have networking, regular expression, and exception features. This makes it a reliable and trusted programming language that can automate several tasks.
3. Learning to Code with Python is difficult and Time-consuming
Learning to program with Python is easy as it doesn’t require any prior programming knowledge. However, coding experts are advantaged as they can easily relate to its concepts. Python is a high-level language that can easily be implemented. Most of its syntax is simple mathematical instructions and calculations.
Most statements written in python programs look familiar with the English language as it contains less syntax. That said, learning to code with Python can take between three to six months, depending on your commitment. Besides, there are plenty of learning resources and a large supporting community that is ready to help learners.
4. Python is Not Scalable
Contrary to what most people believe, Python can scale both horizontally and vertically better than other languages. However, there is some confusion about this. The scaling process isn’t automated, thus requires some engineering effort. Scaling Python isn’t a straightforward process as it requires several entities.
For instance, you should make the most from the underlying memory, enhance single systems into distributed form, and more. Nonetheless, with proper architecture, scaling Python won’t be a problem.
Python runs your bank, your search engine, and your spacecraft.
5. Coding with Python is Expensive
You are highly mistaken if you think python programming is expensive. Unlike other coding languages, Python is an open-source language that can be downloaded for free from its official website. Python was officially developed in 1991 and is managed under the Python Software Foundation, which guarantees small and large scale users an Open Source License.
However, most of Python’s licenses remain open-source, though others are not. Some contributions, especially those from the General Public License, require users to pay a fee to access customizations added by other developers.
6. Python has Support and Security Issues
Another common myth is that Python isn’t secure, and code lines can easily be hacked. Most programmers believe the assumption that python codes are prone to cyberattacks. In contrast, Python has been used to build networking security systems. The language is also used to develop security testing tools and automation testing, which perform faster compared to others.
On the other hand, Python’s support team is always on standby and ready to assist in case of security issues affecting python programmers. You can contact them anytime, and your details will be kept confidential. Python has also adapted PayPal, eBay, and other highly-secured third-party payment gateways to prove its legitimacy.
7. Python Cannot be used for Big Projects
Just because Python is a simple language doesn’t mean it cannot be applied in big projects. Python has reusable codes and an extensive predefined library, which allow developers to create new codes tailored to suit project needs. Python libraries are also reusable, reducing the amount of time and effort required to write codes. Other languages are quite complicated and take long before a program is designed and implemented. This explains why tech giants, including Google, Facebook, YouTube, and Instagram, use this language.
Major websites / internet services written in Python
The Bottom Line
There is a lot to discover about Python and other programming languages in general. You shouldn’t agree easily to some of these baseless and unproven myths and misconceptions, which often arise during specific situations. That said, if you have some python programming basics, check out this course to learn UX/UI design and advance your skills to also expand your applications to cover front end as well.
[mfe_send_fox title=”Join the Python Insiders Group and get FREE tips in your inbox” body=”
Also, when you subscribe, we will send you a list of the most useful python one liners which will help you save time, make your code more readable, and which you can use immediately in your code! Subscribe to our email list and get the list now!
If you are new to the world of computer programming, choosing a programming language, to begin with, is probably the toughest hurdle. Currently, there are thousands of programming languages with different idiosyncrasies and complexities. On our site, we focus on Python, but there are other languages out there. Before you start your software development journey, choosing a programming language that suits your interests and career goals is important. That said, below are some of the best and in-demand coding languages you should consider.
Written by Pubs
Python developer and educator with 15+ years building production systems across data engineering, web APIs, and AI tooling. Founder of Python How To Program — 270+ in-depth tutorials covering the modern Python stack.
Modern software developers cannot succeed without mastering JavaScript. A 2020 survey done by Stack Overflow found that JavaScript is still the most popular programming language for developers for eight years in a row. More than 70% of study participants reported that they used this language for more than one year.
Together with CSS and HTML, JavaScript is an important coding language for front-end website development. Most websites, including Facebook, Gmail, YouTube, and Twitter, depend on JavaScript to display dynamic content to users for their interactive website pages.
Even though JavaScript is primarily a front-end web development language on browsers, it can be used on the server-side to develop scalable network applications with the help of Node.js. Node.js works with Windows, Linux, Mac OS, and SunOs.
JavaScript is a popular language amongst programming beginners because of its simple learning curve. It is used all through the web, thanks to its speed, and works well with other coding languages, enabling it to be used in various applications. That aside, the demand for JavaScript developers is currently high, with a CareerFoundry study concluding that 72% of businesses need JavaScript developers.
Pros of learning JavaScript
Fast and can run immediately in browsers
Provides an enriched and better web interface
Highly versatile
It can be used in various applications
Has multiple add-ons
Easily integrates with other programming languages.
Cons of learning JavaScript
Lacks an equivalent or alternate method
Different web browsers can interpret code lines differently.
2. Python
Python is a general-purpose coding language that is also very learner-friendly; there are even Python classes for children. However, despite being easy to learn, Python is an overly versatile and powerful language, making it suitable for beginners and experts. It is because of this that major companies, including Facebook and Google, use this language.
Python’s popularity is largely attributed to its extensive usage. It has applications in data science, scientific computing, data analytics, animation, database interfacing, web applications, machine learning, and data visualization. This versatility also explains the high demand for experts in this language.
Key features of Python include;
It has a unique selling point – simple, productive, elegant, and powerful in one package.
It influences other programming languages, such as Go and Julia
Best for back-end web development with first-class integration with other programming languages, such as C++ and C.
It offers many tools that can be applied in computational science, mathematics, statistics, and various libraries and frameworks, such as NumPy, Scikit-Learn, and Pandas.
Pros of learning Python
Works in various platforms
Improves developers and programmers productivity
Has a wide array of support frameworks and libraries
Powered by object-oriented programming
Cons of learning Python
Not ideal for mobile computing
It has a primitive and underdeveloped database
Python won the language war. Just not the speed war.
3. Java
Java is another popular coding language commonly used in-app and web development. Despite being an old coding language, Java is still in demand due to its complexity. Unfortunately, it isn’t beginner-friendly. It is a platform-independent language and a popular choice for various organizations, including Google and Airbnb, for its stability.
Key features of Java include;
It is a multi-paradigm and feature-rich programming language
Very productive for developers
Moderate learning curve
It doesn’t have major changes and updates like Python and Scala
Has the best runtime
Pros of learning Java
Has a wide array of open-source libraries
Automated garbage collection
Allows for platform independence
Supports multithreading and distributed computing
Has multiple APIs that support completion of various tasks, such as database connection, networking, and XML parsing
Cons of learning Java
Expensive memory management
Slow compared to other coding languages, such as C and C++
4. C#
C# is an object-oriented programming language developed by Microsoft. It was initially designed as part of the .NET framework for developing windows applications but is currently used in various applications. It is a general-purpose coding language used particularly in back-end development, game creation, mobile app development, and more. Despite being a Windows-specific language, it can also be used in Android, Linux, and iOS platforms.
The language has a legion of libraries and frameworks that have accrued for the last 20 years. Like Java, C# is independent of other platforms, thanks to its Common Language Runtime feature.
Pros of learning C#
Can work with shared codebases
Safe compared C++ and C
Uses similar syntax with C++ and other C-derived languages
Has rich data types and library
Has a fast compilation and execution
Cons of learning C#
Less flexible compared to C++
You should have good knowledge to solve errors
Same web app, two stacks. The stack matters less than the team.
5. PHP
PHP is another excellent programming language with many applications. While it faces stiff competition from other languages, such as Python and JavaScript, especially for web development, there is still a high demand for PHP professionals in the current job market. PHP is also a general-purpose and dynamic coding language that can be used to develop server-side applications.
Pros of learning PHP
Easy to learn and use
Has a wide ecosystem and community support
Has many frameworks
Supports object-oriented and functional paradigms
Supports various automation tools
Cons of PHP
Builds slow web pages
Lacks error and security handling features
6. Angular
Angular is a recently updated and improved version of the initial AngularJS framework developed by Google. Compared to other recent coding languages, such as React, Angular has a steep learning curve but offers better practical solutions for front-end development. Developers can also program complicated and scalable applications using Angular, thanks to its great functionality, aesthetic visual designs, and business logic.
Key features of Angular include;
Features a model-view control architecture that facilitates dynamic modeling
Uses HTML coding language to develop user interfaces that are simple and easy to understand
Uses old JavaScript objects, which are self-sufficient and very functional
Has Angular filters, which filter data before being viewed
Pros of learning Angular
Requires minimal coding experience to use
Allows development of high-quality hybrid apps
Has quick app prototyping
Has enhanced testing ability
Cons of Angular
Angular developed apps are dynamic, diminishing their performance
Complicated pages in apps can cause glitches
Difficult to learn
Python or JavaScript? Pick what your team can hire for.
7. React
Also called ReactJS, React is a JavaScript framework developed by Facebook that enables programmers to develop user interfaces with dynamic abilities. Sites built using React respond faster, and developers can switch between multiple variable elements seamlessly. The language also enables businesses to build and maintain customer loyalty by providing a great user experience.
Pros of learning React
Easy to learn and SEO friendly
Reuses various components, thus saves time
Has an open-source library
Supported by a strong online community
Has plenty of helpful development tools
Cons of React
Additional SEO hurdle
Has poor code documentation
The Bottom Line
As you choose your preferred web development language to learn, ensure that you aren’t guided by flashy inclinations and popularity contests. Even though the realm of computer programming keeps changing rapidly, the languages mentioned above can withstand these changes. Learning one or more of these languages will put you in a great position for many years to come. Make use of federal funding to pay for your online programming courses and Bootcamps. Veterans can learn web development languages at a discount using the GI Bill Benefits.
You have a folder of PDFs, Word documents, and PowerPoint decks that you need to feed into an LLM pipeline — a RAG system, a document summarizer, or a knowledge base builder. The problem is that LLMs work best with plain text, and most documents are packed with binary formatting, embedded fonts, and layout metadata that the model cannot interpret. Sending a raw PDF to an LLM is like handing someone a ZIP file and asking them to read it.
Microsoft’s markitdown library solves this by converting dozens of file formats — PDF, DOCX, PPTX, XLSX, HTML, CSV, EPUB, images, and audio — into clean Markdown that any LLM can process. It is a single pip install, works from Python code or the command line, and handles the conversion pipeline so your code does not have to. The Markdown output preserves headings, tables, and code blocks in a structured format that models handle especially well.
This article covers everything you need to get documents into your AI pipelines with MarkItDown. You will learn how to install it, convert individual files and entire directories, work with the Python API, handle different file types, and build a real document-processing pipeline that prepares files for a RAG system. By the end you will have a working utility that accepts any folder of mixed-format documents and outputs a structured Markdown dataset ready for embedding.
MarkItDown: Quick Example
Before diving into the details, here is the fastest path from a file to Markdown text you can feed into an LLM. This example converts an HTML page to Markdown in four lines of Python.
# quick_markitdown.py
from markitdown import MarkItDown

md = MarkItDown()
result = md.convert("https://example.com")
print(result.text_content[:500])
Output:
Example Domain
==============

This domain is for use in illustrative examples in documents. You may use this
domain in literature without prior coordination or asking for permission.

[More information...](https://www.iana.org/domains/reserved)
The MarkItDown() constructor creates a converter instance, and convert() accepts a file path, a URL, or a file-like object. The result is a DocumentConverterResult object — result.text_content holds the clean Markdown string ready to pass into any LLM or text processing pipeline.
The real power emerges when you need to handle PDFs, Office files, and mixed directories at scale. The sections below cover all of that, starting with installation.
What Is MarkItDown and Why Use It?
MarkItDown is an open-source Python library from Microsoft that acts as a universal document-to-Markdown converter. Think of it as a universal adapter — on one end you plug in a document in almost any format, and on the other end you get clean, structured Markdown text. The library was built specifically with LLM use cases in mind: the Markdown output is structured in a way that helps models understand document hierarchy (headings, tables, code blocks) rather than receiving a flat blob of text.
The key difference from alternatives like pypdf2 or python-docx is breadth and consistency. Those libraries require a different API for each format, handle only one format each, and return raw extracted text with no structure. MarkItDown gives you one API that handles all formats and preserves semantic structure as Markdown.
Format
MarkItDown
pypdf2 / python-docx / openpyxl
PDF
Yes
pypdf2 only
DOCX
Yes
python-docx only
PPTX
Yes
python-pptx only
XLSX
Yes
openpyxl only
HTML / URL
Yes
No
EPUB
Yes
No
CSV / JSON
Yes
No
Images (OCR)
Yes (optional)
No
Audio (transcription)
Yes (optional)
No
Unified output format
Markdown
Raw text / format-specific objects
The optional image OCR and audio transcription require extra dependencies (and an LLM API key for the best results), but the core document converters — PDF, Office, HTML — work completely offline with no API key required. That makes MarkItDown an excellent fit for any pipeline where you control the infrastructure.
Installing MarkItDown
MarkItDown is on PyPI. A basic install that handles PDFs, Office documents, and HTML covers most use cases and has minimal dependencies.
# Install the base package
pip install markitdown

# For PDF support (pdfminer.six is included in most installs)
pip install markitdown[pdf]

# For all optional extras (OCR, audio, Azure Document Intelligence)
pip install markitdown[all]
The [pdf] extra pulls in pdfminer.six for text-based PDF extraction. If you need image OCR within PDFs, you will also need an LLM plugin (covered in the advanced section). For most document-to-Markdown pipelines the base install is all you need — it handles DOCX, PPTX, XLSX, HTML, CSV, JSON, and EPUB without any extras.
One API to rule them all. Finally.
Converting Files, URLs, and Streams
The MarkItDown class is the main entry point. It auto-detects the file format based on extension or MIME type, so you call the same method regardless of what you are converting.
Converting a Local File
Pass any local file path as a string. MarkItDown detects the format automatically and returns a DocumentConverterResult.
# convert_file.py
from markitdown import MarkItDown

md = MarkItDown()

# Convert a DOCX file
result = md.convert("report.docx")
print(f"Title: {result.title}")
print(f"Characters: {len(result.text_content)}")
print()
print(result.text_content[:300])
Output:
Title: Q3 Sales Report
Characters: 4821

# Q3 Sales Report

**Prepared by:** Finance Team
**Date:** September 30, 2025

## Executive Summary

Revenue grew 12% year-over-year driven by the enterprise segment...
The result.title property extracts the document title from metadata where available (DOCX, PDF). The text_content property always holds the full Markdown string. Notice that the headings from the Word document are preserved as Markdown heading levels — this is exactly the structural information that LLMs use to understand document hierarchy.
Converting a URL
Pass a URL string and MarkItDown fetches the page and converts the HTML to Markdown. This works especially well for documentation pages, Wikipedia articles, and any page with semantic HTML structure.
# convert_url.py
from markitdown import MarkItDown

md = MarkItDown()
result = md.convert("https://docs.python.org/3/library/json.html")

print(result.text_content[:600])
Output:
json --- JSON encoder and decoder
=================================

**Source code:** [Lib/json/__init__.py](https://github.com/python/cpython/tree/3.13/Lib/json/__init__.py)

JSON (JavaScript Object Notation), specified by [RFC 7159](https://datatracker.ietf.org/doc/html/rfc7159.html)...

## json.dumps(obj, *, skipkeys=False, ...)

Serialize obj to a JSON formatted str...
Navigation menus, footers, and sidebars are typically stripped out, leaving the actual content. This makes URL conversion a fast way to pull documentation into a RAG corpus without building a custom scraper for every site.
Converting from a File-Like Object
When you receive a file as bytes (from an API response, an email attachment, or a web upload), you can convert it directly from a BytesIO object without writing it to disk first.
# convert_stream.py
import io
from markitdown import MarkItDown
import requests

md = MarkItDown()

# Download a PDF into memory and convert without saving to disk
response = requests.get("https://www.w3.org/WAI/WCAG21/wcag21.pdf")
pdf_stream = io.BytesIO(response.content)

# Must pass extension hint when using streams -- no filename to detect from
result = md.convert(pdf_stream, file_extension=".pdf")
print(f"Converted {len(result.text_content)} characters from in-memory PDF")
print(result.text_content[:400])
Output:
Converted 87432 characters from in-memory PDF

Web Content Accessibility Guidelines (WCAG) 2.1
================================================

W3C Recommendation 05 June 2018

Abstract
--------

Web Content Accessibility Guidelines (WCAG) 2.1 covers a wide range of...
The file_extension parameter is required when passing a stream because there is no filename to inspect. Always include it for streams to ensure the correct converter is selected.
BytesIO: no temp files, no disk I/O, no drama.
Format-Specific Conversion Options
Most formats work out of the box, but a few have options worth knowing about. PowerPoint files get per-slide conversion, Excel files convert to Markdown tables, and PDFs expose page-level control.
Excel and CSV to Markdown Tables
Excel sheets are converted to Markdown tables — one table per worksheet. This is particularly useful when feeding structured data to LLMs that need to reason about tabular information.
# convert_excel.py
from markitdown import MarkItDown

md = MarkItDown()
result = md.convert("sales_data.xlsx")
print(result.text_content)
Output (example with a two-sheet workbook):
## Sheet1

| Month | Revenue | Units |
|-------|---------|-------|
| Jan   | 84000   | 420   |
| Feb   | 91200   | 456   |
| Mar   | 78500   | 392   |

## Sheet2

| Region | Manager | Target |
|--------|---------|--------|
| East   | Alice   | 100000 |
| West   | Bob     | 95000  |
Each worksheet becomes an H2 section followed by a Markdown table. LLMs handle this format well for question-answering tasks — the model can identify column headers, filter by region, and compute simple aggregations when the data is in this structured Markdown table format rather than raw CSV text.
PowerPoint Slide Extraction
PPTX files are converted slide by slide. Each slide becomes a section with its title as a heading and the body text extracted below it. Speaker notes are included when present.
# convert_pptx.py
from markitdown import MarkItDown

md = MarkItDown()
result = md.convert("product_roadmap.pptx")

# Show first 500 chars to see the structure
print(result.text_content[:500])
Output:
## Slide 1: Product Roadmap 2026

Vision: Ship the AI-native workflow layer by Q3.

- Q1: Core infrastructure and auth
- Q2: Integration layer + partner APIs
- Q3: Public launch
- Q4: Enterprise tier

**Notes:** Emphasize the partnership angle -- this is key differentiator vs competitors.

## Slide 2: Q1 Milestones

- Authentication service -- 95% complete
- Database migration -- in progress
...
Speaker notes appear as bold “Notes:” blocks after each slide’s content. For meeting-notes pipelines or sales-deck summarizers this is especially useful — you get the full context that the presenter intended to convey, not just the bullet points on the slide.
Speaker notes included. Your LLM finally hears what the presenter was thinking.
Batch Converting a Directory
Real pipelines rarely deal with a single file. Here is a pattern to convert every supported file in a directory, log any failures, and save all results to a single Markdown file for easy embedding.
# batch_convert.py
import os
from pathlib import Path
from markitdown import MarkItDown

SUPPORTED = {".pdf", ".docx", ".pptx", ".xlsx", ".html", ".csv", ".json", ".epub"}

def batch_convert(input_dir: str, output_path: str) -> dict:
    """Convert all supported files in input_dir to a single Markdown file."""
    md = MarkItDown()
    results = {"success": [], "failed": []}
    output_parts = []

    for fpath in sorted(Path(input_dir).rglob("*")):
        if fpath.suffix.lower() not in SUPPORTED:
            continue

        print(f"Converting: {fpath.name}")
        try:
            result = md.convert(str(fpath))
            # Separate each document with a clear section header
            section = f"\n\n---\n## Document: {fpath.name}\n\n{result.text_content}"
            output_parts.append(section)
            results["success"].append(str(fpath))
        except Exception as exc:
            print(f"  FAILED: {exc}")
            results["failed"].append({"file": str(fpath), "error": str(exc)})

    with open(output_path, "w", encoding="utf-8") as f:
        f.write("# Document Corpus\n")
        f.write(f"Converted {len(results['success'])} documents.\n")
        f.write("".join(output_parts))

    return results


if __name__ == "__main__":
    stats = batch_convert("./docs", "corpus.md")
    print(f"\nDone: {len(stats['success'])} converted, {len(stats['failed'])} failed")
Output:
Converting: annual_report.pdf
Converting: onboarding.docx
Converting: roadmap.pptx
Converting: q3_data.xlsx
  FAILED: File appears to be encrypted

Done: 3 converted, 1 failed
The try/except around each conversion is essential — encrypted PDFs, corrupted files, or unsupported subtypes will raise exceptions rather than silently producing empty output. The pattern above logs the failure and continues with the rest of the batch, which is the right behavior for any automated pipeline. The output corpus.md contains all documents separated by clear section dividers that chunk-based RAG systems can split on.
Using MarkItDown with LLM Pipelines
The most common use case is feeding converted documents into an LLM. Here is how to wire MarkItDown into an OpenAI-compatible pipeline for a simple document Q&A pattern.
# doc_qa.py
from markitdown import MarkItDown
from openai import OpenAI

def answer_from_document(file_path: str, question: str, api_key: str) -> str:
    """Convert a document to Markdown and answer a question about it."""
    md = MarkItDown()
    result = md.convert(file_path)
    doc_text = result.text_content

    # Truncate if the document exceeds a safe context window size
    max_chars = 80000  # ~20K tokens for most models
    if len(doc_text) > max_chars:
        doc_text = doc_text[:max_chars] + "\n\n[Document truncated...]"

    client = OpenAI(api_key=api_key)
    response = client.chat.completions.create(
        model="gpt-4o-mini",
        messages=[
            {
                "role": "system",
                "content": "You are a document analyst. Answer questions based only on the provided document.",
            },
            {
                "role": "user",
                "content": f"Document:\n\n{doc_text}\n\nQuestion: {question}",
            },
        ],
    )
    return response.choices[0].message.content


# Example usage
answer = answer_from_document(
    "contract.pdf",
    "What is the termination clause?",
    api_key="your-openai-api-key"
)
print(answer)
Output:
Section 12.3 of the contract states that either party may terminate this agreement
with 30 days written notice. Termination for cause requires only 5 business days
notice and must be accompanied by written documentation of the breach.
This pattern works with any OpenAI-compatible API — swap the base URL and API key for Anthropic, Gemini, or a local Ollama endpoint and the pattern is identical. The key insight is that MarkItDown’s Markdown output is substantially better context than raw extracted text because the model can use heading levels and table structure to locate specific sections of long documents.
Raw PDF to LLM: garbled. Markdown to LLM: actually works.
Real-Life Example: Building a Document Corpus Preparer for RAG
This project ties together everything from this article. It accepts a folder of mixed-format documents, converts all of them to Markdown, chunks the output into LLM-ready segments, and saves a JSON file that a vector database like Chroma or Pinecone can ingest directly.
# rag_preparer.py
import json
import os
from pathlib import Path
from markitdown import MarkItDown

SUPPORTED = {".pdf", ".docx", ".pptx", ".xlsx", ".html", ".csv", ".epub"}
CHUNK_SIZE = 1500   # characters per chunk (~375 tokens)
CHUNK_OVERLAP = 150 # overlap so context is not lost at boundaries


def chunk_text(text: str, size: int = CHUNK_SIZE, overlap: int = CHUNK_OVERLAP) -> list:
    """Split text into overlapping chunks."""
    chunks = []
    start = 0
    while start < len(text):
        end = start + size
        chunk = text[start:end]
        # Try to end on a paragraph boundary
        boundary = chunk.rfind("\n\n")
        if boundary > size // 2:
            chunk = chunk[:boundary]
        chunks.append(chunk.strip())
        start += len(chunk) - overlap
    return [c for c in chunks if len(c) > 50]  # drop tiny trailing chunks


def prepare_rag_corpus(docs_dir: str, output_path: str) -> None:
    md = MarkItDown()
    corpus = []
    chunk_id = 0

    for fpath in sorted(Path(docs_dir).rglob("*")):
        if fpath.suffix.lower() not in SUPPORTED:
            continue

        print(f"Processing: {fpath.name}")
        try:
            result = md.convert(str(fpath))
            chunks = chunk_text(result.text_content)
            for i, chunk in enumerate(chunks):
                corpus.append({
                    "id": f"chunk_{chunk_id:05d}",
                    "source_file": fpath.name,
                    "source_title": result.title or fpath.stem,
                    "chunk_index": i,
                    "total_chunks": len(chunks),
                    "text": chunk,
                })
                chunk_id += 1
            print(f"  -> {len(chunks)} chunks")
        except Exception as exc:
            print(f"  FAILED: {exc}")

    with open(output_path, "w", encoding="utf-8") as f:
        json.dump(corpus, f, indent=2, ensure_ascii=False)

    print(f"\nCorpus saved: {len(corpus)} chunks from {chunk_id} total across all docs")
    print(f"Output: {output_path}")


if __name__ == "__main__":
    prepare_rag_corpus("./knowledge_base", "rag_corpus.json")
Output:
Processing: company_handbook.pdf
  -> 47 chunks
Processing: product_specs.docx
  -> 18 chunks
Processing: roadmap_2026.pptx
  -> 9 chunks
Processing: pricing.xlsx
  -> 3 chunks

Corpus saved: 77 chunks from 77 total across all docs
Output: rag_corpus.json
The output rag_corpus.json is ready to embed. Each chunk carries its source file and title as metadata, so your vector database can filter by document when answering queries that should be scoped to a specific source. The overlapping chunks prevent context loss at boundaries — a sentence that straddles a chunk boundary will appear in both adjacent chunks, so the model always sees complete context around any retrieved passage. To extend this project, add an embedding step using sentence-transformers or the OpenAI Embeddings API and pipe the corpus directly into your vector store of choice.
Frequently Asked Questions
Can MarkItDown convert password-protected PDFs?
No — password-protected PDFs raise an exception during conversion because the underlying pdfminer.six library cannot read encrypted content without the password. You will see a PDFPasswordIncorrect or PDFEncryptionError. The fix is to pre-decrypt the PDF before conversion using a library like pikepdf: open with the password and save a decrypted copy, then convert the decrypted file. Always wrap conversion in try/except in batch pipelines so a single locked file does not abort the entire run.
Does MarkItDown extract images from PDFs?
With the base install, MarkItDown extracts text from PDFs but skips embedded images. If your PDFs are scanned documents (images of text, not actual text layers), the base converter will return little or no content. For scanned PDFs you need to add an LLM plugin — MarkItDown supports Azure Document Intelligence and OpenAI Vision as optional backends that can OCR images within documents. Pass an llm_client and llm_model to the MarkItDown constructor to enable this. The optional dependency install is pip install markitdown[all].
How should I handle very large documents?
For documents that produce more than 100,000 characters of Markdown, pass the whole text to an LLM in a single call only if your model supports a large context window (128K+). Otherwise, use the chunking pattern from the real-life example above — split the Markdown at paragraph boundaries with a 10% overlap and embed the chunks rather than the whole document. MarkItDown itself handles arbitrarily large files without issue; the bottleneck is always the downstream LLM context window, not the conversion step.
How well does MarkItDown handle complex tables?
Simple flat tables — with consistent column counts and no merged cells — convert reliably to Markdown tables. Complex tables with merged headers, multi-row cells, or heavily styled cells may produce irregular Markdown. Excel files generally convert better than Word or PDF tables because the underlying data is already structured. If you find table output unreliable for a specific document type, consider using openpyxl or python-docx for that format and MarkItDown for everything else in the same pipeline.
Can I stream the conversion output?
MarkItDown does not support streaming output — the convert() call blocks until the full document is converted and returns the complete result. For large documents this can take several seconds, especially for multi-hundred-page PDFs. If you need non-blocking behavior in an async pipeline, wrap the conversion in asyncio.run_in_executor() to run it in a thread pool and await the result without blocking your event loop.
Can I add a custom converter for a format MarkItDown does not support?
Yes — MarkItDown has a plugin system. You can register a custom DocumentConverter subclass for any file extension. Implement the convert() method that accepts a file path and returns a DocumentConverterResult, then register it via md.register_converter(MyConverter()). This is useful for proprietary formats specific to your industry — medical records in HL7, CAD files, or internal XML schemas — where you have the parsing logic but need to plug it into the same batch pipeline that handles standard formats.
Conclusion
MarkItDown removes the most painful part of building LLM document pipelines: writing and maintaining a different parser for every file format. A single MarkItDown().convert() call handles PDFs, DOCX, PPTX, XLSX, HTML, CSV, EPUB, and more, returning clean Markdown that LLMs can reason over rather than raw binary or poorly-structured text. The real-life example above gives you a complete RAG corpus preparer that you can extend — add an embedding step, plug in a vector store, or swap in a different chunking strategy depending on your document types.
The next step is to test it on your actual document set. Run the batch converter, inspect the output Markdown for any formatting issues specific to your files, and tune the chunk size to match your embedding model’s token limit. For OCR-heavy or audio transcription pipelines, explore the optional llm_client parameter to unlock MarkItDown’s full feature set.
How does Python compare to JavaScript for web development?
Python excels in backend development with Django and Flask. JavaScript dominates the frontend and runs on the backend with Node.js. Python is preferred for data-heavy backends, while JavaScript enables full-stack development with a single language.
Is Python slower than other web languages?
Python is generally slower in raw execution speed compared to Go, Java, or Node.js. However, for most web apps the bottleneck is I/O, not CPU speed. Python’s developer productivity and rich ecosystem often outweigh the performance difference.
Can Python be used for frontend web development?
Python is primarily a backend language. Tools like Brython, Pyodide, and PyScript allow Python in the browser, but for production frontends JavaScript/TypeScript with React or Vue remains the standard.
What makes Python a good choice for web APIs?
Python offers mature API frameworks (Flask, FastAPI, Django REST Framework), excellent library support for data processing, simple syntax, and strong integration with databases, ML models, and third-party services.
Should I learn Python or JavaScript for web development?
Learn Python if you focus on data science, ML, or backend APIs. Learn JavaScript for full-stack web development. Many developers learn both. Python’s versatility across web, data, and automation makes it a strong choice.
The easiest and simplest mechanism to store data from python is the humble file storage which is often, but does not have to be, text based. There are no libraries that you require, and you can use native python functions to open and write to the file very easily.
There are many use cases for file storage and is usually the “go to” method when hacking a quick solution or prototype together. These are also arguably good solutions for production use cases.
Written by Pubs
Python developer and educator with 15+ years building production systems across data engineering, web APIs, and AI tooling. Founder of Python How To Program — 270+ in-depth tutorials covering the modern Python stack.
The typical use cases has the following commonalities:
Setup: There’s no setup that is required for files. You can create the file even from python
Volume: Size Small-ish file size (< 5-10mb). You can go larger of course if your application is not doing heavy reads or writes nor if it doesn’t require fast response (e.g. batch processing)
Record access: Does not require to search data within the file to extract just portion of the records. You would load or save all the data in the file in one go
Data Writes: You can either append to the file or you can upload and download all data in the file.
Write reliability: You do not need to have multiple writes at the same time – there is only possibility (or likelihood) of one person writing at one time, and if there was a case of multiple people writing at once, the consequence are not serious for your application. There are ways to put a lock on a file to prevent conflicts, but you should double check if a file is the write option for you
Data formats: You may have structured record based (such as comma separated value – CSV or tab delimited) or unstructured (eg document of text or JSON format). You can also store binary data in a file as well – e.g. for images
Editability: You may want or allow direct editing of the file by other applications or direct editing by people
Redundancy: There’s no inbuilt redundancy. If there is any failure (data corrupt, the server with the file fails), then you’re out of luck. You need to setup your own mechanisms (e.g. replicate file to another server automatically)
Code examples to read and write to a file
Here are two sets of example code for writing and reading from a file. It is very easy and does not require any libraries. The one thing to be mindful of is what mode you want the file to be opened- read, write, read and write.
Open a text file for (over)writing:
To write to a file, it’s very easy to do so which is to use the ‘w’ switch on the open() function. There are other options as well:
‘r’ – Reading
‘w’ – Writing to a file
‘a’ – Append to end of file
‘r+’ – Read and write to the same file
‘x’ – Used to create and write to a new file
file = open( ‘population.txt’, ‘w’)
file.write(‘Japan’)
file.write(‘United States’)
file.write(‘Australia’)
file.write(‘China’)
file.close() #file is released and closed
You will then have the following output file of population.txt:
Japan
United States
Australia
China
Open a text file fully for reading:
Using the same population.txt file created above –
file = open( ‘population.txt’, ‘r’)
data = file.read() #read full contents of file into a single string
file.close() #file is released and closed
print(“*** file start ***”)
print( data )
print(“*** end file ***”)
The output would be:
*** file start ***
Japan
United States
Australia
China
*** end file ***
Now to explain this a bit further, the open() command helps to open a file where you need to specify how the file is to be opened – in this case with ‘r’ to indicate it is for reading. There are other options as well:
‘r’ – Reading
‘w’ – Writing to a file
‘a’ – Append to end of file
‘r+’ – Read and write to the same file
‘x’ – Used to create and write to a new file
Read a text file line by line:
file = open( ‘population.txt’, ‘r’)
data_list = file.readlines() #read full contents of file into a list of rows
file.close() #file is released and closed
print(“*** file start ***”)
counter = 0
for row in data_list:
  counter = counter + 1
  print( f”{counter}:  {data_list}” )
print(“*** end file ***”)
The output would be:
*** file start ***
1: Japan
2: United States
3: Australia
4: China
*** end file ***
The difference in above to the first example is that the data comes out in a list separated by a newline so that you can process each row. Please note, you can simplify the above using the enumerate to avoid having the separate counter variable setup. E.g.
print(“*** file start ***”)
for index, row in enumerate(data_list):
  print( f”{index+1}:  {data_list}” ) #Note that when using enumerate, first index is 0
print(“*** end file ***”)
Read a file in 3 lines. Write it in 4. Everything else is detail.
Summary of writing and reading to a file
Reading and writing to a file is a very straightforward native operation in Python. There are many other related operations that you can do ranging from putting a lock on a file to prevent two processes writing to the same file, checking file attributes such as access and size, and many other operations. At the most basic though, you can simply use the “open” statement to do the read/write to satisfy most of your needs.
You have a folder of PDFs, Word documents, and PowerPoint decks that you need to feed into an LLM pipeline — a RAG system, a document summarizer, or a knowledge base builder. The problem is that LLMs work best with plain text, and most documents are packed with binary formatting, embedded fonts, and layout metadata that the model cannot interpret. Sending a raw PDF to an LLM is like handing someone a ZIP file and asking them to read it.
Microsoft’s markitdown library solves this by converting dozens of file formats — PDF, DOCX, PPTX, XLSX, HTML, CSV, EPUB, images, and audio — into clean Markdown that any LLM can process. It is a single pip install, works from Python code or the command line, and handles the conversion pipeline so your code does not have to. The Markdown output preserves headings, tables, and code blocks in a structured format that models handle especially well.
This article covers everything you need to get documents into your AI pipelines with MarkItDown. You will learn how to install it, convert individual files and entire directories, work with the Python API, handle different file types, and build a real document-processing pipeline that prepares files for a RAG system. By the end you will have a working utility that accepts any folder of mixed-format documents and outputs a structured Markdown dataset ready for embedding.
MarkItDown: Quick Example
Before diving into the details, here is the fastest path from a file to Markdown text you can feed into an LLM. This example converts an HTML page to Markdown in four lines of Python.
# quick_markitdown.py
from markitdown import MarkItDown

md = MarkItDown()
result = md.convert("https://example.com")
print(result.text_content[:500])
Output:
Example Domain
==============

This domain is for use in illustrative examples in documents. You may use this
domain in literature without prior coordination or asking for permission.

[More information...](https://www.iana.org/domains/reserved)
The MarkItDown() constructor creates a converter instance, and convert() accepts a file path, a URL, or a file-like object. The result is a DocumentConverterResult object — result.text_content holds the clean Markdown string ready to pass into any LLM or text processing pipeline.
The real power emerges when you need to handle PDFs, Office files, and mixed directories at scale. The sections below cover all of that, starting with installation.
What Is MarkItDown and Why Use It?
MarkItDown is an open-source Python library from Microsoft that acts as a universal document-to-Markdown converter. Think of it as a universal adapter — on one end you plug in a document in almost any format, and on the other end you get clean, structured Markdown text. The library was built specifically with LLM use cases in mind: the Markdown output is structured in a way that helps models understand document hierarchy (headings, tables, code blocks) rather than receiving a flat blob of text.
The key difference from alternatives like pypdf2 or python-docx is breadth and consistency. Those libraries require a different API for each format, handle only one format each, and return raw extracted text with no structure. MarkItDown gives you one API that handles all formats and preserves semantic structure as Markdown.
Format
MarkItDown
pypdf2 / python-docx / openpyxl
PDF
Yes
pypdf2 only
DOCX
Yes
python-docx only
PPTX
Yes
python-pptx only
XLSX
Yes
openpyxl only
HTML / URL
Yes
No
EPUB
Yes
No
CSV / JSON
Yes
No
Images (OCR)
Yes (optional)
No
Audio (transcription)
Yes (optional)
No
Unified output format
Markdown
Raw text / format-specific objects
The optional image OCR and audio transcription require extra dependencies (and an LLM API key for the best results), but the core document converters — PDF, Office, HTML — work completely offline with no API key required. That makes MarkItDown an excellent fit for any pipeline where you control the infrastructure.
Installing MarkItDown
MarkItDown is on PyPI. A basic install that handles PDFs, Office documents, and HTML covers most use cases and has minimal dependencies.
# Install the base package
pip install markitdown

# For PDF support (pdfminer.six is included in most installs)
pip install markitdown[pdf]

# For all optional extras (OCR, audio, Azure Document Intelligence)
pip install markitdown[all]
The [pdf] extra pulls in pdfminer.six for text-based PDF extraction. If you need image OCR within PDFs, you will also need an LLM plugin (covered in the advanced section). For most document-to-Markdown pipelines the base install is all you need — it handles DOCX, PPTX, XLSX, HTML, CSV, JSON, and EPUB without any extras.
One API to rule them all. Finally.
Converting Files, URLs, and Streams
The MarkItDown class is the main entry point. It auto-detects the file format based on extension or MIME type, so you call the same method regardless of what you are converting.
Converting a Local File
Pass any local file path as a string. MarkItDown detects the format automatically and returns a DocumentConverterResult.
# convert_file.py
from markitdown import MarkItDown

md = MarkItDown()

# Convert a DOCX file
result = md.convert("report.docx")
print(f"Title: {result.title}")
print(f"Characters: {len(result.text_content)}")
print()
print(result.text_content[:300])
Output:
Title: Q3 Sales Report
Characters: 4821

# Q3 Sales Report

**Prepared by:** Finance Team
**Date:** September 30, 2025

## Executive Summary

Revenue grew 12% year-over-year driven by the enterprise segment...
The result.title property extracts the document title from metadata where available (DOCX, PDF). The text_content property always holds the full Markdown string. Notice that the headings from the Word document are preserved as Markdown heading levels — this is exactly the structural information that LLMs use to understand document hierarchy.
Converting a URL
Pass a URL string and MarkItDown fetches the page and converts the HTML to Markdown. This works especially well for documentation pages, Wikipedia articles, and any page with semantic HTML structure.
# convert_url.py
from markitdown import MarkItDown

md = MarkItDown()
result = md.convert("https://docs.python.org/3/library/json.html")

print(result.text_content[:600])
Output:
json --- JSON encoder and decoder
=================================

**Source code:** [Lib/json/__init__.py](https://github.com/python/cpython/tree/3.13/Lib/json/__init__.py)

JSON (JavaScript Object Notation), specified by [RFC 7159](https://datatracker.ietf.org/doc/html/rfc7159.html)...

## json.dumps(obj, *, skipkeys=False, ...)

Serialize obj to a JSON formatted str...
Navigation menus, footers, and sidebars are typically stripped out, leaving the actual content. This makes URL conversion a fast way to pull documentation into a RAG corpus without building a custom scraper for every site.
Converting from a File-Like Object
When you receive a file as bytes (from an API response, an email attachment, or a web upload), you can convert it directly from a BytesIO object without writing it to disk first.
# convert_stream.py
import io
from markitdown import MarkItDown
import requests

md = MarkItDown()

# Download a PDF into memory and convert without saving to disk
response = requests.get("https://www.w3.org/WAI/WCAG21/wcag21.pdf")
pdf_stream = io.BytesIO(response.content)

# Must pass extension hint when using streams -- no filename to detect from
result = md.convert(pdf_stream, file_extension=".pdf")
print(f"Converted {len(result.text_content)} characters from in-memory PDF")
print(result.text_content[:400])
Output:
Converted 87432 characters from in-memory PDF

Web Content Accessibility Guidelines (WCAG) 2.1
================================================

W3C Recommendation 05 June 2018

Abstract
--------

Web Content Accessibility Guidelines (WCAG) 2.1 covers a wide range of...
The file_extension parameter is required when passing a stream because there is no filename to inspect. Always include it for streams to ensure the correct converter is selected.
BytesIO: no temp files, no disk I/O, no drama.
Format-Specific Conversion Options
Most formats work out of the box, but a few have options worth knowing about. PowerPoint files get per-slide conversion, Excel files convert to Markdown tables, and PDFs expose page-level control.
Excel and CSV to Markdown Tables
Excel sheets are converted to Markdown tables — one table per worksheet. This is particularly useful when feeding structured data to LLMs that need to reason about tabular information.
# convert_excel.py
from markitdown import MarkItDown

md = MarkItDown()
result = md.convert("sales_data.xlsx")
print(result.text_content)
Output (example with a two-sheet workbook):
## Sheet1

| Month | Revenue | Units |
|-------|---------|-------|
| Jan   | 84000   | 420   |
| Feb   | 91200   | 456   |
| Mar   | 78500   | 392   |

## Sheet2

| Region | Manager | Target |
|--------|---------|--------|
| East   | Alice   | 100000 |
| West   | Bob     | 95000  |
Each worksheet becomes an H2 section followed by a Markdown table. LLMs handle this format well for question-answering tasks — the model can identify column headers, filter by region, and compute simple aggregations when the data is in this structured Markdown table format rather than raw CSV text.
PowerPoint Slide Extraction
PPTX files are converted slide by slide. Each slide becomes a section with its title as a heading and the body text extracted below it. Speaker notes are included when present.
# convert_pptx.py
from markitdown import MarkItDown

md = MarkItDown()
result = md.convert("product_roadmap.pptx")

# Show first 500 chars to see the structure
print(result.text_content[:500])
Output:
## Slide 1: Product Roadmap 2026

Vision: Ship the AI-native workflow layer by Q3.

- Q1: Core infrastructure and auth
- Q2: Integration layer + partner APIs
- Q3: Public launch
- Q4: Enterprise tier

**Notes:** Emphasize the partnership angle -- this is key differentiator vs competitors.

## Slide 2: Q1 Milestones

- Authentication service -- 95% complete
- Database migration -- in progress
...
Speaker notes appear as bold “Notes:” blocks after each slide’s content. For meeting-notes pipelines or sales-deck summarizers this is especially useful — you get the full context that the presenter intended to convey, not just the bullet points on the slide.
Speaker notes included. Your LLM finally hears what the presenter was thinking.
Batch Converting a Directory
Real pipelines rarely deal with a single file. Here is a pattern to convert every supported file in a directory, log any failures, and save all results to a single Markdown file for easy embedding.
# batch_convert.py
import os
from pathlib import Path
from markitdown import MarkItDown

SUPPORTED = {".pdf", ".docx", ".pptx", ".xlsx", ".html", ".csv", ".json", ".epub"}

def batch_convert(input_dir: str, output_path: str) -> dict:
    """Convert all supported files in input_dir to a single Markdown file."""
    md = MarkItDown()
    results = {"success": [], "failed": []}
    output_parts = []

    for fpath in sorted(Path(input_dir).rglob("*")):
        if fpath.suffix.lower() not in SUPPORTED:
            continue

        print(f"Converting: {fpath.name}")
        try:
            result = md.convert(str(fpath))
            # Separate each document with a clear section header
            section = f"\n\n---\n## Document: {fpath.name}\n\n{result.text_content}"
            output_parts.append(section)
            results["success"].append(str(fpath))
        except Exception as exc:
            print(f"  FAILED: {exc}")
            results["failed"].append({"file": str(fpath), "error": str(exc)})

    with open(output_path, "w", encoding="utf-8") as f:
        f.write("# Document Corpus\n")
        f.write(f"Converted {len(results['success'])} documents.\n")
        f.write("".join(output_parts))

    return results


if __name__ == "__main__":
    stats = batch_convert("./docs", "corpus.md")
    print(f"\nDone: {len(stats['success'])} converted, {len(stats['failed'])} failed")
Output:
Converting: annual_report.pdf
Converting: onboarding.docx
Converting: roadmap.pptx
Converting: q3_data.xlsx
  FAILED: File appears to be encrypted

Done: 3 converted, 1 failed
The try/except around each conversion is essential — encrypted PDFs, corrupted files, or unsupported subtypes will raise exceptions rather than silently producing empty output. The pattern above logs the failure and continues with the rest of the batch, which is the right behavior for any automated pipeline. The output corpus.md contains all documents separated by clear section dividers that chunk-based RAG systems can split on.
Using MarkItDown with LLM Pipelines
The most common use case is feeding converted documents into an LLM. Here is how to wire MarkItDown into an OpenAI-compatible pipeline for a simple document Q&A pattern.
# doc_qa.py
from markitdown import MarkItDown
from openai import OpenAI

def answer_from_document(file_path: str, question: str, api_key: str) -> str:
    """Convert a document to Markdown and answer a question about it."""
    md = MarkItDown()
    result = md.convert(file_path)
    doc_text = result.text_content

    # Truncate if the document exceeds a safe context window size
    max_chars = 80000  # ~20K tokens for most models
    if len(doc_text) > max_chars:
        doc_text = doc_text[:max_chars] + "\n\n[Document truncated...]"

    client = OpenAI(api_key=api_key)
    response = client.chat.completions.create(
        model="gpt-4o-mini",
        messages=[
            {
                "role": "system",
                "content": "You are a document analyst. Answer questions based only on the provided document.",
            },
            {
                "role": "user",
                "content": f"Document:\n\n{doc_text}\n\nQuestion: {question}",
            },
        ],
    )
    return response.choices[0].message.content


# Example usage
answer = answer_from_document(
    "contract.pdf",
    "What is the termination clause?",
    api_key="your-openai-api-key"
)
print(answer)
Output:
Section 12.3 of the contract states that either party may terminate this agreement
with 30 days written notice. Termination for cause requires only 5 business days
notice and must be accompanied by written documentation of the breach.
This pattern works with any OpenAI-compatible API — swap the base URL and API key for Anthropic, Gemini, or a local Ollama endpoint and the pattern is identical. The key insight is that MarkItDown’s Markdown output is substantially better context than raw extracted text because the model can use heading levels and table structure to locate specific sections of long documents.
Raw PDF to LLM: garbled. Markdown to LLM: actually works.
Real-Life Example: Building a Document Corpus Preparer for RAG
This project ties together everything from this article. It accepts a folder of mixed-format documents, converts all of them to Markdown, chunks the output into LLM-ready segments, and saves a JSON file that a vector database like Chroma or Pinecone can ingest directly.
# rag_preparer.py
import json
import os
from pathlib import Path
from markitdown import MarkItDown
SUPPORTED = {".pdf", ".docx", ".pptx", ".xlsx", ".html", ".csv", ".epub"}
CHUNK_SIZE = 1500 # characters per chunk (~375 tokens)
CHUNK_OVERLAP = 150 # overlap so context is not lost at boundaries
def chunk_text(text: str, size: int = CHUNK_SIZE, overlap: int = CHUNK_OVERLAP) -> list:
"""Split text into overlapping chunks."""
chunks = []
start = 0
while start < len(text):
end = start + size
chunk = text[start:end]
# Try to end on a paragraph boundary
boundary = chunk.rfind("\n\n")
if boundary > size // 2:
chunk = chunk[:boundary]
chunks.append(chunk.strip())
start += len(chunk) - overlap
return [c for c in chunks if len(c) > 50] # drop tiny trailing chunks
def prepare_rag_corpus(docs_dir: str, output_path: str) -> None:
md = MarkItDown()
corpus = []
chunk_id = 0
for fpath in sorted(Path(docs_dir).rglob("*")):
if fpath.suffix.lower() not in SUPPORTED:
continue
print(f"Processing: {fpath.name}")
try:
result = md.convert(str(fpath))
chunks = chunk_text(result.text_content)
for i, chunk in enumerate(chunks):
corpus.append({
"id": f"chunk_{chunk_id:05d}",
"source_file": fpath.name,
"source_title": result.title or fpath.stem,
"chunk_index": i,
"total_chunks": len(chunks),
"text": chunk,
})
chunk_id += 1
print(f" -> {len(chunks)} chunks")
except Exception as exc:
print(f" FAILED: {exc}")
with open(output_path, "w", encoding="utf-8") as f:
json.dump(corpus, f, indent=2, ensure_ascii=False)
print(f"\nCorpus saved: {len(corpus)} chunks from {chunk_id} total across all docs")
print(f"Output: {output_path}")
if __name__ == "__main__":
prepare_rag_corpus("./knowledge_base", "rag_corpus.json")
Output:
Processing: company_handbook.pdf
-> 47 chunks
Processing: product_specs.docx
-> 18 chunks
Processing: roadmap_2026.pptx
-> 9 chunks
Processing: pricing.xlsx
-> 3 chunks
Corpus saved: 77 chunks from 77 total across all docs
Output: rag_corpus.json
The output rag_corpus.json is ready to embed. Each chunk carries its source file and title as metadata, so your vector database can filter by document when answering queries that should be scoped to a specific source. The overlapping chunks prevent context loss at boundaries — a sentence that straddles a chunk boundary will appear in both adjacent chunks, so the model always sees complete context around any retrieved passage. To extend this project, add an embedding step using sentence-transformers or the OpenAI Embeddings API and pipe the corpus directly into your vector store of choice.
Frequently Asked Questions
Can MarkItDown convert password-protected PDFs?
No — password-protected PDFs raise an exception during conversion because the underlying pdfminer.six library cannot read encrypted content without the password. You will see a PDFPasswordIncorrect or PDFEncryptionError. The fix is to pre-decrypt the PDF before conversion using a library like pikepdf: open with the password and save a decrypted copy, then convert the decrypted file. Always wrap conversion in try/except in batch pipelines so a single locked file does not abort the entire run.
Does MarkItDown extract images from PDFs?
With the base install, MarkItDown extracts text from PDFs but skips embedded images. If your PDFs are scanned documents (images of text, not actual text layers), the base converter will return little or no content. For scanned PDFs you need to add an LLM plugin — MarkItDown supports Azure Document Intelligence and OpenAI Vision as optional backends that can OCR images within documents. Pass an llm_client and llm_model to the MarkItDown constructor to enable this. The optional dependency install is pip install markitdown[all].
How should I handle very large documents?
For documents that produce more than 100,000 characters of Markdown, pass the whole text to an LLM in a single call only if your model supports a large context window (128K+). Otherwise, use the chunking pattern from the real-life example above — split the Markdown at paragraph boundaries with a 10% overlap and embed the chunks rather than the whole document. MarkItDown itself handles arbitrarily large files without issue; the bottleneck is always the downstream LLM context window, not the conversion step.
How well does MarkItDown handle complex tables?
Simple flat tables — with consistent column counts and no merged cells — convert reliably to Markdown tables. Complex tables with merged headers, multi-row cells, or heavily styled cells may produce irregular Markdown. Excel files generally convert better than Word or PDF tables because the underlying data is already structured. If you find table output unreliable for a specific document type, consider using openpyxl or python-docx for that format and MarkItDown for everything else in the same pipeline.
Can I stream the conversion output?
MarkItDown does not support streaming output — the convert() call blocks until the full document is converted and returns the complete result. For large documents this can take several seconds, especially for multi-hundred-page PDFs. If you need non-blocking behavior in an async pipeline, wrap the conversion in asyncio.run_in_executor() to run it in a thread pool and await the result without blocking your event loop.
Can I add a custom converter for a format MarkItDown does not support?
Yes — MarkItDown has a plugin system. You can register a custom DocumentConverter subclass for any file extension. Implement the convert() method that accepts a file path and returns a DocumentConverterResult, then register it via md.register_converter(MyConverter()). This is useful for proprietary formats specific to your industry — medical records in HL7, CAD files, or internal XML schemas — where you have the parsing logic but need to plug it into the same batch pipeline that handles standard formats.
Conclusion
MarkItDown removes the most painful part of building LLM document pipelines: writing and maintaining a different parser for every file format. A single MarkItDown().convert() call handles PDFs, DOCX, PPTX, XLSX, HTML, CSV, EPUB, and more, returning clean Markdown that LLMs can reason over rather than raw binary or poorly-structured text. The real-life example above gives you a complete RAG corpus preparer that you can extend — add an embedding step, plug in a vector store, or swap in a different chunking strategy depending on your document types.
The next step is to test it on your actual document set. Run the batch converter, inspect the output Markdown for any formatting issues specific to your files, and tune the chunk size to match your embedding model’s token limit. For OCR-heavy or audio transcription pipelines, explore the optional llm_client parameter to unlock MarkItDown’s full feature set.
Forgot to close the file? Welcome to the leak club.
Frequently Asked Questions
How do I read a text file in Python?
Use open('file.txt', 'r') with a with statement: with open('file.txt') as f: content = f.read(). This reads the entire file and automatically closes it. Use f.readlines() to get a list of lines instead.
What is the difference between read(), readline(), and readlines()?
read() returns the entire file as a single string. readline() reads one line at a time. readlines() returns a list of all lines. For large files, iterating with for line in f: is the most memory-efficient approach.
How do I write to a file in Python?
Use open('file.txt', 'w') to write (overwrites existing content) or 'a' to append. Write with f.write('text') or f.writelines(list_of_strings). Always use a with statement to ensure the file is properly closed.
What encoding should I use when reading text files?
Use encoding='utf-8' for most modern text files. UTF-8 handles international characters and is the default on most systems. For legacy files, you may need 'latin-1' or 'cp1252'.
How do I handle file not found errors in Python?
Use a try/except block catching FileNotFoundError. Alternatively, check if the file exists first with pathlib.Path('file.txt').exists() before attempting to read it.
A config file is a flat file but is used for reading and writing of settings that affect the behaviour of your application. These files can be incredibly useful so that you can put individual settings inside the human editable file and then have the settings read from your application. This helps you configure your application in the way you need without having to change the application code.
Typically the config file is edited by a simple text editor by the user, then the application runs and reads the config file. If there are any changes to the config file, normally (depending how the code is written), the application will then have to be restarted to take on the new settings.
Some of the considerations for using a config file as a “data store” includes:
Setup: There’s no setup that is required for files. You should use one of the config management python libraries that are available to make it easier to manipulate config files.
Volume: Size Small-ish file size (< 5-10mb)
Record access: Does not require to search data within the file to extract just a portion of the records. You would load or save all the data in the file in one go
Data Writes: Applications don’t generally write to a config file, but it can be done. Instead the config file is edited outside in a text editor
Data formats: Normally the data would be a structured record based (such as comma separated value – CSV or tab delimited), or a more complex structure such as what you see in windows based .INI files or JSON format even
Editability: You generally want to allow direct editing of the file by users
Redundancy: There’s no inbuilt redundancy. If there is any failure (data corrupt, the server with the file fails), then you’re out of luck. You need to setup your own mechanisms (e.g. replicate file to another server automatically)
Written by Pubs
Python developer and educator with 15+ years building production systems across data engineering, web APIs, and AI tooling. Founder of Python How To Program — 270+ in-depth tutorials covering the modern Python stack.
Code examples to read and write from config file using ConfigParse
Setting up a config file is actually not that much harder than simply creating a constants inside your application. Your main decision will be what type of configuration file format you’d like to use as there are quite a few to choose from. Here are some options and samples:
Example 1: Simple text file which is tab-delimited
You can see a full article on how to read a text file in our “Storing Data in Files in Python” article. The short version of open a tab delimited file is as follows:
Suppose you have a configuration file as follows where each row has two fields which is separated by a tab:
Some explanation may be required on the code though to make it easier to understand. Firstly, the for loop is used to read a record line by line. So each time the for loop iterates, it will read a line into the field rec until the whole file is read.
The following code is a little tricky, but the intent is to take the two columns in the tab delimited file and create a dictionary key value pair.
It first removes the newline character from the end of the line (through rec.strip() )
This will then return a string which is then split with split() by the a tab characters (denoted by ‘\t’)
The result of this is a two filed array which is then created into a tuple format
The tuple is then put in a list and added to list with the [] brackets
The dictionary .update() method is used to finally add they key value pair
Example 2: A properties file with key value pair
If you have a fairly simple configuration needs with just a key-value pair, then a properties type file would work for you where you have <config name> = <config value>. This can be easily loaded as a text file and then the key-value be loaded into a dictionary.
The following code could easily load this configuration:
config = {}
with open('config_data.txt', 'r') as file_hander:
for rec in file_hander:
if rec.startswith('#'): continue
key, value = rec.strip().split('=')
if key: config[key] = value
print( config )
Here the code ignores any comment lines (e.g. the line starts with a ‘#’), and then string-splits the line by the ‘=’ sign. This will then load the dictionary ‘config’
[default]
name = development
host = 192.168.1.1
port = 31
username = admin
password = admin
[database]
name = production
host = 144.101.1.1
You can then read the file with the following simple code:
import configparser
config = configparser.ConfigParser()
#Open the file again to try to read it
config.read('test.ini')
print( config['database'][‘name’] ) #This will output ‘production’
print( config['database'][‘port’] ) #This will output ‘31’. As there is no port under# database the default value will be extracted
Example 4: Reading Config values from a JSON file
With JSON being so popular, this is also another alternative you could use to keep all your config data in. It is very easy to also load.
Assume your config file is as follows: config_data.txt
A config file is a great option if you are looking to store settings for your applications. These are usually loaded at the start of the application and then can be loaded into a dictionary which can then serve as a set of constants which your application can use. This will both avoid the need to hardcode settings and also allow you to change the behaviour of your application without having to touch the code.
You have a folder of PDFs, Word documents, and PowerPoint decks that you need to feed into an LLM pipeline — a RAG system, a document summarizer, or a knowledge base builder. The problem is that LLMs work best with plain text, and most documents are packed with binary formatting, embedded fonts, and layout metadata that the model cannot interpret. Sending a raw PDF to an LLM is like handing someone a ZIP file and asking them to read it.
Microsoft’s markitdown library solves this by converting dozens of file formats — PDF, DOCX, PPTX, XLSX, HTML, CSV, EPUB, images, and audio — into clean Markdown that any LLM can process. It is a single pip install, works from Python code or the command line, and handles the conversion pipeline so your code does not have to. The Markdown output preserves headings, tables, and code blocks in a structured format that models handle especially well.
This article covers everything you need to get documents into your AI pipelines with MarkItDown. You will learn how to install it, convert individual files and entire directories, work with the Python API, handle different file types, and build a real document-processing pipeline that prepares files for a RAG system. By the end you will have a working utility that accepts any folder of mixed-format documents and outputs a structured Markdown dataset ready for embedding.
MarkItDown: Quick Example
Before diving into the details, here is the fastest path from a file to Markdown text you can feed into an LLM. This example converts an HTML page to Markdown in four lines of Python.
# quick_markitdown.py
from markitdown import MarkItDown
md = MarkItDown()
result = md.convert("https://example.com")
print(result.text_content[:500])
Output:
Example Domain
==============
This domain is for use in illustrative examples in documents. You may use this
domain in literature without prior coordination or asking for permission.
[More information...](https://www.iana.org/domains/reserved)
The MarkItDown() constructor creates a converter instance, and convert() accepts a file path, a URL, or a file-like object. The result is a DocumentConverterResult object — result.text_content holds the clean Markdown string ready to pass into any LLM or text processing pipeline.
The real power emerges when you need to handle PDFs, Office files, and mixed directories at scale. The sections below cover all of that, starting with installation.
What Is MarkItDown and Why Use It?
MarkItDown is an open-source Python library from Microsoft that acts as a universal document-to-Markdown converter. Think of it as a universal adapter — on one end you plug in a document in almost any format, and on the other end you get clean, structured Markdown text. The library was built specifically with LLM use cases in mind: the Markdown output is structured in a way that helps models understand document hierarchy (headings, tables, code blocks) rather than receiving a flat blob of text.
The key difference from alternatives like pypdf2 or python-docx is breadth and consistency. Those libraries require a different API for each format, handle only one format each, and return raw extracted text with no structure. MarkItDown gives you one API that handles all formats and preserves semantic structure as Markdown.
Format
MarkItDown
pypdf2 / python-docx / openpyxl
PDF
Yes
pypdf2 only
DOCX
Yes
python-docx only
PPTX
Yes
python-pptx only
XLSX
Yes
openpyxl only
HTML / URL
Yes
No
EPUB
Yes
No
CSV / JSON
Yes
No
Images (OCR)
Yes (optional)
No
Audio (transcription)
Yes (optional)
No
Unified output format
Markdown
Raw text / format-specific objects
The optional image OCR and audio transcription require extra dependencies (and an LLM API key for the best results), but the core document converters — PDF, Office, HTML — work completely offline with no API key required. That makes MarkItDown an excellent fit for any pipeline where you control the infrastructure.
Installing MarkItDown
MarkItDown is on PyPI. A basic install that handles PDFs, Office documents, and HTML covers most use cases and has minimal dependencies.
# Install the base package
pip install markitdown
# For PDF support (pdfminer.six is included in most installs)
pip install markitdown[pdf]
# For all optional extras (OCR, audio, Azure Document Intelligence)
pip install markitdown[all]
The [pdf] extra pulls in pdfminer.six for text-based PDF extraction. If you need image OCR within PDFs, you will also need an LLM plugin (covered in the advanced section). For most document-to-Markdown pipelines the base install is all you need — it handles DOCX, PPTX, XLSX, HTML, CSV, JSON, and EPUB without any extras.
One API to rule them all. Finally.
Converting Files, URLs, and Streams
The MarkItDown class is the main entry point. It auto-detects the file format based on extension or MIME type, so you call the same method regardless of what you are converting.
Converting a Local File
Pass any local file path as a string. MarkItDown detects the format automatically and returns a DocumentConverterResult.
# convert_file.py
from markitdown import MarkItDown
md = MarkItDown()
# Convert a DOCX file
result = md.convert("report.docx")
print(f"Title: {result.title}")
print(f"Characters: {len(result.text_content)}")
print()
print(result.text_content[:300])
Output:
Title: Q3 Sales Report
Characters: 4821
# Q3 Sales Report
**Prepared by:** Finance Team
**Date:** September 30, 2025
## Executive Summary
Revenue grew 12% year-over-year driven by the enterprise segment...
The result.title property extracts the document title from metadata where available (DOCX, PDF). The text_content property always holds the full Markdown string. Notice that the headings from the Word document are preserved as Markdown heading levels — this is exactly the structural information that LLMs use to understand document hierarchy.
Converting a URL
Pass a URL string and MarkItDown fetches the page and converts the HTML to Markdown. This works especially well for documentation pages, Wikipedia articles, and any page with semantic HTML structure.
# convert_url.py
from markitdown import MarkItDown
md = MarkItDown()
result = md.convert("https://docs.python.org/3/library/json.html")
print(result.text_content[:600])
Output:
json --- JSON encoder and decoder
=================================
**Source code:** [Lib/json/__init__.py](https://github.com/python/cpython/tree/3.13/Lib/json/__init__.py)
JSON (JavaScript Object Notation), specified by [RFC 7159](https://datatracker.ietf.org/doc/html/rfc7159.html)...
## json.dumps(obj, *, skipkeys=False, ...)
Serialize obj to a JSON formatted str...
Navigation menus, footers, and sidebars are typically stripped out, leaving the actual content. This makes URL conversion a fast way to pull documentation into a RAG corpus without building a custom scraper for every site.
Converting from a File-Like Object
When you receive a file as bytes (from an API response, an email attachment, or a web upload), you can convert it directly from a BytesIO object without writing it to disk first.
# convert_stream.py
import io
from markitdown import MarkItDown
import requests
md = MarkItDown()
# Download a PDF into memory and convert without saving to disk
response = requests.get("https://www.w3.org/WAI/WCAG21/wcag21.pdf")
pdf_stream = io.BytesIO(response.content)
# Must pass extension hint when using streams -- no filename to detect from
result = md.convert(pdf_stream, file_extension=".pdf")
print(f"Converted {len(result.text_content)} characters from in-memory PDF")
print(result.text_content[:400])
Output:
Converted 87432 characters from in-memory PDF
Web Content Accessibility Guidelines (WCAG) 2.1
================================================
W3C Recommendation 05 June 2018
Abstract
--------
Web Content Accessibility Guidelines (WCAG) 2.1 covers a wide range of...
The file_extension parameter is required when passing a stream because there is no filename to inspect. Always include it for streams to ensure the correct converter is selected.
BytesIO: no temp files, no disk I/O, no drama.
Format-Specific Conversion Options
Most formats work out of the box, but a few have options worth knowing about. PowerPoint files get per-slide conversion, Excel files convert to Markdown tables, and PDFs expose page-level control.
Excel and CSV to Markdown Tables
Excel sheets are converted to Markdown tables — one table per worksheet. This is particularly useful when feeding structured data to LLMs that need to reason about tabular information.
# convert_excel.py
from markitdown import MarkItDown
md = MarkItDown()
result = md.convert("sales_data.xlsx")
print(result.text_content)
Output (example with a two-sheet workbook):
## Sheet1
| Month | Revenue | Units |
|-------|---------|-------|
| Jan | 84000 | 420 |
| Feb | 91200 | 456 |
| Mar | 78500 | 392 |
## Sheet2
| Region | Manager | Target |
|--------|---------|--------|
| East | Alice | 100000 |
| West | Bob | 95000 |
Each worksheet becomes an H2 section followed by a Markdown table. LLMs handle this format well for question-answering tasks — the model can identify column headers, filter by region, and compute simple aggregations when the data is in this structured Markdown table format rather than raw CSV text.
PowerPoint Slide Extraction
PPTX files are converted slide by slide. Each slide becomes a section with its title as a heading and the body text extracted below it. Speaker notes are included when present.
# convert_pptx.py
from markitdown import MarkItDown
md = MarkItDown()
result = md.convert("product_roadmap.pptx")
# Show first 500 chars to see the structure
print(result.text_content[:500])
Output:
## Slide 1: Product Roadmap 2026
Vision: Ship the AI-native workflow layer by Q3.
- Q1: Core infrastructure and auth
- Q2: Integration layer + partner APIs
- Q3: Public launch
- Q4: Enterprise tier
**Notes:** Emphasize the partnership angle -- this is key differentiator vs competitors.
## Slide 2: Q1 Milestones
- Authentication service -- 95% complete
- Database migration -- in progress
...
Speaker notes appear as bold “Notes:” blocks after each slide’s content. For meeting-notes pipelines or sales-deck summarizers this is especially useful — you get the full context that the presenter intended to convey, not just the bullet points on the slide.
Speaker notes included. Your LLM finally hears what the presenter was thinking.
Batch Converting a Directory
Real pipelines rarely deal with a single file. Here is a pattern to convert every supported file in a directory, log any failures, and save all results to a single Markdown file for easy embedding.
# batch_convert.py
import os
from pathlib import Path
from markitdown import MarkItDown
SUPPORTED = {".pdf", ".docx", ".pptx", ".xlsx", ".html", ".csv", ".json", ".epub"}
def batch_convert(input_dir: str, output_path: str) -> dict:
"""Convert all supported files in input_dir to a single Markdown file."""
md = MarkItDown()
results = {"success": [], "failed": []}
output_parts = []
for fpath in sorted(Path(input_dir).rglob("*")):
if fpath.suffix.lower() not in SUPPORTED:
continue
print(f"Converting: {fpath.name}")
try:
result = md.convert(str(fpath))
# Separate each document with a clear section header
section = f"\n\n---\n## Document: {fpath.name}\n\n{result.text_content}"
output_parts.append(section)
results["success"].append(str(fpath))
except Exception as exc:
print(f" FAILED: {exc}")
results["failed"].append({"file": str(fpath), "error": str(exc)})
with open(output_path, "w", encoding="utf-8") as f:
f.write("# Document Corpus\n")
f.write(f"Converted {len(results['success'])} documents.\n")
f.write("".join(output_parts))
return results
if __name__ == "__main__":
stats = batch_convert("./docs", "corpus.md")
print(f"\nDone: {len(stats['success'])} converted, {len(stats['failed'])} failed")
Output:
Converting: annual_report.pdf
Converting: onboarding.docx
Converting: roadmap.pptx
Converting: q3_data.xlsx
FAILED: File appears to be encrypted
Done: 3 converted, 1 failed
The try/except around each conversion is essential — encrypted PDFs, corrupted files, or unsupported subtypes will raise exceptions rather than silently producing empty output. The pattern above logs the failure and continues with the rest of the batch, which is the right behavior for any automated pipeline. The output corpus.md contains all documents separated by clear section dividers that chunk-based RAG systems can split on.
Using MarkItDown with LLM Pipelines
The most common use case is feeding converted documents into an LLM. Here is how to wire MarkItDown into an OpenAI-compatible pipeline for a simple document Q&A pattern.
# doc_qa.py
from markitdown import MarkItDown
from openai import OpenAI
def answer_from_document(file_path: str, question: str, api_key: str) -> str:
"""Convert a document to Markdown and answer a question about it."""
md = MarkItDown()
result = md.convert(file_path)
doc_text = result.text_content
# Truncate if the document exceeds a safe context window size
max_chars = 80000 # ~20K tokens for most models
if len(doc_text) > max_chars:
doc_text = doc_text[:max_chars] + "\n\n[Document truncated...]"
client = OpenAI(api_key=api_key)
response = client.chat.completions.create(
model="gpt-4o-mini",
messages=[
{
"role": "system",
"content": "You are a document analyst. Answer questions based only on the provided document.",
},
{
"role": "user",
"content": f"Document:\n\n{doc_text}\n\nQuestion: {question}",
},
],
)
return response.choices[0].message.content
# Example usage
answer = answer_from_document(
"contract.pdf",
"What is the termination clause?",
api_key="your-openai-api-key"
)
print(answer)
Output:
Section 12.3 of the contract states that either party may terminate this agreement
with 30 days written notice. Termination for cause requires only 5 business days
notice and must be accompanied by written documentation of the breach.
This pattern works with any OpenAI-compatible API — swap the base URL and API key for Anthropic, Gemini, or a local Ollama endpoint and the pattern is identical. The key insight is that MarkItDown’s Markdown output is substantially better context than raw extracted text because the model can use heading levels and table structure to locate specific sections of long documents.
Raw PDF to LLM: garbled. Markdown to LLM: actually works.
Real-Life Example: Building a Document Corpus Preparer for RAG
This project ties together everything from this article. It accepts a folder of mixed-format documents, converts all of them to Markdown, chunks the output into LLM-ready segments, and saves a JSON file that a vector database like Chroma or Pinecone can ingest directly.
# rag_preparer.py
import json
import os
from pathlib import Path
from markitdown import MarkItDown
SUPPORTED = {".pdf", ".docx", ".pptx", ".xlsx", ".html", ".csv", ".epub"}
CHUNK_SIZE = 1500 # characters per chunk (~375 tokens)
CHUNK_OVERLAP = 150 # overlap so context is not lost at boundaries
def chunk_text(text: str, size: int = CHUNK_SIZE, overlap: int = CHUNK_OVERLAP) -> list:
"""Split text into overlapping chunks."""
chunks = []
start = 0
while start < len(text):
end = start + size
chunk = text[start:end]
# Try to end on a paragraph boundary
boundary = chunk.rfind("\n\n")
if boundary > size // 2:
chunk = chunk[:boundary]
chunks.append(chunk.strip())
start += len(chunk) - overlap
return [c for c in chunks if len(c) > 50] # drop tiny trailing chunks
def prepare_rag_corpus(docs_dir: str, output_path: str) -> None:
md = MarkItDown()
corpus = []
chunk_id = 0
for fpath in sorted(Path(docs_dir).rglob("*")):
if fpath.suffix.lower() not in SUPPORTED:
continue
print(f"Processing: {fpath.name}")
try:
result = md.convert(str(fpath))
chunks = chunk_text(result.text_content)
for i, chunk in enumerate(chunks):
corpus.append({
"id": f"chunk_{chunk_id:05d}",
"source_file": fpath.name,
"source_title": result.title or fpath.stem,
"chunk_index": i,
"total_chunks": len(chunks),
"text": chunk,
})
chunk_id += 1
print(f" -> {len(chunks)} chunks")
except Exception as exc:
print(f" FAILED: {exc}")
with open(output_path, "w", encoding="utf-8") as f:
json.dump(corpus, f, indent=2, ensure_ascii=False)
print(f"\nCorpus saved: {len(corpus)} chunks from {chunk_id} total across all docs")
print(f"Output: {output_path}")
if __name__ == "__main__":
prepare_rag_corpus("./knowledge_base", "rag_corpus.json")
Output:
Processing: company_handbook.pdf
-> 47 chunks
Processing: product_specs.docx
-> 18 chunks
Processing: roadmap_2026.pptx
-> 9 chunks
Processing: pricing.xlsx
-> 3 chunks
Corpus saved: 77 chunks from 77 total across all docs
Output: rag_corpus.json
The output rag_corpus.json is ready to embed. Each chunk carries its source file and title as metadata, so your vector database can filter by document when answering queries that should be scoped to a specific source. The overlapping chunks prevent context loss at boundaries — a sentence that straddles a chunk boundary will appear in both adjacent chunks, so the model always sees complete context around any retrieved passage. To extend this project, add an embedding step using sentence-transformers or the OpenAI Embeddings API and pipe the corpus directly into your vector store of choice.
Frequently Asked Questions
Can MarkItDown convert password-protected PDFs?
No — password-protected PDFs raise an exception during conversion because the underlying pdfminer.six library cannot read encrypted content without the password. You will see a PDFPasswordIncorrect or PDFEncryptionError. The fix is to pre-decrypt the PDF before conversion using a library like pikepdf: open with the password and save a decrypted copy, then convert the decrypted file. Always wrap conversion in try/except in batch pipelines so a single locked file does not abort the entire run.
Does MarkItDown extract images from PDFs?
With the base install, MarkItDown extracts text from PDFs but skips embedded images. If your PDFs are scanned documents (images of text, not actual text layers), the base converter will return little or no content. For scanned PDFs you need to add an LLM plugin — MarkItDown supports Azure Document Intelligence and OpenAI Vision as optional backends that can OCR images within documents. Pass an llm_client and llm_model to the MarkItDown constructor to enable this. The optional dependency install is pip install markitdown[all].
How should I handle very large documents?
For documents that produce more than 100,000 characters of Markdown, pass the whole text to an LLM in a single call only if your model supports a large context window (128K+). Otherwise, use the chunking pattern from the real-life example above — split the Markdown at paragraph boundaries with a 10% overlap and embed the chunks rather than the whole document. MarkItDown itself handles arbitrarily large files without issue; the bottleneck is always the downstream LLM context window, not the conversion step.
How well does MarkItDown handle complex tables?
Simple flat tables — with consistent column counts and no merged cells — convert reliably to Markdown tables. Complex tables with merged headers, multi-row cells, or heavily styled cells may produce irregular Markdown. Excel files generally convert better than Word or PDF tables because the underlying data is already structured. If you find table output unreliable for a specific document type, consider using openpyxl or python-docx for that format and MarkItDown for everything else in the same pipeline.
Can I stream the conversion output?
MarkItDown does not support streaming output — the convert() call blocks until the full document is converted and returns the complete result. For large documents this can take several seconds, especially for multi-hundred-page PDFs. If you need non-blocking behavior in an async pipeline, wrap the conversion in asyncio.run_in_executor() to run it in a thread pool and await the result without blocking your event loop.
Can I add a custom converter for a format MarkItDown does not support?
Yes — MarkItDown has a plugin system. You can register a custom DocumentConverter subclass for any file extension. Implement the convert() method that accepts a file path and returns a DocumentConverterResult, then register it via md.register_converter(MyConverter()). This is useful for proprietary formats specific to your industry — medical records in HL7, CAD files, or internal XML schemas — where you have the parsing logic but need to plug it into the same batch pipeline that handles standard formats.
Conclusion
MarkItDown removes the most painful part of building LLM document pipelines: writing and maintaining a different parser for every file format. A single MarkItDown().convert() call handles PDFs, DOCX, PPTX, XLSX, HTML, CSV, EPUB, and more, returning clean Markdown that LLMs can reason over rather than raw binary or poorly-structured text. The real-life example above gives you a complete RAG corpus preparer that you can extend — add an embedding step, plug in a vector store, or swap in a different chunking strategy depending on your document types.
The next step is to test it on your actual document set. Run the batch converter, inspect the output Markdown for any formatting issues specific to your files, and tune the chunk size to match your embedding model’s token limit. For OCR-heavy or audio transcription pipelines, explore the optional llm_client parameter to unlock MarkItDown’s full feature set.
For simple key-value settings, use INI files with ConfigParser. For nested data, use JSON or TOML. For environment-specific settings, use .env files with python-dotenv. The best choice depends on your complexity needs and whether non-developers will edit the settings.
How do I create a config file in Python?
Use ConfigParser to create INI files: instantiate the parser, add sections and key-value pairs with config['section'] = {'key': 'value'}, then write with config.write(open('config.ini', 'w')). For JSON, use json.dump().
Should I use environment variables or config files?
Use environment variables for sensitive data (API keys, passwords) and deployment-specific settings. Use config files for application-level settings that rarely change. Many projects combine both: a config file for defaults and environment variables for overrides and secrets.
How do I prevent config files from being committed to Git?
Add your config file names to .gitignore (e.g., config.ini, .env). Provide a config.example.ini template in the repository so other developers know what settings are needed without exposing actual values.
Can I use YAML for Python configuration files?
Yes. Install PyYAML with pip install pyyaml and use yaml.safe_load() to read YAML files. YAML supports nested structures, lists, and comments, making it more expressive than INI. However, it is not part of Python’s standard library.
Importing modules or packages (in other languages this would be referred to as libraries) is a fundamental aspect of the language which makes it so useful. As of this writing, the most popular python package library, pypi.org, has over 300k packages to import. This isn’t just important for importing of external packages. It also becomes a must when your own project becomes quite large. You need to make sure you can split your code into manageable logical chunks which can talk to each other. This is what this article is all about.
Written by Pubs
Python developer and educator with 15+ years building production systems across data engineering, web APIs, and AI tooling. Founder of Python How To Program — 270+ in-depth tutorials covering the modern Python stack.
What’s the difference between a python package vs module
First, some terminology. A module, is a single python file (still with a .py extension) that contains some code which you can import. While a package, is a collection of files. In your project, a package is all the files in a given directory and where the directory also contains the file __init__.py to signal that this is a package.
What happens when you import a python module
There is nothing special in fact you need to do to make a module – all python files are by default a module and can be imported. When a file is imported, all the code does get processed – e.g. if there’s any code to be executed it will run.
See following example. Suppose we have the following relationship:
We have main_file.py importing two modules
Code as follows:
#module1.py
print("module1: I'm in module 1 root section")
def output_hw():
print("module1: Hello world - output_hw 1")
#module2.py
import module1
print("module2: I'm in root section of module 2")
def output_hw():
print("module2: Hello world - output_hw 2")
#main_file.py
print("main_file: starting code")
import module1
import module2
print("main_file: I'm in the root section ")
if __name__ == '__main__':
print("main_file: ******* starting __main__ section")
module1.output_hw()
module2.output_hw()
print("main_file: Main file done!")
Output:
So what’s happening here:
The main_file.py gets executed first and then imports module1 then module2
As part of importing module1, it executes all the code including the print statements in the root part of the code. Similarly for module2
Then the code returns to the main_file where it calls the functions under module1 and module2.
Please note, that both module1 and module2 have the same function name of output_hw(). This is perfectly fine as the scope of the function is in different modules.
One additional item to note, is that the module2 also imports module1. However, the print statement in the root section print("module1: I'm in module 1 root section") did not get executed the second time. Why? Python only imports a given module once.
Now let’s make a slight change – let’s remove the references to module1 in the main_file, and in module2, import module1!
Now import module1 from module2
The updated code looks like this:
#module1.py
print("module1: I'm in module 1 root section")
def output_hw():
print("module1: Hello world - output_hw 1")
#module2.py
import module1
print("module2: I'm in root section of module 2")
def output_hw():
print("module2: Hello world - output_hw 2")
#main_file.py
print("main_file: starting code")
# import module1
import module2
print("main_file: I'm in the root section ")
if __name__ == '__main__':
print("main_file: ******* starting __main__ section")
module2.output_hw()
# module2.output_hw()
print("main_file: Main file done!")
Output:
Now notice that module1 gets imported and executed from module2. Notice that the first line is “module1: I’m in module 1 root section” since the very first line of module2 is to import module1!
How do you make a package in your python project
To create a package it’s fairly straightforward. You simply need to move all your files into a directory and then create a file called __init__.py.
This means your directory structure looks like this:
#module1.py
print("module1: I'm in module 1 root section")
def output_hw():
print("module1: Hello world - output_hw 1")
#module2.py
import package1.module1
print("module2: I'm in root section of module 2")
def output_hw():
print("module2: Hello world - output_hw 2")
#main_file.py
print("main_file: starting code")
import package
print("main_file: I'm in the root section ")
if __name__ == '__main__':
print("main_file: ******* starting __main__ section")
package1.module1.output_hw()
package1.module2.output_hw()
print("main_file: Main file done!")
So in the __init__.py file, it imports module1 & module2. The reason this is important is because so that when in main_file the package1 is imported, then it will have immediate access to module1 and module2. This is why the package1.module1 and package1.module2 works.
You cannot make the inclusion of modules automatic, and generally you shouldn’t as you may have name clashes which you can avoid if you do this manually.
Can you avoid typing the prefix of “package1” each time? Yes in fact if you use the “from”. See next section.
Only Import a part of a module
You can also import just either a class or a function of a given module if you prefer in order to limit what is accessible in your local code. However, it does still execute your whole module though. It is more a means to make your code much more readable. See the following example:
#module1.py
print("module1: I'm in module 1 root section")
def output_hw():
print("module1: Hello world - output_hw 1")
#main_file.py
print("main_file: starting code")
from module1 import output_hw
print("main_file: I'm in the root section ")
if __name__ == '__main__':
print("main_file: ******* starting __main__ section")
output_hw()
print("main_file: Main file done!")
Output
As can be seen in the above output, although just the output_hw() function is being imported, the statement “module1: Im in module1 root section” was still executed.
Note also, that you do not need to mention the module prefix in the code, you can just refer to the function as is.
So back to above, for the packages, instead of the following:
import package1.module1
you can instead use the “from” keyword but force to check local directory:
from .module1 import *
There’s a few things going on here. The '.' in front of module1 is referring to the current directory. If you wanted to check the parent directory then you can use two '.'s so the line looks like this: from ..module1 import *. The second item is that everything is being imported with the import * section.
Importing a module and applying an alias
In case you wanted to make your code easier to read, or you wanted to avoid any name clashes (see at the start of the article how module1 and module2 both had the same function name of output_hw() ), you can use the “as” keyword at the import statement to give an alternative name.
You can do the following:
#main_file.py
print("main_file: starting code")
from module1 import output_hw as module1__output_hw
print("main_file: I'm in the root section ")
if __name__ == '__main__':
print("main_file: ******* starting __main__ section")
module1__output_hw()
print("main_file: Main file done!")
This can also be done with the module or package name as well, i.e.
import module1 as mod1
Importing modules outside your project folder
Modules can by default be imported from the sub-directories up to the main script file. So the following works:
To resolve this, you can in fact tell python where to look. Python keeps track of all the directories to search for modules under sys.path folder. Hence, the solution is to add an entry for the parent directory. Namely:
import sys
sys.path.append("..")
So the full code looks like the following:
#main_file.py
import sys
sys.path.append("..")
print("main_file: starting code")
import package1
print("main_file: I'm in the root section ")
if __name__ == '__main__':
print("main_file: ******* starting __main__ section")
package1.module1.output_hw()
print("main_file: Main file done!")
#module1.py
from package2.pkg2_mod_a import get_main_list
from server_key import get_server_master_key
def output_hw():
print("module1: List from pkg2 module A:" + str( get_main_list()) )
print("module1: server key :" + get_server_master_key() )
All of the above is when you know exactly what the module name to import. However, what if you don’t know the module name until runtime?
This is where you can use the __import__ and the getattr functions to achieve this.
Firstly the getattr(). This function is used to in fact load an object dynamically where you can specify the object name in a string, or provide a default.
Secondly, the __import__() can be used to provide a module name as a string.
When you combine the two together, you first load the module with __import__, and then use getattr to load the actual function you want to call or class you want to load from the import.
#module1.py
def output_hw():
print("module1: take me to a funky town")
#main_file.py
if __name__ == '__main__':
print("main_file: ******* starting __main__ section")
module = __import__( 'package1.module1')
func = getattr( module, 'output_hw', None)
if func:
func()
print("main_file: Main file done!")
In the above code, we first load the module called “package1.module1” which only loads the module. Then the getattr is called on the module and then the function is passed as a string. You can also pass in a class name if you wish.
Conclusion
There are many ways to import files and to organize your projects into smaller chunks. The most difficult piece is to decide what parts of your code go where..
Get notified automatically of new articles
We are always here to help provide useful articles with usable ode snippets. Sign up to our newsletter and receive articles in your inbox automatically so you won’t miss out on the next useful tips.
You have a folder of PDFs, Word documents, and PowerPoint decks that you need to feed into an LLM pipeline — a RAG system, a document summarizer, or a knowledge base builder. The problem is that LLMs work best with plain text, and most documents are packed with binary formatting, embedded fonts, and layout metadata that the model cannot interpret. Sending a raw PDF to an LLM is like handing someone a ZIP file and asking them to read it.
Microsoft’s markitdown library solves this by converting dozens of file formats — PDF, DOCX, PPTX, XLSX, HTML, CSV, EPUB, images, and audio — into clean Markdown that any LLM can process. It is a single pip install, works from Python code or the command line, and handles the conversion pipeline so your code does not have to. The Markdown output preserves headings, tables, and code blocks in a structured format that models handle especially well.
This article covers everything you need to get documents into your AI pipelines with MarkItDown. You will learn how to install it, convert individual files and entire directories, work with the Python API, handle different file types, and build a real document-processing pipeline that prepares files for a RAG system. By the end you will have a working utility that accepts any folder of mixed-format documents and outputs a structured Markdown dataset ready for embedding.
MarkItDown: Quick Example
Before diving into the details, here is the fastest path from a file to Markdown text you can feed into an LLM. This example converts an HTML page to Markdown in four lines of Python.
# quick_markitdown.py
from markitdown import MarkItDown
md = MarkItDown()
result = md.convert("https://example.com")
print(result.text_content[:500])
Output:
Example Domain
==============
This domain is for use in illustrative examples in documents. You may use this
domain in literature without prior coordination or asking for permission.
[More information...](https://www.iana.org/domains/reserved)
The MarkItDown() constructor creates a converter instance, and convert() accepts a file path, a URL, or a file-like object. The result is a DocumentConverterResult object — result.text_content holds the clean Markdown string ready to pass into any LLM or text processing pipeline.
The real power emerges when you need to handle PDFs, Office files, and mixed directories at scale. The sections below cover all of that, starting with installation.
What Is MarkItDown and Why Use It?
MarkItDown is an open-source Python library from Microsoft that acts as a universal document-to-Markdown converter. Think of it as a universal adapter — on one end you plug in a document in almost any format, and on the other end you get clean, structured Markdown text. The library was built specifically with LLM use cases in mind: the Markdown output is structured in a way that helps models understand document hierarchy (headings, tables, code blocks) rather than receiving a flat blob of text.
The key difference from alternatives like pypdf2 or python-docx is breadth and consistency. Those libraries require a different API for each format, handle only one format each, and return raw extracted text with no structure. MarkItDown gives you one API that handles all formats and preserves semantic structure as Markdown.
Format
MarkItDown
pypdf2 / python-docx / openpyxl
PDF
Yes
pypdf2 only
DOCX
Yes
python-docx only
PPTX
Yes
python-pptx only
XLSX
Yes
openpyxl only
HTML / URL
Yes
No
EPUB
Yes
No
CSV / JSON
Yes
No
Images (OCR)
Yes (optional)
No
Audio (transcription)
Yes (optional)
No
Unified output format
Markdown
Raw text / format-specific objects
The optional image OCR and audio transcription require extra dependencies (and an LLM API key for the best results), but the core document converters — PDF, Office, HTML — work completely offline with no API key required. That makes MarkItDown an excellent fit for any pipeline where you control the infrastructure.
Installing MarkItDown
MarkItDown is on PyPI. A basic install that handles PDFs, Office documents, and HTML covers most use cases and has minimal dependencies.
# Install the base package
pip install markitdown
# For PDF support (pdfminer.six is included in most installs)
pip install markitdown[pdf]
# For all optional extras (OCR, audio, Azure Document Intelligence)
pip install markitdown[all]
The [pdf] extra pulls in pdfminer.six for text-based PDF extraction. If you need image OCR within PDFs, you will also need an LLM plugin (covered in the advanced section). For most document-to-Markdown pipelines the base install is all you need — it handles DOCX, PPTX, XLSX, HTML, CSV, JSON, and EPUB without any extras.
One API to rule them all. Finally.
Converting Files, URLs, and Streams
The MarkItDown class is the main entry point. It auto-detects the file format based on extension or MIME type, so you call the same method regardless of what you are converting.
Converting a Local File
Pass any local file path as a string. MarkItDown detects the format automatically and returns a DocumentConverterResult.
# convert_file.py
from markitdown import MarkItDown
md = MarkItDown()
# Convert a DOCX file
result = md.convert("report.docx")
print(f"Title: {result.title}")
print(f"Characters: {len(result.text_content)}")
print()
print(result.text_content[:300])
Output:
Title: Q3 Sales Report
Characters: 4821
# Q3 Sales Report
**Prepared by:** Finance Team
**Date:** September 30, 2025
## Executive Summary
Revenue grew 12% year-over-year driven by the enterprise segment...
The result.title property extracts the document title from metadata where available (DOCX, PDF). The text_content property always holds the full Markdown string. Notice that the headings from the Word document are preserved as Markdown heading levels — this is exactly the structural information that LLMs use to understand document hierarchy.
Converting a URL
Pass a URL string and MarkItDown fetches the page and converts the HTML to Markdown. This works especially well for documentation pages, Wikipedia articles, and any page with semantic HTML structure.
# convert_url.py
from markitdown import MarkItDown
md = MarkItDown()
result = md.convert("https://docs.python.org/3/library/json.html")
print(result.text_content[:600])
Output:
json --- JSON encoder and decoder
=================================
**Source code:** [Lib/json/__init__.py](https://github.com/python/cpython/tree/3.13/Lib/json/__init__.py)
JSON (JavaScript Object Notation), specified by [RFC 7159](https://datatracker.ietf.org/doc/html/rfc7159.html)...
## json.dumps(obj, *, skipkeys=False, ...)
Serialize obj to a JSON formatted str...
Navigation menus, footers, and sidebars are typically stripped out, leaving the actual content. This makes URL conversion a fast way to pull documentation into a RAG corpus without building a custom scraper for every site.
Converting from a File-Like Object
When you receive a file as bytes (from an API response, an email attachment, or a web upload), you can convert it directly from a BytesIO object without writing it to disk first.
# convert_stream.py
import io
from markitdown import MarkItDown
import requests
md = MarkItDown()
# Download a PDF into memory and convert without saving to disk
response = requests.get("https://www.w3.org/WAI/WCAG21/wcag21.pdf")
pdf_stream = io.BytesIO(response.content)
# Must pass extension hint when using streams -- no filename to detect from
result = md.convert(pdf_stream, file_extension=".pdf")
print(f"Converted {len(result.text_content)} characters from in-memory PDF")
print(result.text_content[:400])
Output:
Converted 87432 characters from in-memory PDF
Web Content Accessibility Guidelines (WCAG) 2.1
================================================
W3C Recommendation 05 June 2018
Abstract
--------
Web Content Accessibility Guidelines (WCAG) 2.1 covers a wide range of...
The file_extension parameter is required when passing a stream because there is no filename to inspect. Always include it for streams to ensure the correct converter is selected.
BytesIO: no temp files, no disk I/O, no drama.
Format-Specific Conversion Options
Most formats work out of the box, but a few have options worth knowing about. PowerPoint files get per-slide conversion, Excel files convert to Markdown tables, and PDFs expose page-level control.
Excel and CSV to Markdown Tables
Excel sheets are converted to Markdown tables — one table per worksheet. This is particularly useful when feeding structured data to LLMs that need to reason about tabular information.
# convert_excel.py
from markitdown import MarkItDown
md = MarkItDown()
result = md.convert("sales_data.xlsx")
print(result.text_content)
Output (example with a two-sheet workbook):
## Sheet1
| Month | Revenue | Units |
|-------|---------|-------|
| Jan | 84000 | 420 |
| Feb | 91200 | 456 |
| Mar | 78500 | 392 |
## Sheet2
| Region | Manager | Target |
|--------|---------|--------|
| East | Alice | 100000 |
| West | Bob | 95000 |
Each worksheet becomes an H2 section followed by a Markdown table. LLMs handle this format well for question-answering tasks — the model can identify column headers, filter by region, and compute simple aggregations when the data is in this structured Markdown table format rather than raw CSV text.
PowerPoint Slide Extraction
PPTX files are converted slide by slide. Each slide becomes a section with its title as a heading and the body text extracted below it. Speaker notes are included when present.
# convert_pptx.py
from markitdown import MarkItDown
md = MarkItDown()
result = md.convert("product_roadmap.pptx")
# Show first 500 chars to see the structure
print(result.text_content[:500])
Output:
## Slide 1: Product Roadmap 2026
Vision: Ship the AI-native workflow layer by Q3.
- Q1: Core infrastructure and auth
- Q2: Integration layer + partner APIs
- Q3: Public launch
- Q4: Enterprise tier
**Notes:** Emphasize the partnership angle -- this is key differentiator vs competitors.
## Slide 2: Q1 Milestones
- Authentication service -- 95% complete
- Database migration -- in progress
...
Speaker notes appear as bold “Notes:” blocks after each slide’s content. For meeting-notes pipelines or sales-deck summarizers this is especially useful — you get the full context that the presenter intended to convey, not just the bullet points on the slide.
Speaker notes included. Your LLM finally hears what the presenter was thinking.
Batch Converting a Directory
Real pipelines rarely deal with a single file. Here is a pattern to convert every supported file in a directory, log any failures, and save all results to a single Markdown file for easy embedding.
# batch_convert.py
import os
from pathlib import Path
from markitdown import MarkItDown
SUPPORTED = {".pdf", ".docx", ".pptx", ".xlsx", ".html", ".csv", ".json", ".epub"}
def batch_convert(input_dir: str, output_path: str) -> dict:
"""Convert all supported files in input_dir to a single Markdown file."""
md = MarkItDown()
results = {"success": [], "failed": []}
output_parts = []
for fpath in sorted(Path(input_dir).rglob("*")):
if fpath.suffix.lower() not in SUPPORTED:
continue
print(f"Converting: {fpath.name}")
try:
result = md.convert(str(fpath))
# Separate each document with a clear section header
section = f"\n\n---\n## Document: {fpath.name}\n\n{result.text_content}"
output_parts.append(section)
results["success"].append(str(fpath))
except Exception as exc:
print(f" FAILED: {exc}")
results["failed"].append({"file": str(fpath), "error": str(exc)})
with open(output_path, "w", encoding="utf-8") as f:
f.write("# Document Corpus\n")
f.write(f"Converted {len(results['success'])} documents.\n")
f.write("".join(output_parts))
return results
if __name__ == "__main__":
stats = batch_convert("./docs", "corpus.md")
print(f"\nDone: {len(stats['success'])} converted, {len(stats['failed'])} failed")
Output:
Converting: annual_report.pdf
Converting: onboarding.docx
Converting: roadmap.pptx
Converting: q3_data.xlsx
FAILED: File appears to be encrypted
Done: 3 converted, 1 failed
The try/except around each conversion is essential — encrypted PDFs, corrupted files, or unsupported subtypes will raise exceptions rather than silently producing empty output. The pattern above logs the failure and continues with the rest of the batch, which is the right behavior for any automated pipeline. The output corpus.md contains all documents separated by clear section dividers that chunk-based RAG systems can split on.
Using MarkItDown with LLM Pipelines
The most common use case is feeding converted documents into an LLM. Here is how to wire MarkItDown into an OpenAI-compatible pipeline for a simple document Q&A pattern.
# doc_qa.py
from markitdown import MarkItDown
from openai import OpenAI
def answer_from_document(file_path: str, question: str, api_key: str) -> str:
"""Convert a document to Markdown and answer a question about it."""
md = MarkItDown()
result = md.convert(file_path)
doc_text = result.text_content
# Truncate if the document exceeds a safe context window size
max_chars = 80000 # ~20K tokens for most models
if len(doc_text) > max_chars:
doc_text = doc_text[:max_chars] + "\n\n[Document truncated...]"
client = OpenAI(api_key=api_key)
response = client.chat.completions.create(
model="gpt-4o-mini",
messages=[
{
"role": "system",
"content": "You are a document analyst. Answer questions based only on the provided document.",
},
{
"role": "user",
"content": f"Document:\n\n{doc_text}\n\nQuestion: {question}",
},
],
)
return response.choices[0].message.content
# Example usage
answer = answer_from_document(
"contract.pdf",
"What is the termination clause?",
api_key="your-openai-api-key"
)
print(answer)
Output:
Section 12.3 of the contract states that either party may terminate this agreement
with 30 days written notice. Termination for cause requires only 5 business days
notice and must be accompanied by written documentation of the breach.
This pattern works with any OpenAI-compatible API — swap the base URL and API key for Anthropic, Gemini, or a local Ollama endpoint and the pattern is identical. The key insight is that MarkItDown’s Markdown output is substantially better context than raw extracted text because the model can use heading levels and table structure to locate specific sections of long documents.
Raw PDF to LLM: garbled. Markdown to LLM: actually works.
Real-Life Example: Building a Document Corpus Preparer for RAG
This project ties together everything from this article. It accepts a folder of mixed-format documents, converts all of them to Markdown, chunks the output into LLM-ready segments, and saves a JSON file that a vector database like Chroma or Pinecone can ingest directly.
# rag_preparer.py
import json
import os
from pathlib import Path
from markitdown import MarkItDown
SUPPORTED = {".pdf", ".docx", ".pptx", ".xlsx", ".html", ".csv", ".epub"}
CHUNK_SIZE = 1500 # characters per chunk (~375 tokens)
CHUNK_OVERLAP = 150 # overlap so context is not lost at boundaries
def chunk_text(text: str, size: int = CHUNK_SIZE, overlap: int = CHUNK_OVERLAP) -> list:
"""Split text into overlapping chunks."""
chunks = []
start = 0
while start < len(text):
end = start + size
chunk = text[start:end]
# Try to end on a paragraph boundary
boundary = chunk.rfind("\n\n")
if boundary > size // 2:
chunk = chunk[:boundary]
chunks.append(chunk.strip())
start += len(chunk) - overlap
return [c for c in chunks if len(c) > 50] # drop tiny trailing chunks
def prepare_rag_corpus(docs_dir: str, output_path: str) -> None:
md = MarkItDown()
corpus = []
chunk_id = 0
for fpath in sorted(Path(docs_dir).rglob("*")):
if fpath.suffix.lower() not in SUPPORTED:
continue
print(f"Processing: {fpath.name}")
try:
result = md.convert(str(fpath))
chunks = chunk_text(result.text_content)
for i, chunk in enumerate(chunks):
corpus.append({
"id": f"chunk_{chunk_id:05d}",
"source_file": fpath.name,
"source_title": result.title or fpath.stem,
"chunk_index": i,
"total_chunks": len(chunks),
"text": chunk,
})
chunk_id += 1
print(f" -> {len(chunks)} chunks")
except Exception as exc:
print(f" FAILED: {exc}")
with open(output_path, "w", encoding="utf-8") as f:
json.dump(corpus, f, indent=2, ensure_ascii=False)
print(f"\nCorpus saved: {len(corpus)} chunks from {chunk_id} total across all docs")
print(f"Output: {output_path}")
if __name__ == "__main__":
prepare_rag_corpus("./knowledge_base", "rag_corpus.json")
Output:
Processing: company_handbook.pdf
-> 47 chunks
Processing: product_specs.docx
-> 18 chunks
Processing: roadmap_2026.pptx
-> 9 chunks
Processing: pricing.xlsx
-> 3 chunks
Corpus saved: 77 chunks from 77 total across all docs
Output: rag_corpus.json
The output rag_corpus.json is ready to embed. Each chunk carries its source file and title as metadata, so your vector database can filter by document when answering queries that should be scoped to a specific source. The overlapping chunks prevent context loss at boundaries — a sentence that straddles a chunk boundary will appear in both adjacent chunks, so the model always sees complete context around any retrieved passage. To extend this project, add an embedding step using sentence-transformers or the OpenAI Embeddings API and pipe the corpus directly into your vector store of choice.
Frequently Asked Questions
Can MarkItDown convert password-protected PDFs?
No — password-protected PDFs raise an exception during conversion because the underlying pdfminer.six library cannot read encrypted content without the password. You will see a PDFPasswordIncorrect or PDFEncryptionError. The fix is to pre-decrypt the PDF before conversion using a library like pikepdf: open with the password and save a decrypted copy, then convert the decrypted file. Always wrap conversion in try/except in batch pipelines so a single locked file does not abort the entire run.
Does MarkItDown extract images from PDFs?
With the base install, MarkItDown extracts text from PDFs but skips embedded images. If your PDFs are scanned documents (images of text, not actual text layers), the base converter will return little or no content. For scanned PDFs you need to add an LLM plugin — MarkItDown supports Azure Document Intelligence and OpenAI Vision as optional backends that can OCR images within documents. Pass an llm_client and llm_model to the MarkItDown constructor to enable this. The optional dependency install is pip install markitdown[all].
How should I handle very large documents?
For documents that produce more than 100,000 characters of Markdown, pass the whole text to an LLM in a single call only if your model supports a large context window (128K+). Otherwise, use the chunking pattern from the real-life example above — split the Markdown at paragraph boundaries with a 10% overlap and embed the chunks rather than the whole document. MarkItDown itself handles arbitrarily large files without issue; the bottleneck is always the downstream LLM context window, not the conversion step.
How well does MarkItDown handle complex tables?
Simple flat tables — with consistent column counts and no merged cells — convert reliably to Markdown tables. Complex tables with merged headers, multi-row cells, or heavily styled cells may produce irregular Markdown. Excel files generally convert better than Word or PDF tables because the underlying data is already structured. If you find table output unreliable for a specific document type, consider using openpyxl or python-docx for that format and MarkItDown for everything else in the same pipeline.
Can I stream the conversion output?
MarkItDown does not support streaming output — the convert() call blocks until the full document is converted and returns the complete result. For large documents this can take several seconds, especially for multi-hundred-page PDFs. If you need non-blocking behavior in an async pipeline, wrap the conversion in asyncio.run_in_executor() to run it in a thread pool and await the result without blocking your event loop.
Can I add a custom converter for a format MarkItDown does not support?
Yes — MarkItDown has a plugin system. You can register a custom DocumentConverter subclass for any file extension. Implement the convert() method that accepts a file path and returns a DocumentConverterResult, then register it via md.register_converter(MyConverter()). This is useful for proprietary formats specific to your industry — medical records in HL7, CAD files, or internal XML schemas — where you have the parsing logic but need to plug it into the same batch pipeline that handles standard formats.
Conclusion
MarkItDown removes the most painful part of building LLM document pipelines: writing and maintaining a different parser for every file format. A single MarkItDown().convert() call handles PDFs, DOCX, PPTX, XLSX, HTML, CSV, EPUB, and more, returning clean Markdown that LLMs can reason over rather than raw binary or poorly-structured text. The real-life example above gives you a complete RAG corpus preparer that you can extend — add an embedding step, plug in a vector store, or swap in a different chunking strategy depending on your document types.
The next step is to test it on your actual document set. Run the batch converter, inspect the output Markdown for any formatting issues specific to your files, and tune the chunk size to match your embedding model’s token limit. For OCR-heavy or audio transcription pipelines, explore the optional llm_client parameter to unlock MarkItDown’s full feature set.
What is the difference between absolute and relative imports in Python?
Absolute imports use the full package path from the project root (e.g., from mypackage.module import func). Relative imports use dots to reference the current package (e.g., from .module import func). Absolute imports are generally preferred for clarity.
What does __init__.py do in a Python package?
The __init__.py file marks a directory as a Python package, allowing its modules to be imported. It can be empty or contain initialization code, define __all__ for controlling wildcard imports, or re-export symbols for a cleaner public API.
How do I fix ‘ModuleNotFoundError’ in Python?
Check that the module is installed (pip install), verify your PYTHONPATH includes the right directories, ensure __init__.py files exist in package directories, and confirm you are using the correct Python environment. Running from the project root often resolves path issues.
What is the best project structure for a Python application?
A common structure includes a top-level project directory containing a src/ folder with your package, a tests/ folder, setup.py or pyproject.toml, and a requirements.txt. This keeps source code, tests, and configuration clearly separated.
Should I use relative or absolute imports?
PEP 8 recommends absolute imports for most cases because they are more readable and less error-prone. Use relative imports only within a package when the internal structure is unlikely to change and the import path would be excessively long with absolute imports.
Selenium is a useful python library to extract web page data especially for pages with javascript loading. Many of you may have tried to use selenium but may have gotten stuck in the installation process. One key thing you have to remember is that Selenium will run an actual browser in the background (or foreground if you wish) to query a given website. So a key step is to install the driver if you haven’t done so already.
Step 1: Locate the right web driver
Since Selenium will use an actual driver, one of the first decisions you’ll need to make is to determine which driver to use. Generally it won’t matter, but the best browser to use, is the one that works the best for your target website. For example, if your target website works best under Firefox, then use that.
So decide which one, and then go to the download page. For this example we will use FireFox. In the above table, the download link goes to this page: https://github.com/mozilla/geckodriver/releases
You can then click on the latest release:
First, click on the latest release
You can then scroll down to the bottom of the page to see the driver list:
Right click on the .gz file, and then get the URL.
Step 2: Download the web driver
Next go to your linux terminal and create a directory to store this file:
Next go into that directory, and then use wget to download the url by pasting the link you copied above:
Next you should see the .gz file when you list the files:
You can the gzip the file to extract it:
gzip -d geckodriver-v0.29.1-linux32.tar.gz
You can then finally untar the file to decompress:
tar -xvf geckodriver-v0.29.1-linux32.tar
Step 4: Configure PATH
What you will be left with is a file called “geckodriver”. This is the driver file. You will need to have it made available via the export path. The reason is that the selenium looks for the driver file from the PATH operating system environment variable.
I simply went to the parent directory, then updated the PATH environment variable by taking the existing PATH value ($PATH) then appending the gdriver folder:
export PATH=$PATH:gdriver
If you do not do the above, you will get the error:
selenium.common.exceptions.WebDriverException: Message: 'geckodriver' executable needs to be in PATH.
Step 5: Test running the web driver
That’s it! Now if you test the following code, you should be able to run a web query by running a firefox driver in the background:
# main.py
from selenium import webdriver
from selenium.webdriver import FirefoxOptions
opts = FirefoxOptions()
opts.add_argument("--headless")
browser = webdriver.Firefox(options=opts)
# Declare a variable containing the URL is going to be scrapped
URL = 'https://pythonhowtoprogram.com/'
# Web driver going into website
browser.get(URL)
# Printing page title
print(browser.title)
You will notice it does take a few seconds to run for the first time. It’s because that an instance of a browser needs to be loaded which does take a few seconds. Just keep this in mind in case you need to have faster performance for which you may need to use urllib or requests instead.
Written by Pubs
Python developer and educator with 15+ years building production systems across data engineering, web APIs, and AI tooling. Founder of Python How To Program — 270+ in-depth tutorials covering the modern Python stack.
You have a folder of PDFs, Word documents, and PowerPoint decks that you need to feed into an LLM pipeline — a RAG system, a document summarizer, or a knowledge base builder. The problem is that LLMs work best with plain text, and most documents are packed with binary formatting, embedded fonts, and layout metadata that the model cannot interpret. Sending a raw PDF to an LLM is like handing someone a ZIP file and asking them to read it.
Microsoft’s markitdown library solves this by converting dozens of file formats — PDF, DOCX, PPTX, XLSX, HTML, CSV, EPUB, images, and audio — into clean Markdown that any LLM can process. It is a single pip install, works from Python code or the command line, and handles the conversion pipeline so your code does not have to. The Markdown output preserves headings, tables, and code blocks in a structured format that models handle especially well.
This article covers everything you need to get documents into your AI pipelines with MarkItDown. You will learn how to install it, convert individual files and entire directories, work with the Python API, handle different file types, and build a real document-processing pipeline that prepares files for a RAG system. By the end you will have a working utility that accepts any folder of mixed-format documents and outputs a structured Markdown dataset ready for embedding.
MarkItDown: Quick Example
Before diving into the details, here is the fastest path from a file to Markdown text you can feed into an LLM. This example converts an HTML page to Markdown in four lines of Python.
# quick_markitdown.py
from markitdown import MarkItDown
md = MarkItDown()
result = md.convert("https://example.com")
print(result.text_content[:500])
Output:
Example Domain
==============
This domain is for use in illustrative examples in documents. You may use this
domain in literature without prior coordination or asking for permission.
[More information...](https://www.iana.org/domains/reserved)
The MarkItDown() constructor creates a converter instance, and convert() accepts a file path, a URL, or a file-like object. The result is a DocumentConverterResult object — result.text_content holds the clean Markdown string ready to pass into any LLM or text processing pipeline.
The real power emerges when you need to handle PDFs, Office files, and mixed directories at scale. The sections below cover all of that, starting with installation.
What Is MarkItDown and Why Use It?
MarkItDown is an open-source Python library from Microsoft that acts as a universal document-to-Markdown converter. Think of it as a universal adapter — on one end you plug in a document in almost any format, and on the other end you get clean, structured Markdown text. The library was built specifically with LLM use cases in mind: the Markdown output is structured in a way that helps models understand document hierarchy (headings, tables, code blocks) rather than receiving a flat blob of text.
The key difference from alternatives like pypdf2 or python-docx is breadth and consistency. Those libraries require a different API for each format, handle only one format each, and return raw extracted text with no structure. MarkItDown gives you one API that handles all formats and preserves semantic structure as Markdown.
Format
MarkItDown
pypdf2 / python-docx / openpyxl
PDF
Yes
pypdf2 only
DOCX
Yes
python-docx only
PPTX
Yes
python-pptx only
XLSX
Yes
openpyxl only
HTML / URL
Yes
No
EPUB
Yes
No
CSV / JSON
Yes
No
Images (OCR)
Yes (optional)
No
Audio (transcription)
Yes (optional)
No
Unified output format
Markdown
Raw text / format-specific objects
The optional image OCR and audio transcription require extra dependencies (and an LLM API key for the best results), but the core document converters — PDF, Office, HTML — work completely offline with no API key required. That makes MarkItDown an excellent fit for any pipeline where you control the infrastructure.
Installing MarkItDown
MarkItDown is on PyPI. A basic install that handles PDFs, Office documents, and HTML covers most use cases and has minimal dependencies.
# Install the base package
pip install markitdown
# For PDF support (pdfminer.six is included in most installs)
pip install markitdown[pdf]
# For all optional extras (OCR, audio, Azure Document Intelligence)
pip install markitdown[all]
The [pdf] extra pulls in pdfminer.six for text-based PDF extraction. If you need image OCR within PDFs, you will also need an LLM plugin (covered in the advanced section). For most document-to-Markdown pipelines the base install is all you need — it handles DOCX, PPTX, XLSX, HTML, CSV, JSON, and EPUB without any extras.
One API to rule them all. Finally.
Converting Files, URLs, and Streams
The MarkItDown class is the main entry point. It auto-detects the file format based on extension or MIME type, so you call the same method regardless of what you are converting.
Converting a Local File
Pass any local file path as a string. MarkItDown detects the format automatically and returns a DocumentConverterResult.
# convert_file.py
from markitdown import MarkItDown
md = MarkItDown()
# Convert a DOCX file
result = md.convert("report.docx")
print(f"Title: {result.title}")
print(f"Characters: {len(result.text_content)}")
print()
print(result.text_content[:300])
Output:
Title: Q3 Sales Report
Characters: 4821
# Q3 Sales Report
**Prepared by:** Finance Team
**Date:** September 30, 2025
## Executive Summary
Revenue grew 12% year-over-year driven by the enterprise segment...
The result.title property extracts the document title from metadata where available (DOCX, PDF). The text_content property always holds the full Markdown string. Notice that the headings from the Word document are preserved as Markdown heading levels — this is exactly the structural information that LLMs use to understand document hierarchy.
Converting a URL
Pass a URL string and MarkItDown fetches the page and converts the HTML to Markdown. This works especially well for documentation pages, Wikipedia articles, and any page with semantic HTML structure.
# convert_url.py
from markitdown import MarkItDown
md = MarkItDown()
result = md.convert("https://docs.python.org/3/library/json.html")
print(result.text_content[:600])
Output:
json --- JSON encoder and decoder
=================================
**Source code:** [Lib/json/__init__.py](https://github.com/python/cpython/tree/3.13/Lib/json/__init__.py)
JSON (JavaScript Object Notation), specified by [RFC 7159](https://datatracker.ietf.org/doc/html/rfc7159.html)...
## json.dumps(obj, *, skipkeys=False, ...)
Serialize obj to a JSON formatted str...
Navigation menus, footers, and sidebars are typically stripped out, leaving the actual content. This makes URL conversion a fast way to pull documentation into a RAG corpus without building a custom scraper for every site.
Converting from a File-Like Object
When you receive a file as bytes (from an API response, an email attachment, or a web upload), you can convert it directly from a BytesIO object without writing it to disk first.
# convert_stream.py
import io
from markitdown import MarkItDown
import requests
md = MarkItDown()
# Download a PDF into memory and convert without saving to disk
response = requests.get("https://www.w3.org/WAI/WCAG21/wcag21.pdf")
pdf_stream = io.BytesIO(response.content)
# Must pass extension hint when using streams -- no filename to detect from
result = md.convert(pdf_stream, file_extension=".pdf")
print(f"Converted {len(result.text_content)} characters from in-memory PDF")
print(result.text_content[:400])
Output:
Converted 87432 characters from in-memory PDF
Web Content Accessibility Guidelines (WCAG) 2.1
================================================
W3C Recommendation 05 June 2018
Abstract
--------
Web Content Accessibility Guidelines (WCAG) 2.1 covers a wide range of...
The file_extension parameter is required when passing a stream because there is no filename to inspect. Always include it for streams to ensure the correct converter is selected.
BytesIO: no temp files, no disk I/O, no drama.
Format-Specific Conversion Options
Most formats work out of the box, but a few have options worth knowing about. PowerPoint files get per-slide conversion, Excel files convert to Markdown tables, and PDFs expose page-level control.
Excel and CSV to Markdown Tables
Excel sheets are converted to Markdown tables — one table per worksheet. This is particularly useful when feeding structured data to LLMs that need to reason about tabular information.
# convert_excel.py
from markitdown import MarkItDown
md = MarkItDown()
result = md.convert("sales_data.xlsx")
print(result.text_content)
Output (example with a two-sheet workbook):
## Sheet1
| Month | Revenue | Units |
|-------|---------|-------|
| Jan | 84000 | 420 |
| Feb | 91200 | 456 |
| Mar | 78500 | 392 |
## Sheet2
| Region | Manager | Target |
|--------|---------|--------|
| East | Alice | 100000 |
| West | Bob | 95000 |
Each worksheet becomes an H2 section followed by a Markdown table. LLMs handle this format well for question-answering tasks — the model can identify column headers, filter by region, and compute simple aggregations when the data is in this structured Markdown table format rather than raw CSV text.
PowerPoint Slide Extraction
PPTX files are converted slide by slide. Each slide becomes a section with its title as a heading and the body text extracted below it. Speaker notes are included when present.
# convert_pptx.py
from markitdown import MarkItDown
md = MarkItDown()
result = md.convert("product_roadmap.pptx")
# Show first 500 chars to see the structure
print(result.text_content[:500])
Output:
## Slide 1: Product Roadmap 2026
Vision: Ship the AI-native workflow layer by Q3.
- Q1: Core infrastructure and auth
- Q2: Integration layer + partner APIs
- Q3: Public launch
- Q4: Enterprise tier
**Notes:** Emphasize the partnership angle -- this is key differentiator vs competitors.
## Slide 2: Q1 Milestones
- Authentication service -- 95% complete
- Database migration -- in progress
...
Speaker notes appear as bold “Notes:” blocks after each slide’s content. For meeting-notes pipelines or sales-deck summarizers this is especially useful — you get the full context that the presenter intended to convey, not just the bullet points on the slide.
Speaker notes included. Your LLM finally hears what the presenter was thinking.
Batch Converting a Directory
Real pipelines rarely deal with a single file. Here is a pattern to convert every supported file in a directory, log any failures, and save all results to a single Markdown file for easy embedding.
# batch_convert.py
import os
from pathlib import Path
from markitdown import MarkItDown
SUPPORTED = {".pdf", ".docx", ".pptx", ".xlsx", ".html", ".csv", ".json", ".epub"}
def batch_convert(input_dir: str, output_path: str) -> dict:
"""Convert all supported files in input_dir to a single Markdown file."""
md = MarkItDown()
results = {"success": [], "failed": []}
output_parts = []
for fpath in sorted(Path(input_dir).rglob("*")):
if fpath.suffix.lower() not in SUPPORTED:
continue
print(f"Converting: {fpath.name}")
try:
result = md.convert(str(fpath))
# Separate each document with a clear section header
section = f"\n\n---\n## Document: {fpath.name}\n\n{result.text_content}"
output_parts.append(section)
results["success"].append(str(fpath))
except Exception as exc:
print(f" FAILED: {exc}")
results["failed"].append({"file": str(fpath), "error": str(exc)})
with open(output_path, "w", encoding="utf-8") as f:
f.write("# Document Corpus\n")
f.write(f"Converted {len(results['success'])} documents.\n")
f.write("".join(output_parts))
return results
if __name__ == "__main__":
stats = batch_convert("./docs", "corpus.md")
print(f"\nDone: {len(stats['success'])} converted, {len(stats['failed'])} failed")
Output:
Converting: annual_report.pdf
Converting: onboarding.docx
Converting: roadmap.pptx
Converting: q3_data.xlsx
FAILED: File appears to be encrypted
Done: 3 converted, 1 failed
The try/except around each conversion is essential — encrypted PDFs, corrupted files, or unsupported subtypes will raise exceptions rather than silently producing empty output. The pattern above logs the failure and continues with the rest of the batch, which is the right behavior for any automated pipeline. The output corpus.md contains all documents separated by clear section dividers that chunk-based RAG systems can split on.
Using MarkItDown with LLM Pipelines
The most common use case is feeding converted documents into an LLM. Here is how to wire MarkItDown into an OpenAI-compatible pipeline for a simple document Q&A pattern.
# doc_qa.py
from markitdown import MarkItDown
from openai import OpenAI
def answer_from_document(file_path: str, question: str, api_key: str) -> str:
"""Convert a document to Markdown and answer a question about it."""
md = MarkItDown()
result = md.convert(file_path)
doc_text = result.text_content
# Truncate if the document exceeds a safe context window size
max_chars = 80000 # ~20K tokens for most models
if len(doc_text) > max_chars:
doc_text = doc_text[:max_chars] + "\n\n[Document truncated...]"
client = OpenAI(api_key=api_key)
response = client.chat.completions.create(
model="gpt-4o-mini",
messages=[
{
"role": "system",
"content": "You are a document analyst. Answer questions based only on the provided document.",
},
{
"role": "user",
"content": f"Document:\n\n{doc_text}\n\nQuestion: {question}",
},
],
)
return response.choices[0].message.content
# Example usage
answer = answer_from_document(
"contract.pdf",
"What is the termination clause?",
api_key="your-openai-api-key"
)
print(answer)
Output:
Section 12.3 of the contract states that either party may terminate this agreement
with 30 days written notice. Termination for cause requires only 5 business days
notice and must be accompanied by written documentation of the breach.
This pattern works with any OpenAI-compatible API — swap the base URL and API key for Anthropic, Gemini, or a local Ollama endpoint and the pattern is identical. The key insight is that MarkItDown’s Markdown output is substantially better context than raw extracted text because the model can use heading levels and table structure to locate specific sections of long documents.
Raw PDF to LLM: garbled. Markdown to LLM: actually works.
Real-Life Example: Building a Document Corpus Preparer for RAG
This project ties together everything from this article. It accepts a folder of mixed-format documents, converts all of them to Markdown, chunks the output into LLM-ready segments, and saves a JSON file that a vector database like Chroma or Pinecone can ingest directly.
# rag_preparer.py
import json
import os
from pathlib import Path
from markitdown import MarkItDown
SUPPORTED = {".pdf", ".docx", ".pptx", ".xlsx", ".html", ".csv", ".epub"}
CHUNK_SIZE = 1500 # characters per chunk (~375 tokens)
CHUNK_OVERLAP = 150 # overlap so context is not lost at boundaries
def chunk_text(text: str, size: int = CHUNK_SIZE, overlap: int = CHUNK_OVERLAP) -> list:
"""Split text into overlapping chunks."""
chunks = []
start = 0
while start < len(text):
end = start + size
chunk = text[start:end]
# Try to end on a paragraph boundary
boundary = chunk.rfind("\n\n")
if boundary > size // 2:
chunk = chunk[:boundary]
chunks.append(chunk.strip())
start += len(chunk) - overlap
return [c for c in chunks if len(c) > 50] # drop tiny trailing chunks
def prepare_rag_corpus(docs_dir: str, output_path: str) -> None:
md = MarkItDown()
corpus = []
chunk_id = 0
for fpath in sorted(Path(docs_dir).rglob("*")):
if fpath.suffix.lower() not in SUPPORTED:
continue
print(f"Processing: {fpath.name}")
try:
result = md.convert(str(fpath))
chunks = chunk_text(result.text_content)
for i, chunk in enumerate(chunks):
corpus.append({
"id": f"chunk_{chunk_id:05d}",
"source_file": fpath.name,
"source_title": result.title or fpath.stem,
"chunk_index": i,
"total_chunks": len(chunks),
"text": chunk,
})
chunk_id += 1
print(f" -> {len(chunks)} chunks")
except Exception as exc:
print(f" FAILED: {exc}")
with open(output_path, "w", encoding="utf-8") as f:
json.dump(corpus, f, indent=2, ensure_ascii=False)
print(f"\nCorpus saved: {len(corpus)} chunks from {chunk_id} total across all docs")
print(f"Output: {output_path}")
if __name__ == "__main__":
prepare_rag_corpus("./knowledge_base", "rag_corpus.json")
Output:
Processing: company_handbook.pdf
-> 47 chunks
Processing: product_specs.docx
-> 18 chunks
Processing: roadmap_2026.pptx
-> 9 chunks
Processing: pricing.xlsx
-> 3 chunks
Corpus saved: 77 chunks from 77 total across all docs
Output: rag_corpus.json
The output rag_corpus.json is ready to embed. Each chunk carries its source file and title as metadata, so your vector database can filter by document when answering queries that should be scoped to a specific source. The overlapping chunks prevent context loss at boundaries — a sentence that straddles a chunk boundary will appear in both adjacent chunks, so the model always sees complete context around any retrieved passage. To extend this project, add an embedding step using sentence-transformers or the OpenAI Embeddings API and pipe the corpus directly into your vector store of choice.
Frequently Asked Questions
Can MarkItDown convert password-protected PDFs?
No — password-protected PDFs raise an exception during conversion because the underlying pdfminer.six library cannot read encrypted content without the password. You will see a PDFPasswordIncorrect or PDFEncryptionError. The fix is to pre-decrypt the PDF before conversion using a library like pikepdf: open with the password and save a decrypted copy, then convert the decrypted file. Always wrap conversion in try/except in batch pipelines so a single locked file does not abort the entire run.
Does MarkItDown extract images from PDFs?
With the base install, MarkItDown extracts text from PDFs but skips embedded images. If your PDFs are scanned documents (images of text, not actual text layers), the base converter will return little or no content. For scanned PDFs you need to add an LLM plugin — MarkItDown supports Azure Document Intelligence and OpenAI Vision as optional backends that can OCR images within documents. Pass an llm_client and llm_model to the MarkItDown constructor to enable this. The optional dependency install is pip install markitdown[all].
How should I handle very large documents?
For documents that produce more than 100,000 characters of Markdown, pass the whole text to an LLM in a single call only if your model supports a large context window (128K+). Otherwise, use the chunking pattern from the real-life example above — split the Markdown at paragraph boundaries with a 10% overlap and embed the chunks rather than the whole document. MarkItDown itself handles arbitrarily large files without issue; the bottleneck is always the downstream LLM context window, not the conversion step.
How well does MarkItDown handle complex tables?
Simple flat tables — with consistent column counts and no merged cells — convert reliably to Markdown tables. Complex tables with merged headers, multi-row cells, or heavily styled cells may produce irregular Markdown. Excel files generally convert better than Word or PDF tables because the underlying data is already structured. If you find table output unreliable for a specific document type, consider using openpyxl or python-docx for that format and MarkItDown for everything else in the same pipeline.
Can I stream the conversion output?
MarkItDown does not support streaming output — the convert() call blocks until the full document is converted and returns the complete result. For large documents this can take several seconds, especially for multi-hundred-page PDFs. If you need non-blocking behavior in an async pipeline, wrap the conversion in asyncio.run_in_executor() to run it in a thread pool and await the result without blocking your event loop.
Can I add a custom converter for a format MarkItDown does not support?
Yes — MarkItDown has a plugin system. You can register a custom DocumentConverter subclass for any file extension. Implement the convert() method that accepts a file path and returns a DocumentConverterResult, then register it via md.register_converter(MyConverter()). This is useful for proprietary formats specific to your industry — medical records in HL7, CAD files, or internal XML schemas — where you have the parsing logic but need to plug it into the same batch pipeline that handles standard formats.
Conclusion
MarkItDown removes the most painful part of building LLM document pipelines: writing and maintaining a different parser for every file format. A single MarkItDown().convert() call handles PDFs, DOCX, PPTX, XLSX, HTML, CSV, EPUB, and more, returning clean Markdown that LLMs can reason over rather than raw binary or poorly-structured text. The real-life example above gives you a complete RAG corpus preparer that you can extend — add an embedding step, plug in a vector store, or swap in a different chunking strategy depending on your document types.
The next step is to test it on your actual document set. Run the batch converter, inspect the output Markdown for any formatting issues specific to your files, and tune the chunk size to match your embedding model’s token limit. For OCR-heavy or audio transcription pipelines, explore the optional llm_client parameter to unlock MarkItDown’s full feature set.
Selenium WebDriver is a tool for automating web browser interactions. In Python, it is used for web scraping, automated testing of web applications, form filling, screenshot capture, and any task that requires programmatic control of a web browser.
Which browser drivers work with Selenium in Python?
Selenium supports ChromeDriver (Chrome/Chromium), GeckoDriver (Firefox), EdgeDriver (Microsoft Edge), and SafariDriver (Safari). ChromeDriver and GeckoDriver are the most commonly used for Linux-based automation.
How do I install ChromeDriver on Linux?
Download ChromeDriver from the official site matching your Chrome version, extract it, and place it in your PATH (e.g., /usr/local/bin/). Alternatively, use webdriver-manager package: pip install webdriver-manager to handle driver installation automatically.
Why do I get ‘WebDriver not found’ errors?
This typically occurs when the driver executable is not in your system PATH, the driver version does not match your browser version, or the driver file lacks execute permissions. Use chmod +x chromedriver to set permissions and ensure version compatibility.
Can Selenium run without a visible browser window?
Yes. Use headless mode by adding options.add_argument('--headless') to your browser options. This runs the browser in the background without a GUI, which is faster and ideal for servers and CI/CD pipelines.
Installing the Right Driver Binary
Selenium needs a browser-specific driver binary on the system PATH or pointed to explicitly. The two paths that work on Linux:
Option 1 — Selenium Manager (Selenium 4.6+): The library auto-downloads the right driver. Zero setup beyond installing selenium:
Option 2 — webdriver-manager: Explicit installation per session, handy when you need to pin a version:
# pip install webdriver-manager
from selenium import webdriver
from selenium.webdriver.chrome.service import Service
from webdriver_manager.chrome import ChromeDriverManager
service = Service(ChromeDriverManager().install())
driver = webdriver.Chrome(service=service)
Headless Mode for Servers
On a server with no display, you need headless mode (and matching Chrome / Chromium installed). The minimal Chrome install on Ubuntu 22.04 and Debian:
# Install Chrome and the libraries it needs
sudo apt-get update
sudo apt-get install -y wget gnupg
wget -q -O - https://dl-ssl.google.com/linux/linux_signing_key.pub | sudo apt-key add -
echo "deb [arch=amd64] http://dl.google.com/linux/chrome/deb/ stable main" | \
sudo tee /etc/apt/sources.list.d/google-chrome.list
sudo apt-get update
sudo apt-get install -y google-chrome-stable
# Python: enable headless
from selenium.webdriver.chrome.options import Options
opts = Options()
opts.add_argument("--headless=new") # use the new headless mode (Chrome 109+)
opts.add_argument("--no-sandbox") # required when running as root
opts.add_argument("--disable-dev-shm-usage") # avoid /dev/shm size issues
opts.add_argument("--window-size=1920,1080") # avoid layout-dependent failures
driver = webdriver.Chrome(options=opts)
The --disable-dev-shm-usage flag fixes a notorious crash in Docker containers where the shared-memory partition is too small. --no-sandbox is required when Chrome runs as root (Docker default).
Firefox / geckodriver
If Chrome isn’t your target, swap in Firefox. Same pattern, different driver:
sudo apt-get install -y firefox
# Python
from selenium import webdriver
from selenium.webdriver.firefox.options import Options as FFOptions
from selenium.webdriver.firefox.service import Service as FFService
from webdriver_manager.firefox import GeckoDriverManager
opts = FFOptions()
opts.add_argument("--headless")
service = FFService(GeckoDriverManager().install())
driver = webdriver.Firefox(service=service, options=opts)
driver.get("https://example.com")
Docker Setup for Selenium
For CI / production, run Selenium in Docker rather than installing system-wide. The official Selenium images have everything bundled:
# Pull a ready-to-go Chrome stack
docker run -d -p 4444:4444 -p 7900:7900 --shm-size=2g \
selenium/standalone-chrome:latest
# Now connect from any host (no local Chrome needed)
from selenium import webdriver
from selenium.webdriver.chrome.options import Options
opts = Options()
opts.add_argument("--headless=new")
driver = webdriver.Remote(
command_executor="http://localhost:4444/wd/hub",
options=opts,
)
driver.get("https://example.com")
The --shm-size=2g on the container fixes the same shared-memory issue as --disable-dev-shm-usage in the Chrome args. Pick whichever is convenient.
Verifying Your Setup
A 6-line smoke test catches 90% of install failures:
If this runs and prints “Welcome to Python.org” — you’re done. If it fails, the error message tells you exactly what’s missing (driver, browser binary, sandbox flag, etc.).
Common Pitfalls
Mixing Chrome and chromedriver versions. chromedriver must match Chrome’s major version. Selenium Manager handles this; webdriver-manager handles it; manual installs break every Chrome update.
Forgetting –no-sandbox in Docker. Chrome refuses to run as root (which Docker default is) without it. Add it OR run as a non-root user.
Insufficient /dev/shm. Default 64MB shared memory in Docker isn’t enough. Use --shm-size=2g or --disable-dev-shm-usage.
Missing browser binary. chromedriver alone isn’t enough — you also need Chrome itself installed. Same for Firefox + geckodriver.
Old –headless flag. Chrome’s old headless mode is deprecated in favor of --headless=new (Chrome 109+). The new mode is faster and renders more accurately.
FAQ
Q: Selenium or Playwright?
A: For new projects, Playwright is faster, has better selectors, and auto-handles waits. Selenium is mature and ubiquitous — if you have existing Selenium tests or need browser support beyond Chrome/Firefox/WebKit, stick with it.
Q: Headless or headful?
A: Headless for CI, scrapers, and any unattended workflow. Headful when developing — you can SEE what your code is doing, which speeds debugging by 10x.
Q: How do I run as a specific browser version?
A: Install that specific version of Chrome / Firefox, then point Selenium at it: options.binary_location = "/path/to/chrome". webdriver-manager can also pin to a version.
Q: Why is the test slow on the first run?
A: The driver download. Subsequent runs use the cached binary. CI systems should cache ~/.wdm (webdriver-manager) and ~/.cache/selenium.
Q: How do I bypass Cloudflare / bot protection?
A: Standard Selenium gets blocked by Cloudflare. Use undetected-chromedriver (better) or Playwright with stealth plugins (best). For aggressive bot detection, you may need to rotate user agents and use residential proxies.
Wrapping Up
Selenium on Linux comes down to three pieces: Python’s selenium package, the browser binary (Chrome or Firefox), and the driver binary (chromedriver or geckodriver). Selenium Manager handles the driver auto-download. --headless=new, --no-sandbox, and --disable-dev-shm-usage are the three flags that make Chrome work reliably in Docker. Get that combination right and Selenium runs cleanly in CI, on servers, and in production scrapers.
Once your core application is complete, a plugin architecture can help you to extend the functionality very easily. With a plugin architecture, you can simply write the core application, and then extend the functionality in the future much more easily. Without a plugin architecture, it can be quite difficult to do this since you will be afraid that you will break the original functionality.
So why don’t do this all the time? Well it does take more planning effort in the beginning in order to reap the rewards in the future, and most of us (myself included) are often too impatient to do that. However, there are some methods that you can take in order to embed a plugin desirable to extend the functionality. Last time we looked at using importlib (see our previous article “A Plugin Architecture using importlib“), and this time we have an even simpler library called pyplugs.
Written by Pubs
Python developer and educator with 15+ years building production systems across data engineering, web APIs, and AI tooling. Founder of Python How To Program — 270+ in-depth tutorials covering the modern Python stack.
So when should you use a plugin architecture? Here are several scenarios – they are all around separating the code from the core to the variations:
Separate Functionality: When you can split the problem you’re trying to solve/application from core functionality (the main “engine”) to the variations: e.g. ranking cheapest flights where data is from different websites. The core application/engine is the ranking logic. The data extraction from different websites would each be a plugin – website 1 = plugin 1, website 2 = plugin2. When you want to add a new website, you just need to add a new plugin
Distribute Development Effort: When you want to work in a team to easily separate the focus from core functionality to variations: e.g. suppose you have an application to do image recognition. Team 1 (e.g. data science team) can work on the core engine of doing the image recognition, while you can have Team 2-4 work on creating different plugins for different image formats (e.g. Team 2: read in JPG files, Team 3: read in PNG files, etc)
Launch sooner and add functionality in future: When you want to launch an application as quickly as possible. e.g. Suppose you want to create an application to return the number of working days from different countries. To begin with, you can just start by launching this for United States and Australia. Then, you can add more countries in the future. Since you designed the plugin architecture from the start, it’ll be safer to add more countries.
There are many more, but the disadvantage is that you have to plan for it upfront. Invest now in a plugin architecture, and then reap the benefits in the future.
Invest now in a plugin architecture, and then reap the benefits in the future
Plan ahead at the start to make your applications extendible
Let’s explore this third example of a public holiday counter application and show how the pyplugs library can help.
Example Problem: Extracting Public Holidays
The application we’d like to create is a command line application that can be used to pass in a location (country and/or state), and then return the list of public holidays in 2020:
The pseudo-code will be as follows:
1. Get location
2. If data for location not available, then error
3. Get the list of all holidays from the location
4. Return the list of working days
As you probably guessed, it’s step 3 that can be converted into a plugin. However, let’s start without a plugin architecture and do this the normal way.
First let’s see where we can get the data from – for UK data you can get this from publicholidays.co.uk:
And then for Singapore data, you can get it from jalanow.com:
In both cases, the data is in a HTML Table view where the data is in a <td> tag. We will need to use regular expressions to extract the data.
Here’s the code for non-plugin approach:
#pubholiday.py
import argparse
import requests, re
G_COUNTRIES = ['UK', 'SG']
def get_working_days(args):
if args.countrycode =='UK':
r = requests.get( 'https://publicholidays.co.uk/2020-dates/')
m = re.findall('<tr class.+?><td>(.+?)<\/td>', r.text)
return list(set(m))
elif args.countrycode =='SG':
r = requests.get('https://www.jalanow.com/singapore-holidays-2021.htm')
m = re.findall('<td class\=\"crDate\">(.+?)<\/td>', r.text)
return list(set(m))
def setup_args():
parser = argparse.ArgumentParser(description='Get list of public holidays in a given year')
parser.add_argument('-c', '--countrycode', required=True, type=str, choices=G_COUNTRIES, help='Country code')
return parser
if __name__ == '__main__':
parser = setup_args()
args = parser.parse_args()
print( get_working_days(args) )
Now, when we run the application with either UK or SG, we get the following data:
The way the code works is all from the function get_working_days:
def get_working_days(args):
if args.countrycode =='UK':
r = requests.get( 'https://publicholidays.co.uk/2020-dates/')
m = re.findall('<tr class.+?><td>(.+?)<\/td>', r.text)
return list(set(m))
elif args.countrycode =='SG':
r = requests.get('https://www.jalanow.com/singapore-holidays-2021.htm')
m = re.findall('<td class\=\"crDate\">(.+?)<\/td>', r.text)
return list(set(m))
The code for UK, for examples works the following way:
1. Get the data using the requests to the website. All the data will be in a r.text
2. Next, run a regular expression to extract the date data from the <TD> tag
3. Finally, remove duplicates with the list(set(m)) code
The disadvantage with this code is that if we add more countries, the function get_working_days() will become longer and longer with complex IF statements. The other challenge is testing it, either manually or with pytest will become quite painful. We can always have it call a dynamic function, but then we end up having difficult to read code.
What we need is a dynamic way to call a function for each country so that it can be easily maintainable and extendible… this is where a plugin architecture will help.
Extracting Public Holidays with a plugin architecture using pyplugs
What we will do now is to separate the main core logic from the plugins. So the file structure will be as follows:
So there will be the main functionality still in pubholidays.py, however all the country readers will all be in the plugins package (and subdirectory).
But first, let’s install the pyplugs library
Installing pyplugs
PyPlugs is available at PyPI. You can install it using pip:
python -m pip install pyplugs
Or, using pip directly:
pip install pyplugs
Pyplugs is composed of three levels:
Plug-in packages: Directories containing files with plug-ins
Plug-ins: Modules containing registered functions or classes
Plug-in functions: Several registered functions in the same file
Core logic in plugin architecture
The core logic will be simplified to the following:
#pubholiday_pi.py
import argparse
import requests, re
import plugins
G_COUNTRIES = ['UK', 'SG']
def get_working_days(args):
return plugins.read( 'reader_' + args.countrycode)
def setup_args():
parser = argparse.ArgumentParser(description='Get list of public holidays in a given year')
parser.add_argument('-c', '--countrycode', required=True, type=str, choices=G_COUNTRIES, help='Country code')
return parser
if __name__ == '__main__':
parser = setup_args()
args = parser.parse_args()
print( get_working_days(args) )
Now the get_working_days() function has been significant simplified. It calls the “read” function from the plugins/__init__.py package file. The ‘reader_’ + args.countrycode refers to the function and the module name.
Plugin logic
The plugsin/__init__.py is setup as follows:
# plugins/__init__.py
# Import the pyplugs libs
import pyplugs
# All function names are going to be stored under names
names = pyplugs.names_factory(__package__)
# When read function is called, it will call a function received as parameter
read = pyplugs.call_factory(__package__)
The “read” is the same “read” that is referenced by get_working_days() function from the main pubholiday_pi.py files.
The plugin files/functions are each to be stored in files called “reader_<country code>.py”. The following is the UK file:
#plugins/reader_UK.py
import re, requests
import pyplugs
@pyplugs.register
def reader_UK():
r = requests.get('https://www.jalanow.com/singapore-holidays-2021.htm')
m = re.findall('<td class\=\"crDate\">(.+?)<\/td>', r.text)
return list(set(m))
And then finally the SG file:
#plugins/reader_SG.py
import re, requests
import pyplugs
@pyplugs.register
def reader_SG():
r = requests.get('https://www.jalanow.com/singapore-holidays-2021.htm')
m = re.findall('<td class\=\"crDate\">(.+?)<\/td>', r.text)
return list(set(m))
In Conclusion
So there is no change when you run the application – you still get the same output:
However, you have a much more maintainable application.
So we started with a monolithic file, and now we extended this to a plugin architecture where the variations are all stored in the “plugins/” folder. In order to add more country public holidays where the data may come from different websites, all that needs to be done is to: (1) add the country code into variable G_COUNTRIES to ensure the command line argument validation works, and (2) add the new file called reader_<country code>.py in the plugins directory with a function name also called reader_<country code>(). That’s it, everything else will work.
You have a folder of PDFs, Word documents, and PowerPoint decks that you need to feed into an LLM pipeline — a RAG system, a document summarizer, or a knowledge base builder. The problem is that LLMs work best with plain text, and most documents are packed with binary formatting, embedded fonts, and layout metadata that the model cannot interpret. Sending a raw PDF to an LLM is like handing someone a ZIP file and asking them to read it.
Microsoft’s markitdown library solves this by converting dozens of file formats — PDF, DOCX, PPTX, XLSX, HTML, CSV, EPUB, images, and audio — into clean Markdown that any LLM can process. It is a single pip install, works from Python code or the command line, and handles the conversion pipeline so your code does not have to. The Markdown output preserves headings, tables, and code blocks in a structured format that models handle especially well.
This article covers everything you need to get documents into your AI pipelines with MarkItDown. You will learn how to install it, convert individual files and entire directories, work with the Python API, handle different file types, and build a real document-processing pipeline that prepares files for a RAG system. By the end you will have a working utility that accepts any folder of mixed-format documents and outputs a structured Markdown dataset ready for embedding.
MarkItDown: Quick Example
Before diving into the details, here is the fastest path from a file to Markdown text you can feed into an LLM. This example converts an HTML page to Markdown in four lines of Python.
# quick_markitdown.py
from markitdown import MarkItDown
md = MarkItDown()
result = md.convert("https://example.com")
print(result.text_content[:500])
Output:
Example Domain
==============
This domain is for use in illustrative examples in documents. You may use this
domain in literature without prior coordination or asking for permission.
[More information...](https://www.iana.org/domains/reserved)
The MarkItDown() constructor creates a converter instance, and convert() accepts a file path, a URL, or a file-like object. The result is a DocumentConverterResult object — result.text_content holds the clean Markdown string ready to pass into any LLM or text processing pipeline.
The real power emerges when you need to handle PDFs, Office files, and mixed directories at scale. The sections below cover all of that, starting with installation.
What Is MarkItDown and Why Use It?
MarkItDown is an open-source Python library from Microsoft that acts as a universal document-to-Markdown converter. Think of it as a universal adapter — on one end you plug in a document in almost any format, and on the other end you get clean, structured Markdown text. The library was built specifically with LLM use cases in mind: the Markdown output is structured in a way that helps models understand document hierarchy (headings, tables, code blocks) rather than receiving a flat blob of text.
The key difference from alternatives like pypdf2 or python-docx is breadth and consistency. Those libraries require a different API for each format, handle only one format each, and return raw extracted text with no structure. MarkItDown gives you one API that handles all formats and preserves semantic structure as Markdown.
Format
MarkItDown
pypdf2 / python-docx / openpyxl
PDF
Yes
pypdf2 only
DOCX
Yes
python-docx only
PPTX
Yes
python-pptx only
XLSX
Yes
openpyxl only
HTML / URL
Yes
No
EPUB
Yes
No
CSV / JSON
Yes
No
Images (OCR)
Yes (optional)
No
Audio (transcription)
Yes (optional)
No
Unified output format
Markdown
Raw text / format-specific objects
The optional image OCR and audio transcription require extra dependencies (and an LLM API key for the best results), but the core document converters — PDF, Office, HTML — work completely offline with no API key required. That makes MarkItDown an excellent fit for any pipeline where you control the infrastructure.
Installing MarkItDown
MarkItDown is on PyPI. A basic install that handles PDFs, Office documents, and HTML covers most use cases and has minimal dependencies.
# Install the base package
pip install markitdown
# For PDF support (pdfminer.six is included in most installs)
pip install markitdown[pdf]
# For all optional extras (OCR, audio, Azure Document Intelligence)
pip install markitdown[all]
The [pdf] extra pulls in pdfminer.six for text-based PDF extraction. If you need image OCR within PDFs, you will also need an LLM plugin (covered in the advanced section). For most document-to-Markdown pipelines the base install is all you need — it handles DOCX, PPTX, XLSX, HTML, CSV, JSON, and EPUB without any extras.
One API to rule them all. Finally.
Converting Files, URLs, and Streams
The MarkItDown class is the main entry point. It auto-detects the file format based on extension or MIME type, so you call the same method regardless of what you are converting.
Converting a Local File
Pass any local file path as a string. MarkItDown detects the format automatically and returns a DocumentConverterResult.
# convert_file.py
from markitdown import MarkItDown
md = MarkItDown()
# Convert a DOCX file
result = md.convert("report.docx")
print(f"Title: {result.title}")
print(f"Characters: {len(result.text_content)}")
print()
print(result.text_content[:300])
Output:
Title: Q3 Sales Report
Characters: 4821
# Q3 Sales Report
**Prepared by:** Finance Team
**Date:** September 30, 2025
## Executive Summary
Revenue grew 12% year-over-year driven by the enterprise segment...
The result.title property extracts the document title from metadata where available (DOCX, PDF). The text_content property always holds the full Markdown string. Notice that the headings from the Word document are preserved as Markdown heading levels — this is exactly the structural information that LLMs use to understand document hierarchy.
Converting a URL
Pass a URL string and MarkItDown fetches the page and converts the HTML to Markdown. This works especially well for documentation pages, Wikipedia articles, and any page with semantic HTML structure.
# convert_url.py
from markitdown import MarkItDown
md = MarkItDown()
result = md.convert("https://docs.python.org/3/library/json.html")
print(result.text_content[:600])
Output:
json --- JSON encoder and decoder
=================================
**Source code:** [Lib/json/__init__.py](https://github.com/python/cpython/tree/3.13/Lib/json/__init__.py)
JSON (JavaScript Object Notation), specified by [RFC 7159](https://datatracker.ietf.org/doc/html/rfc7159.html)...
## json.dumps(obj, *, skipkeys=False, ...)
Serialize obj to a JSON formatted str...
Navigation menus, footers, and sidebars are typically stripped out, leaving the actual content. This makes URL conversion a fast way to pull documentation into a RAG corpus without building a custom scraper for every site.
Converting from a File-Like Object
When you receive a file as bytes (from an API response, an email attachment, or a web upload), you can convert it directly from a BytesIO object without writing it to disk first.
# convert_stream.py
import io
from markitdown import MarkItDown
import requests
md = MarkItDown()
# Download a PDF into memory and convert without saving to disk
response = requests.get("https://www.w3.org/WAI/WCAG21/wcag21.pdf")
pdf_stream = io.BytesIO(response.content)
# Must pass extension hint when using streams -- no filename to detect from
result = md.convert(pdf_stream, file_extension=".pdf")
print(f"Converted {len(result.text_content)} characters from in-memory PDF")
print(result.text_content[:400])
Output:
Converted 87432 characters from in-memory PDF
Web Content Accessibility Guidelines (WCAG) 2.1
================================================
W3C Recommendation 05 June 2018
Abstract
--------
Web Content Accessibility Guidelines (WCAG) 2.1 covers a wide range of...
The file_extension parameter is required when passing a stream because there is no filename to inspect. Always include it for streams to ensure the correct converter is selected.
BytesIO: no temp files, no disk I/O, no drama.
Format-Specific Conversion Options
Most formats work out of the box, but a few have options worth knowing about. PowerPoint files get per-slide conversion, Excel files convert to Markdown tables, and PDFs expose page-level control.
Excel and CSV to Markdown Tables
Excel sheets are converted to Markdown tables — one table per worksheet. This is particularly useful when feeding structured data to LLMs that need to reason about tabular information.
# convert_excel.py
from markitdown import MarkItDown
md = MarkItDown()
result = md.convert("sales_data.xlsx")
print(result.text_content)
Output (example with a two-sheet workbook):
## Sheet1
| Month | Revenue | Units |
|-------|---------|-------|
| Jan | 84000 | 420 |
| Feb | 91200 | 456 |
| Mar | 78500 | 392 |
## Sheet2
| Region | Manager | Target |
|--------|---------|--------|
| East | Alice | 100000 |
| West | Bob | 95000 |
Each worksheet becomes an H2 section followed by a Markdown table. LLMs handle this format well for question-answering tasks — the model can identify column headers, filter by region, and compute simple aggregations when the data is in this structured Markdown table format rather than raw CSV text.
PowerPoint Slide Extraction
PPTX files are converted slide by slide. Each slide becomes a section with its title as a heading and the body text extracted below it. Speaker notes are included when present.
# convert_pptx.py
from markitdown import MarkItDown
md = MarkItDown()
result = md.convert("product_roadmap.pptx")
# Show first 500 chars to see the structure
print(result.text_content[:500])
Output:
## Slide 1: Product Roadmap 2026
Vision: Ship the AI-native workflow layer by Q3.
- Q1: Core infrastructure and auth
- Q2: Integration layer + partner APIs
- Q3: Public launch
- Q4: Enterprise tier
**Notes:** Emphasize the partnership angle -- this is key differentiator vs competitors.
## Slide 2: Q1 Milestones
- Authentication service -- 95% complete
- Database migration -- in progress
...
Speaker notes appear as bold “Notes:” blocks after each slide’s content. For meeting-notes pipelines or sales-deck summarizers this is especially useful — you get the full context that the presenter intended to convey, not just the bullet points on the slide.
Speaker notes included. Your LLM finally hears what the presenter was thinking.
Batch Converting a Directory
Real pipelines rarely deal with a single file. Here is a pattern to convert every supported file in a directory, log any failures, and save all results to a single Markdown file for easy embedding.
# batch_convert.py
import os
from pathlib import Path
from markitdown import MarkItDown
SUPPORTED = {".pdf", ".docx", ".pptx", ".xlsx", ".html", ".csv", ".json", ".epub"}
def batch_convert(input_dir: str, output_path: str) -> dict:
"""Convert all supported files in input_dir to a single Markdown file."""
md = MarkItDown()
results = {"success": [], "failed": []}
output_parts = []
for fpath in sorted(Path(input_dir).rglob("*")):
if fpath.suffix.lower() not in SUPPORTED:
continue
print(f"Converting: {fpath.name}")
try:
result = md.convert(str(fpath))
# Separate each document with a clear section header
section = f"\n\n---\n## Document: {fpath.name}\n\n{result.text_content}"
output_parts.append(section)
results["success"].append(str(fpath))
except Exception as exc:
print(f" FAILED: {exc}")
results["failed"].append({"file": str(fpath), "error": str(exc)})
with open(output_path, "w", encoding="utf-8") as f:
f.write("# Document Corpus\n")
f.write(f"Converted {len(results['success'])} documents.\n")
f.write("".join(output_parts))
return results
if __name__ == "__main__":
stats = batch_convert("./docs", "corpus.md")
print(f"\nDone: {len(stats['success'])} converted, {len(stats['failed'])} failed")
Output:
Converting: annual_report.pdf
Converting: onboarding.docx
Converting: roadmap.pptx
Converting: q3_data.xlsx
FAILED: File appears to be encrypted
Done: 3 converted, 1 failed
The try/except around each conversion is essential — encrypted PDFs, corrupted files, or unsupported subtypes will raise exceptions rather than silently producing empty output. The pattern above logs the failure and continues with the rest of the batch, which is the right behavior for any automated pipeline. The output corpus.md contains all documents separated by clear section dividers that chunk-based RAG systems can split on.
Using MarkItDown with LLM Pipelines
The most common use case is feeding converted documents into an LLM. Here is how to wire MarkItDown into an OpenAI-compatible pipeline for a simple document Q&A pattern.
# doc_qa.py
from markitdown import MarkItDown
from openai import OpenAI
def answer_from_document(file_path: str, question: str, api_key: str) -> str:
"""Convert a document to Markdown and answer a question about it."""
md = MarkItDown()
result = md.convert(file_path)
doc_text = result.text_content
# Truncate if the document exceeds a safe context window size
max_chars = 80000 # ~20K tokens for most models
if len(doc_text) > max_chars:
doc_text = doc_text[:max_chars] + "\n\n[Document truncated...]"
client = OpenAI(api_key=api_key)
response = client.chat.completions.create(
model="gpt-4o-mini",
messages=[
{
"role": "system",
"content": "You are a document analyst. Answer questions based only on the provided document.",
},
{
"role": "user",
"content": f"Document:\n\n{doc_text}\n\nQuestion: {question}",
},
],
)
return response.choices[0].message.content
# Example usage
answer = answer_from_document(
"contract.pdf",
"What is the termination clause?",
api_key="your-openai-api-key"
)
print(answer)
Output:
Section 12.3 of the contract states that either party may terminate this agreement
with 30 days written notice. Termination for cause requires only 5 business days
notice and must be accompanied by written documentation of the breach.
This pattern works with any OpenAI-compatible API — swap the base URL and API key for Anthropic, Gemini, or a local Ollama endpoint and the pattern is identical. The key insight is that MarkItDown’s Markdown output is substantially better context than raw extracted text because the model can use heading levels and table structure to locate specific sections of long documents.
Raw PDF to LLM: garbled. Markdown to LLM: actually works.
Real-Life Example: Building a Document Corpus Preparer for RAG
This project ties together everything from this article. It accepts a folder of mixed-format documents, converts all of them to Markdown, chunks the output into LLM-ready segments, and saves a JSON file that a vector database like Chroma or Pinecone can ingest directly.
# rag_preparer.py
import json
import os
from pathlib import Path
from markitdown import MarkItDown
SUPPORTED = {".pdf", ".docx", ".pptx", ".xlsx", ".html", ".csv", ".epub"}
CHUNK_SIZE = 1500 # characters per chunk (~375 tokens)
CHUNK_OVERLAP = 150 # overlap so context is not lost at boundaries
def chunk_text(text: str, size: int = CHUNK_SIZE, overlap: int = CHUNK_OVERLAP) -> list:
"""Split text into overlapping chunks."""
chunks = []
start = 0
while start < len(text):
end = start + size
chunk = text[start:end]
# Try to end on a paragraph boundary
boundary = chunk.rfind("\n\n")
if boundary > size // 2:
chunk = chunk[:boundary]
chunks.append(chunk.strip())
start += len(chunk) - overlap
return [c for c in chunks if len(c) > 50] # drop tiny trailing chunks
def prepare_rag_corpus(docs_dir: str, output_path: str) -> None:
md = MarkItDown()
corpus = []
chunk_id = 0
for fpath in sorted(Path(docs_dir).rglob("*")):
if fpath.suffix.lower() not in SUPPORTED:
continue
print(f"Processing: {fpath.name}")
try:
result = md.convert(str(fpath))
chunks = chunk_text(result.text_content)
for i, chunk in enumerate(chunks):
corpus.append({
"id": f"chunk_{chunk_id:05d}",
"source_file": fpath.name,
"source_title": result.title or fpath.stem,
"chunk_index": i,
"total_chunks": len(chunks),
"text": chunk,
})
chunk_id += 1
print(f" -> {len(chunks)} chunks")
except Exception as exc:
print(f" FAILED: {exc}")
with open(output_path, "w", encoding="utf-8") as f:
json.dump(corpus, f, indent=2, ensure_ascii=False)
print(f"\nCorpus saved: {len(corpus)} chunks from {chunk_id} total across all docs")
print(f"Output: {output_path}")
if __name__ == "__main__":
prepare_rag_corpus("./knowledge_base", "rag_corpus.json")
Output:
Processing: company_handbook.pdf
-> 47 chunks
Processing: product_specs.docx
-> 18 chunks
Processing: roadmap_2026.pptx
-> 9 chunks
Processing: pricing.xlsx
-> 3 chunks
Corpus saved: 77 chunks from 77 total across all docs
Output: rag_corpus.json
The output rag_corpus.json is ready to embed. Each chunk carries its source file and title as metadata, so your vector database can filter by document when answering queries that should be scoped to a specific source. The overlapping chunks prevent context loss at boundaries — a sentence that straddles a chunk boundary will appear in both adjacent chunks, so the model always sees complete context around any retrieved passage. To extend this project, add an embedding step using sentence-transformers or the OpenAI Embeddings API and pipe the corpus directly into your vector store of choice.
Frequently Asked Questions
Can MarkItDown convert password-protected PDFs?
No — password-protected PDFs raise an exception during conversion because the underlying pdfminer.six library cannot read encrypted content without the password. You will see a PDFPasswordIncorrect or PDFEncryptionError. The fix is to pre-decrypt the PDF before conversion using a library like pikepdf: open with the password and save a decrypted copy, then convert the decrypted file. Always wrap conversion in try/except in batch pipelines so a single locked file does not abort the entire run.
Does MarkItDown extract images from PDFs?
With the base install, MarkItDown extracts text from PDFs but skips embedded images. If your PDFs are scanned documents (images of text, not actual text layers), the base converter will return little or no content. For scanned PDFs you need to add an LLM plugin — MarkItDown supports Azure Document Intelligence and OpenAI Vision as optional backends that can OCR images within documents. Pass an llm_client and llm_model to the MarkItDown constructor to enable this. The optional dependency install is pip install markitdown[all].
How should I handle very large documents?
For documents that produce more than 100,000 characters of Markdown, pass the whole text to an LLM in a single call only if your model supports a large context window (128K+). Otherwise, use the chunking pattern from the real-life example above — split the Markdown at paragraph boundaries with a 10% overlap and embed the chunks rather than the whole document. MarkItDown itself handles arbitrarily large files without issue; the bottleneck is always the downstream LLM context window, not the conversion step.
How well does MarkItDown handle complex tables?
Simple flat tables — with consistent column counts and no merged cells — convert reliably to Markdown tables. Complex tables with merged headers, multi-row cells, or heavily styled cells may produce irregular Markdown. Excel files generally convert better than Word or PDF tables because the underlying data is already structured. If you find table output unreliable for a specific document type, consider using openpyxl or python-docx for that format and MarkItDown for everything else in the same pipeline.
Can I stream the conversion output?
MarkItDown does not support streaming output — the convert() call blocks until the full document is converted and returns the complete result. For large documents this can take several seconds, especially for multi-hundred-page PDFs. If you need non-blocking behavior in an async pipeline, wrap the conversion in asyncio.run_in_executor() to run it in a thread pool and await the result without blocking your event loop.
Can I add a custom converter for a format MarkItDown does not support?
Yes — MarkItDown has a plugin system. You can register a custom DocumentConverter subclass for any file extension. Implement the convert() method that accepts a file path and returns a DocumentConverterResult, then register it via md.register_converter(MyConverter()). This is useful for proprietary formats specific to your industry — medical records in HL7, CAD files, or internal XML schemas — where you have the parsing logic but need to plug it into the same batch pipeline that handles standard formats.
Conclusion
MarkItDown removes the most painful part of building LLM document pipelines: writing and maintaining a different parser for every file format. A single MarkItDown().convert() call handles PDFs, DOCX, PPTX, XLSX, HTML, CSV, EPUB, and more, returning clean Markdown that LLMs can reason over rather than raw binary or poorly-structured text. The real-life example above gives you a complete RAG corpus preparer that you can extend — add an embedding step, plug in a vector store, or swap in a different chunking strategy depending on your document types.
The next step is to test it on your actual document set. Run the batch converter, inspect the output Markdown for any formatting issues specific to your files, and tune the chunk size to match your embedding model’s token limit. For OCR-heavy or audio transcription pipelines, explore the optional llm_client parameter to unlock MarkItDown’s full feature set.
A plugin architecture allows you to extend an application’s functionality by loading external code modules at runtime without modifying the core application. It promotes loose coupling, making your software more flexible and maintainable.
How does PyPlugs work?
PyPlugs provides a simple decorator-based system for registering and discovering plugins. You decorate functions or classes with PyPlugs decorators, and the framework automatically discovers and loads them from specified packages or directories.
What are alternatives to PyPlugs for plugin systems in Python?
Alternatives include pluggy (used by pytest), stevedore (uses setuptools entry points), yapsy, and Python’s built-in importlib for manual plugin loading. Each has different tradeoffs in complexity and features.
When should I use a plugin architecture?
Use a plugin architecture when you need extensibility without modifying core code, when third parties should be able to add features, or when different deployments need different feature sets. Common examples include text editors, web frameworks, and data processing pipelines.
Can I create a simple plugin system without external libraries?
Yes. Use Python’s importlib.import_module() to dynamically load modules from a plugins directory, combined with a registration pattern using decorators or base classes. This gives you a basic but functional plugin system with no dependencies.
Determining the current date is a public holiday can be tricky when holidays change and it of course changes from country to country. From system time of servers & machines running to timestamps for tracking the transactions and events in e-commerce platforms, the date and time play a major role. There are a variety of use cases related to manipulating date and time that can be solved using the inbuilt datetime module in Python3, such as
Finding if a given year is a leap year or an ordinary year
Finding the number of days between the two mentioned dates
Convert between different date or time formats
What if you were to check if a given date is a public holiday? There isn’t any specific formula or logic to determine that, do we? Holidays can be pre-defined or uncalled for.
Here, we will be exploring the two ways to detect if a date is a holiday or not.
Written by Pubs
Python developer and educator with 15+ years building production systems across data engineering, web APIs, and AI tooling. Founder of Python How To Program — 270+ in-depth tutorials covering the modern Python stack.
Although Python3 doesn’t provide any modules to detect if a date is a holiday or not, there are some of the external modules that help in detecting this. One of those modules is Holidays.
In your terminal, type in the following to get the module installed.
sudo pip3 install holidays
Module Installation Demo – holidays
Now that our module is ready, let’s understand a bit about what the module and what it is capable of. Have a look at the following code snippet.
'''
Snippet to check if a given date is a holiday
'''
from datetime import date # Step 1
import holidays
us_holidays = holidays.UnitedStates() # Step 2
input_date = input("Enter the date as YYYY-MM-DD: ") # Step 3
holiday_name = us_holidays .get(input_date) # Step 4
if holiday_name != None:
output = "{} is a US Holiday - It's {}".format(input_date, holiday_name)
else:
output = "{} is not a US Holiday".format(input_date)
# Step 5
print (output)
In the above snippet,
Step 1: Imports the required modules
Step 2: Initializes the us_holidays object, so that the corresponding get function can be invoked at step 3
Step 3: Gets dateinput from the user
Step 4: Invokes the get function of the holidays module. This returns the name of the holiday if the date is a holiday or returns None in case if it isn’t. This gets assigned to the variable – holiday_name.
Step 5: Based on the variable – holiday_name, using the if clause the string formatting is done. Can you make this if clause even leaner? Read this article to know about the One line if else statements.
Here’s what the output looks like.
Checking For Holidays With API Call to Calendarific
The above method is suitable for simple projects; however, it can never be used to provide an enterprise-grade solution. Let’s say, you are building a web application for a holiday and travel startup, building an enterprise-grade application requires an enterprise-grade solution. If you haven’t noticed, the holidays module is pretty simple and if you consider state-wise or newly announced holidays, then this solution doesn’t simply cut for a large-scale application.
Enterprise requirements such as these can be satisfied by using external APIs such as Calendarific which provides the API as a service for such applications to consume. They keep updating the holidays of states and countries constantly, and the applications may consume these APIs. Of course, enterprise solutions don’t always come free, but the developer account has a limit of 1000API requests per month.
Locate to https://calendarific.com/ on your favorite browser and follow the steps as shown in the following images to get yourself a free account and an API key for this exercise.
Step 1: Open Calendarific on your favorite browser Step 2: Signup for a free account Step 3: Login to your account Step 4: Copy the API Key
Understanding the Calendarific REST API
Before we could dive into using the API KEY, get yourself a REST API client – Insomnia or Postman. We are about to test our API key if we are able to retrieve the holiday information. Plugin the following URL by replacing [APIKEY] text with your API KEY received from above on your REST client.
https://calendarific.com/api/v2 is the API Base URL
/holidays is the API route
api_key, country, type, year, month, day are URL Parameters
Each parameter has a value allocated to it with an = (equal sign)
Each parameter and value pair is split by an & (ampersand)
For the above API call, the following response will be received; the value corresponding to the code key under the meta tag as ‘200’ corresponds to a successful response.
{
"meta": {
"code": 200
},
"response": {
"holidays": [
{
"name": "New Year's Day",
"description": "New Year's Day is the first day of the Gregorian calendar, which is widely used in many countries such as the USA.",
"country": {
"id": "us",
"name": "United States"
},
"date": {
"iso": "2020-01-01",
"datetime": {
"year": 2020,
"month": 1,
"day": 1
}
},
"type": [
"National holiday"
],
"locations": "All",
"states": "All"
}
]
}
}
The REST API call has returned some useful info about the National holiday on the 1st of January. Let’s see if it’s able to detect for the 2nd of January. Plugin the following URL again by replacing the text [APIKEY] with your API Key.
Indeed, the 2nd of January is not a public holiday and hence, the holidays list inside the response nested JSON key turns out to be an empty list.
Now we know that our API works very well, it is now time to incorporate Calendarific REST API into our Python code. We will be using the requests module in order to make this happen. Here’s how it is done.
'''
Snippet to check if a given date is a holiday using an external API - Calendarific
'''
import requests # Step 1
api_key = '[APIKEY]' # Step 2
base_url = 'https://calendarific.com/api/v2'
api_route = '/holidays'
location = input("Enter Country & State code - E.g.: us-ny: ")
date_inpt = input("Enter the date as YYYY-MM-DD: ") # Step 3
y, m, d = date_inpt.split('-')
full_url = '{}{}?api_key={}&country={}&type=national&year={}&month={}&day={}'\
.format(base_url, api_route, api_key, location, str(int(y)), str(int(m)), str(int(d))) # Step 4
response = requests.get(full_url).json() # Step 5
if response['response']['holidays'] != []:
print ("{} is a holiday - {}".format(date_inpt, response['response']['holidays'][0]['name']))
else: # Step 6
print ("{} is not a holiday".format(date_inpt))
In the above snippet,
Step 1: Import requests module – you will be needing this module to invoke the REST API.
Step 2: Replace ‘[APIKEY]’ with your own API key from Calendarific
Step 3: The user inputs the corresponding location and date for which the holiday needs to be detected
Step 4: String formatting in order to frame the URL
Step 5: Invoke the API and convert the response to a JSON; i.e.) a dictionary
Step 6: If clause checks for the presence of an empty list or with a returned response.
Here’s what the output looks like.
And there you have it, a working example for detecting if a given date is a holiday using an external API.
Summary
From an overall perspective, there could be multiple ways to solve a given problem, and here, we have portrayed two of those ways in detecting if a given date is a holiday or not. One is a straight forward out-of-the-box solution and the other one is an enterprise-ready solution, which one would you choose?
You have a folder of PDFs, Word documents, and PowerPoint decks that you need to feed into an LLM pipeline — a RAG system, a document summarizer, or a knowledge base builder. The problem is that LLMs work best with plain text, and most documents are packed with binary formatting, embedded fonts, and layout metadata that the model cannot interpret. Sending a raw PDF to an LLM is like handing someone a ZIP file and asking them to read it.
Microsoft’s markitdown library solves this by converting dozens of file formats — PDF, DOCX, PPTX, XLSX, HTML, CSV, EPUB, images, and audio — into clean Markdown that any LLM can process. It is a single pip install, works from Python code or the command line, and handles the conversion pipeline so your code does not have to. The Markdown output preserves headings, tables, and code blocks in a structured format that models handle especially well.
This article covers everything you need to get documents into your AI pipelines with MarkItDown. You will learn how to install it, convert individual files and entire directories, work with the Python API, handle different file types, and build a real document-processing pipeline that prepares files for a RAG system. By the end you will have a working utility that accepts any folder of mixed-format documents and outputs a structured Markdown dataset ready for embedding.
MarkItDown: Quick Example
Before diving into the details, here is the fastest path from a file to Markdown text you can feed into an LLM. This example converts an HTML page to Markdown in four lines of Python.
# quick_markitdown.py
from markitdown import MarkItDown
md = MarkItDown()
result = md.convert("https://example.com")
print(result.text_content[:500])
Output:
Example Domain
==============
This domain is for use in illustrative examples in documents. You may use this
domain in literature without prior coordination or asking for permission.
[More information...](https://www.iana.org/domains/reserved)
The MarkItDown() constructor creates a converter instance, and convert() accepts a file path, a URL, or a file-like object. The result is a DocumentConverterResult object — result.text_content holds the clean Markdown string ready to pass into any LLM or text processing pipeline.
The real power emerges when you need to handle PDFs, Office files, and mixed directories at scale. The sections below cover all of that, starting with installation.
What Is MarkItDown and Why Use It?
MarkItDown is an open-source Python library from Microsoft that acts as a universal document-to-Markdown converter. Think of it as a universal adapter — on one end you plug in a document in almost any format, and on the other end you get clean, structured Markdown text. The library was built specifically with LLM use cases in mind: the Markdown output is structured in a way that helps models understand document hierarchy (headings, tables, code blocks) rather than receiving a flat blob of text.
The key difference from alternatives like pypdf2 or python-docx is breadth and consistency. Those libraries require a different API for each format, handle only one format each, and return raw extracted text with no structure. MarkItDown gives you one API that handles all formats and preserves semantic structure as Markdown.
Format
MarkItDown
pypdf2 / python-docx / openpyxl
PDF
Yes
pypdf2 only
DOCX
Yes
python-docx only
PPTX
Yes
python-pptx only
XLSX
Yes
openpyxl only
HTML / URL
Yes
No
EPUB
Yes
No
CSV / JSON
Yes
No
Images (OCR)
Yes (optional)
No
Audio (transcription)
Yes (optional)
No
Unified output format
Markdown
Raw text / format-specific objects
The optional image OCR and audio transcription require extra dependencies (and an LLM API key for the best results), but the core document converters — PDF, Office, HTML — work completely offline with no API key required. That makes MarkItDown an excellent fit for any pipeline where you control the infrastructure.
Installing MarkItDown
MarkItDown is on PyPI. A basic install that handles PDFs, Office documents, and HTML covers most use cases and has minimal dependencies.
# Install the base package
pip install markitdown
# For PDF support (pdfminer.six is included in most installs)
pip install markitdown[pdf]
# For all optional extras (OCR, audio, Azure Document Intelligence)
pip install markitdown[all]
The [pdf] extra pulls in pdfminer.six for text-based PDF extraction. If you need image OCR within PDFs, you will also need an LLM plugin (covered in the advanced section). For most document-to-Markdown pipelines the base install is all you need — it handles DOCX, PPTX, XLSX, HTML, CSV, JSON, and EPUB without any extras.
One API to rule them all. Finally.
Converting Files, URLs, and Streams
The MarkItDown class is the main entry point. It auto-detects the file format based on extension or MIME type, so you call the same method regardless of what you are converting.
Converting a Local File
Pass any local file path as a string. MarkItDown detects the format automatically and returns a DocumentConverterResult.
# convert_file.py
from markitdown import MarkItDown
md = MarkItDown()
# Convert a DOCX file
result = md.convert("report.docx")
print(f"Title: {result.title}")
print(f"Characters: {len(result.text_content)}")
print()
print(result.text_content[:300])
Output:
Title: Q3 Sales Report
Characters: 4821
# Q3 Sales Report
**Prepared by:** Finance Team
**Date:** September 30, 2025
## Executive Summary
Revenue grew 12% year-over-year driven by the enterprise segment...
The result.title property extracts the document title from metadata where available (DOCX, PDF). The text_content property always holds the full Markdown string. Notice that the headings from the Word document are preserved as Markdown heading levels — this is exactly the structural information that LLMs use to understand document hierarchy.
Converting a URL
Pass a URL string and MarkItDown fetches the page and converts the HTML to Markdown. This works especially well for documentation pages, Wikipedia articles, and any page with semantic HTML structure.
# convert_url.py
from markitdown import MarkItDown
md = MarkItDown()
result = md.convert("https://docs.python.org/3/library/json.html")
print(result.text_content[:600])
Output:
json --- JSON encoder and decoder
=================================
**Source code:** [Lib/json/__init__.py](https://github.com/python/cpython/tree/3.13/Lib/json/__init__.py)
JSON (JavaScript Object Notation), specified by [RFC 7159](https://datatracker.ietf.org/doc/html/rfc7159.html)...
## json.dumps(obj, *, skipkeys=False, ...)
Serialize obj to a JSON formatted str...
Navigation menus, footers, and sidebars are typically stripped out, leaving the actual content. This makes URL conversion a fast way to pull documentation into a RAG corpus without building a custom scraper for every site.
Converting from a File-Like Object
When you receive a file as bytes (from an API response, an email attachment, or a web upload), you can convert it directly from a BytesIO object without writing it to disk first.
# convert_stream.py
import io
from markitdown import MarkItDown
import requests
md = MarkItDown()
# Download a PDF into memory and convert without saving to disk
response = requests.get("https://www.w3.org/WAI/WCAG21/wcag21.pdf")
pdf_stream = io.BytesIO(response.content)
# Must pass extension hint when using streams -- no filename to detect from
result = md.convert(pdf_stream, file_extension=".pdf")
print(f"Converted {len(result.text_content)} characters from in-memory PDF")
print(result.text_content[:400])
Output:
Converted 87432 characters from in-memory PDF
Web Content Accessibility Guidelines (WCAG) 2.1
================================================
W3C Recommendation 05 June 2018
Abstract
--------
Web Content Accessibility Guidelines (WCAG) 2.1 covers a wide range of...
The file_extension parameter is required when passing a stream because there is no filename to inspect. Always include it for streams to ensure the correct converter is selected.
BytesIO: no temp files, no disk I/O, no drama.
Format-Specific Conversion Options
Most formats work out of the box, but a few have options worth knowing about. PowerPoint files get per-slide conversion, Excel files convert to Markdown tables, and PDFs expose page-level control.
Excel and CSV to Markdown Tables
Excel sheets are converted to Markdown tables — one table per worksheet. This is particularly useful when feeding structured data to LLMs that need to reason about tabular information.
# convert_excel.py
from markitdown import MarkItDown
md = MarkItDown()
result = md.convert("sales_data.xlsx")
print(result.text_content)
Output (example with a two-sheet workbook):
## Sheet1
| Month | Revenue | Units |
|-------|---------|-------|
| Jan | 84000 | 420 |
| Feb | 91200 | 456 |
| Mar | 78500 | 392 |
## Sheet2
| Region | Manager | Target |
|--------|---------|--------|
| East | Alice | 100000 |
| West | Bob | 95000 |
Each worksheet becomes an H2 section followed by a Markdown table. LLMs handle this format well for question-answering tasks — the model can identify column headers, filter by region, and compute simple aggregations when the data is in this structured Markdown table format rather than raw CSV text.
PowerPoint Slide Extraction
PPTX files are converted slide by slide. Each slide becomes a section with its title as a heading and the body text extracted below it. Speaker notes are included when present.
# convert_pptx.py
from markitdown import MarkItDown
md = MarkItDown()
result = md.convert("product_roadmap.pptx")
# Show first 500 chars to see the structure
print(result.text_content[:500])
Output:
## Slide 1: Product Roadmap 2026
Vision: Ship the AI-native workflow layer by Q3.
- Q1: Core infrastructure and auth
- Q2: Integration layer + partner APIs
- Q3: Public launch
- Q4: Enterprise tier
**Notes:** Emphasize the partnership angle -- this is key differentiator vs competitors.
## Slide 2: Q1 Milestones
- Authentication service -- 95% complete
- Database migration -- in progress
...
Speaker notes appear as bold “Notes:” blocks after each slide’s content. For meeting-notes pipelines or sales-deck summarizers this is especially useful — you get the full context that the presenter intended to convey, not just the bullet points on the slide.
Speaker notes included. Your LLM finally hears what the presenter was thinking.
Batch Converting a Directory
Real pipelines rarely deal with a single file. Here is a pattern to convert every supported file in a directory, log any failures, and save all results to a single Markdown file for easy embedding.
# batch_convert.py
import os
from pathlib import Path
from markitdown import MarkItDown
SUPPORTED = {".pdf", ".docx", ".pptx", ".xlsx", ".html", ".csv", ".json", ".epub"}
def batch_convert(input_dir: str, output_path: str) -> dict:
"""Convert all supported files in input_dir to a single Markdown file."""
md = MarkItDown()
results = {"success": [], "failed": []}
output_parts = []
for fpath in sorted(Path(input_dir).rglob("*")):
if fpath.suffix.lower() not in SUPPORTED:
continue
print(f"Converting: {fpath.name}")
try:
result = md.convert(str(fpath))
# Separate each document with a clear section header
section = f"\n\n---\n## Document: {fpath.name}\n\n{result.text_content}"
output_parts.append(section)
results["success"].append(str(fpath))
except Exception as exc:
print(f" FAILED: {exc}")
results["failed"].append({"file": str(fpath), "error": str(exc)})
with open(output_path, "w", encoding="utf-8") as f:
f.write("# Document Corpus\n")
f.write(f"Converted {len(results['success'])} documents.\n")
f.write("".join(output_parts))
return results
if __name__ == "__main__":
stats = batch_convert("./docs", "corpus.md")
print(f"\nDone: {len(stats['success'])} converted, {len(stats['failed'])} failed")
Output:
Converting: annual_report.pdf
Converting: onboarding.docx
Converting: roadmap.pptx
Converting: q3_data.xlsx
FAILED: File appears to be encrypted
Done: 3 converted, 1 failed
The try/except around each conversion is essential — encrypted PDFs, corrupted files, or unsupported subtypes will raise exceptions rather than silently producing empty output. The pattern above logs the failure and continues with the rest of the batch, which is the right behavior for any automated pipeline. The output corpus.md contains all documents separated by clear section dividers that chunk-based RAG systems can split on.
Using MarkItDown with LLM Pipelines
The most common use case is feeding converted documents into an LLM. Here is how to wire MarkItDown into an OpenAI-compatible pipeline for a simple document Q&A pattern.
# doc_qa.py
from markitdown import MarkItDown
from openai import OpenAI
def answer_from_document(file_path: str, question: str, api_key: str) -> str:
"""Convert a document to Markdown and answer a question about it."""
md = MarkItDown()
result = md.convert(file_path)
doc_text = result.text_content
# Truncate if the document exceeds a safe context window size
max_chars = 80000 # ~20K tokens for most models
if len(doc_text) > max_chars:
doc_text = doc_text[:max_chars] + "\n\n[Document truncated...]"
client = OpenAI(api_key=api_key)
response = client.chat.completions.create(
model="gpt-4o-mini",
messages=[
{
"role": "system",
"content": "You are a document analyst. Answer questions based only on the provided document.",
},
{
"role": "user",
"content": f"Document:\n\n{doc_text}\n\nQuestion: {question}",
},
],
)
return response.choices[0].message.content
# Example usage
answer = answer_from_document(
"contract.pdf",
"What is the termination clause?",
api_key="your-openai-api-key"
)
print(answer)
Output:
Section 12.3 of the contract states that either party may terminate this agreement
with 30 days written notice. Termination for cause requires only 5 business days
notice and must be accompanied by written documentation of the breach.
This pattern works with any OpenAI-compatible API — swap the base URL and API key for Anthropic, Gemini, or a local Ollama endpoint and the pattern is identical. The key insight is that MarkItDown’s Markdown output is substantially better context than raw extracted text because the model can use heading levels and table structure to locate specific sections of long documents.
Raw PDF to LLM: garbled. Markdown to LLM: actually works.
Real-Life Example: Building a Document Corpus Preparer for RAG
This project ties together everything from this article. It accepts a folder of mixed-format documents, converts all of them to Markdown, chunks the output into LLM-ready segments, and saves a JSON file that a vector database like Chroma or Pinecone can ingest directly.
# rag_preparer.py
import json
import os
from pathlib import Path
from markitdown import MarkItDown
SUPPORTED = {".pdf", ".docx", ".pptx", ".xlsx", ".html", ".csv", ".epub"}
CHUNK_SIZE = 1500 # characters per chunk (~375 tokens)
CHUNK_OVERLAP = 150 # overlap so context is not lost at boundaries
def chunk_text(text: str, size: int = CHUNK_SIZE, overlap: int = CHUNK_OVERLAP) -> list:
"""Split text into overlapping chunks."""
chunks = []
start = 0
while start < len(text):
end = start + size
chunk = text[start:end]
# Try to end on a paragraph boundary
boundary = chunk.rfind("\n\n")
if boundary > size // 2:
chunk = chunk[:boundary]
chunks.append(chunk.strip())
start += len(chunk) - overlap
return [c for c in chunks if len(c) > 50] # drop tiny trailing chunks
def prepare_rag_corpus(docs_dir: str, output_path: str) -> None:
md = MarkItDown()
corpus = []
chunk_id = 0
for fpath in sorted(Path(docs_dir).rglob("*")):
if fpath.suffix.lower() not in SUPPORTED:
continue
print(f"Processing: {fpath.name}")
try:
result = md.convert(str(fpath))
chunks = chunk_text(result.text_content)
for i, chunk in enumerate(chunks):
corpus.append({
"id": f"chunk_{chunk_id:05d}",
"source_file": fpath.name,
"source_title": result.title or fpath.stem,
"chunk_index": i,
"total_chunks": len(chunks),
"text": chunk,
})
chunk_id += 1
print(f" -> {len(chunks)} chunks")
except Exception as exc:
print(f" FAILED: {exc}")
with open(output_path, "w", encoding="utf-8") as f:
json.dump(corpus, f, indent=2, ensure_ascii=False)
print(f"\nCorpus saved: {len(corpus)} chunks from {chunk_id} total across all docs")
print(f"Output: {output_path}")
if __name__ == "__main__":
prepare_rag_corpus("./knowledge_base", "rag_corpus.json")
Output:
Processing: company_handbook.pdf
-> 47 chunks
Processing: product_specs.docx
-> 18 chunks
Processing: roadmap_2026.pptx
-> 9 chunks
Processing: pricing.xlsx
-> 3 chunks
Corpus saved: 77 chunks from 77 total across all docs
Output: rag_corpus.json
The output rag_corpus.json is ready to embed. Each chunk carries its source file and title as metadata, so your vector database can filter by document when answering queries that should be scoped to a specific source. The overlapping chunks prevent context loss at boundaries — a sentence that straddles a chunk boundary will appear in both adjacent chunks, so the model always sees complete context around any retrieved passage. To extend this project, add an embedding step using sentence-transformers or the OpenAI Embeddings API and pipe the corpus directly into your vector store of choice.
Frequently Asked Questions
Can MarkItDown convert password-protected PDFs?
No — password-protected PDFs raise an exception during conversion because the underlying pdfminer.six library cannot read encrypted content without the password. You will see a PDFPasswordIncorrect or PDFEncryptionError. The fix is to pre-decrypt the PDF before conversion using a library like pikepdf: open with the password and save a decrypted copy, then convert the decrypted file. Always wrap conversion in try/except in batch pipelines so a single locked file does not abort the entire run.
Does MarkItDown extract images from PDFs?
With the base install, MarkItDown extracts text from PDFs but skips embedded images. If your PDFs are scanned documents (images of text, not actual text layers), the base converter will return little or no content. For scanned PDFs you need to add an LLM plugin — MarkItDown supports Azure Document Intelligence and OpenAI Vision as optional backends that can OCR images within documents. Pass an llm_client and llm_model to the MarkItDown constructor to enable this. The optional dependency install is pip install markitdown[all].
How should I handle very large documents?
For documents that produce more than 100,000 characters of Markdown, pass the whole text to an LLM in a single call only if your model supports a large context window (128K+). Otherwise, use the chunking pattern from the real-life example above — split the Markdown at paragraph boundaries with a 10% overlap and embed the chunks rather than the whole document. MarkItDown itself handles arbitrarily large files without issue; the bottleneck is always the downstream LLM context window, not the conversion step.
How well does MarkItDown handle complex tables?
Simple flat tables — with consistent column counts and no merged cells — convert reliably to Markdown tables. Complex tables with merged headers, multi-row cells, or heavily styled cells may produce irregular Markdown. Excel files generally convert better than Word or PDF tables because the underlying data is already structured. If you find table output unreliable for a specific document type, consider using openpyxl or python-docx for that format and MarkItDown for everything else in the same pipeline.
Can I stream the conversion output?
MarkItDown does not support streaming output — the convert() call blocks until the full document is converted and returns the complete result. For large documents this can take several seconds, especially for multi-hundred-page PDFs. If you need non-blocking behavior in an async pipeline, wrap the conversion in asyncio.run_in_executor() to run it in a thread pool and await the result without blocking your event loop.
Can I add a custom converter for a format MarkItDown does not support?
Yes — MarkItDown has a plugin system. You can register a custom DocumentConverter subclass for any file extension. Implement the convert() method that accepts a file path and returns a DocumentConverterResult, then register it via md.register_converter(MyConverter()). This is useful for proprietary formats specific to your industry — medical records in HL7, CAD files, or internal XML schemas — where you have the parsing logic but need to plug it into the same batch pipeline that handles standard formats.
Conclusion
MarkItDown removes the most painful part of building LLM document pipelines: writing and maintaining a different parser for every file format. A single MarkItDown().convert() call handles PDFs, DOCX, PPTX, XLSX, HTML, CSV, EPUB, and more, returning clean Markdown that LLMs can reason over rather than raw binary or poorly-structured text. The real-life example above gives you a complete RAG corpus preparer that you can extend — add an embedding step, plug in a vector store, or swap in a different chunking strategy depending on your document types.
The next step is to test it on your actual document set. Run the batch converter, inspect the output Markdown for any formatting issues specific to your files, and tune the chunk size to match your embedding model’s token limit. For OCR-heavy or audio transcription pipelines, explore the optional llm_client parameter to unlock MarkItDown’s full feature set.
Pro Tips for Working with Public Holidays in Python
1. Cache Holiday Data to Avoid Repeated API Calls
If you are using the Calendarific API, cache the results locally instead of calling the API every time you check a date. Holiday lists for a given country and year rarely change. Save the API response to a JSON file and only refresh it when the year changes. This reduces API usage and makes your application faster.
# cache_holidays.py
import json
import os
from datetime import date
CACHE_FILE = "holidays_cache.json"
def get_cached_holidays(country, year):
if os.path.exists(CACHE_FILE):
with open(CACHE_FILE, "r") as f:
cache = json.load(f)
key = f"{country}_{year}"
if key in cache:
print(f"Using cached holidays for {country} {year}")
return cache[key]
return None
def save_to_cache(country, year, holidays):
cache = {}
if os.path.exists(CACHE_FILE):
with open(CACHE_FILE, "r") as f:
cache = json.load(f)
cache[f"{country}_{year}"] = holidays
with open(CACHE_FILE, "w") as f:
json.dump(cache, f, indent=2)
print(f"Cached {len(holidays)} holidays for {country} {year}")
Output:
Cached 11 holidays for US 2026
Using cached holidays for US 2026
2. Calculate Business Days Excluding Holidays
One of the most common real-world uses of holiday detection is calculating business days. Combine the holidays library with Python’s datetime to count only working days between two dates, excluding weekends and public holidays. This is essential for shipping estimates, SLA calculations, and payroll processing.
# business_days.py
import holidays
from datetime import date, timedelta
def business_days_between(start, end, country="US"):
us_holidays = holidays.country_holidays(country)
count = 0
current = start
while current <= end:
if current.weekday() < 5 and current not in us_holidays:
count += 1
current += timedelta(days=1)
return count
start = date(2026, 12, 20)
end = date(2026, 12, 31)
days = business_days_between(start, end)
print(f"Business days from {start} to {end}: {days}")
Output:
Business days from 2026-12-20 to 2026-12-31: 7
3. Handle Multiple Countries for International Apps
If your application serves users in different countries, check holidays for each user's country rather than assuming a single country. The holidays library supports 100+ countries. Store each user's country code and pass it when checking holidays. Remember that some countries have regional holidays too -- for example, different states in Australia or provinces in Canada have different public holidays.
4. Build a Holiday-Aware Scheduler
Many applications need to skip processing on holidays. Instead of checking manually every time, create a decorator that wraps scheduled tasks and automatically skips execution on public holidays. This is useful for automated reports, email campaigns, and batch processing jobs that should only run on business days.
# holiday_aware_scheduler.py
import holidays
from datetime import date
from functools import wraps
def skip_on_holidays(country="US"):
def decorator(func):
@wraps(func)
def wrapper(*args, **kwargs):
today = date.today()
if today in holidays.country_holidays(country):
name = holidays.country_holidays(country).get(today)
print(f"Skipping {func.__name__}: today is {name}")
return None
return func(*args, **kwargs)
return wrapper
return decorator
@skip_on_holidays("US")
def send_daily_report():
print("Sending daily report...")
return "Report sent"
result = send_daily_report()
print(f"Result: {result}")
Output (on a regular business day):
Sending daily report...
Result: Report sent
5. Display Upcoming Holidays for Better UX
Show your users which holidays are coming up so they can plan ahead. This is valuable for project management tools, delivery estimate pages, and HR applications. Sort the holiday list by date and filter for upcoming dates only to give users a clear view of the next few holidays.
Frequently Asked Questions
How do I check if a date is a public holiday in Python?
Use the holidays library: install it with pip install holidays, then check with date in holidays.country_holidays('US'). It returns True if the date is a recognized public holiday for that country.
What countries does the Python holidays library support?
The holidays library supports over 100 countries and their subdivisions. Major countries include the US, UK, Canada, Australia, Germany, France, India, and many more. Use holidays.list_supported_countries() to see the complete list.
Can I add custom holidays to the holidays library?
Yes. Create a custom holiday class inheriting from the country class, or use the append() method to add individual dates. You can also create entirely custom holiday calendars for company-specific or regional holidays.
How do I get the name of a holiday for a specific date?
Access the holiday name with holidays.country_holidays('US').get(date), which returns the holiday name as a string, or None if it is not a holiday. You can also iterate over the holidays object to list all holidays in a year.
Is the holidays library useful for business day calculations?
Yes. Combine it with numpy.busday_count() or pandas.bdate_range() to calculate working days excluding public holidays. This is useful for project management, payroll calculations, and delivery date estimation.
Every Python developer reaches a moment when a single file stops working. You’re 500 lines in, juggling functions from data processing, API calls, and database operations all in one main.py, and suddenly finding the function you need feels like a scavenger hunt. This is when organizing your code into multiple files transforms from a nice-to-have into a survival skill.
The good news? Python has a built-in system for this. You don’t need external tools or elaborate frameworks—the module and package system is already there, waiting for you to use it. Whether you’re building a command-line tool, a web application, or a data science project, splitting your code into logical, reusable pieces makes everything cleaner, faster to debug, and easier for others to understand.
In this article, we’ll explore how Python modules and packages work, walk through real examples from organizing a few scripts to building a complete project structure, and learn the best practices that professionals use every day. By the end, you’ll understand __init__.py files, import patterns, and how to structure projects that scale.
Written by Pubs
Python developer and educator with 15+ years building production systems across data engineering, web APIs, and AI tooling. Founder of Python How To Program — 270+ in-depth tutorials covering the modern Python stack.
Splitting Python Code Into Multiple Files: Quick Example
Let’s start with the simplest possible example. Imagine you have a script that needs utility functions. Instead of writing everything in one file, split it into two:
# utils.py
def greet(name):
return f"Hello, {name}!"
def add_numbers(a, b):
return a + b
Now import and use those functions from a separate file:
That’s it. One file defines functions, another imports and uses them. This simple pattern scales to complex projects. The rest of this article teaches you how to expand this concept into packages, subdirectories, and professional-grade structures.
What Are Modules and Packages?
Python uses two core concepts to organize code: modules and packages. Understanding the difference is crucial because they work together but serve different purposes.
A module is simply a Python file. When you create utils.py, you’ve created a module named utils. Inside it, you can define functions, classes, and variables. Other files import and use what you define. A module is the smallest unit of code organization.
A package is a directory that contains Python modules and a special __init__.py file. Packages let you organize related modules into a hierarchical structure. Think of a module as a single document and a package as a folder containing multiple documents (modules).
Here’s a quick comparison:
Concept
What It Is
Example
How to Import
Module
A single Python file
utils.py
import utils or from utils import func
Package
A directory with __init__.py and modules
mypackage/ directory
import mypackage.module or from mypackage import module
Namespace Package
A directory without __init__.py (Python 3.3+)
mypackage/ (no __init__.py)
import mypackage.module (if properly configured)
Think of it this way: a module is like a notebook, and a package is like a filing cabinet full of notebooks. When you want something from one notebook, you ask for it by name. When you want something from a notebook in the cabinet, you specify both the cabinet and the notebook.
One module per concern. Future debugging will thank you.
Importing From Files in the Same Directory
The simplest form of code splitting happens when all your files live in the same directory. Let’s build on the earlier example and explore different import styles.
# utils.py
"""Utility functions for text processing."""
def reverse_string(text):
"""Reverse a string."""
return text[::-1]
def count_vowels(text):
"""Count vowels in a string."""
vowels = "aeiouAEIOU"
return sum(1 for char in text if char in vowels)
def format_title(text):
"""Format text as a title."""
return text.title()
In your main script, you can import from utils several ways. Let’s start with importing the entire module:
Original: hello world
Reversed: dlrow olleh
Vowels: 3
Or use selective imports:
# main.py - Import Approach 2: Import specific functions
from utils import reverse_string, count_vowels
text = "python programming"
print(f"Reversed: {reverse_string(text)}")
print(f"Vowels: {count_vowels(text)}")
Output (Approach 2):
Reversed: gnimmargorp nohtyp
Vowels: 7
When you import a module from the same directory, Python searches the current directory automatically. If your files are in different directories (like one folder for the main app and another for utilities), you’ll use packages instead.
Creating Packages With Directories
Real projects need structure. Instead of dumping all modules in one directory, you organize related modules into packages. A package is a directory with an __init__.py file inside it.
Finally, the main script imports from both packages and ties everything together:
# main.py (at project root)
from data.weather_data import fetch_temperature
from utils.formatters import format_weather
location = "London"
weather = fetch_temperature(location)
print(format_weather(weather))
Output (when main.py runs):
London: 22°C (71.6°F), Sunny
When Python sees from data.weather_data import fetch_temperature, it looks for a directory named data with an __init__.py file, then finds the weather_data module inside it. Without the __init__.py file, Python won’t recognize data as a package, and the import will fail.
Everything in one file is everything in one bug.
The __init__.py File Explained
The __init__.py file is how Python knows a directory is a package. Even if the file is empty, its presence tells Python “this directory should be treated as a package.” But __init__.py can do much more than just mark a directory.
An empty __init__.py file does nothing visible, but it still serves a purpose:
# utils/__init__.py (empty)
# This file exists, but is completely empty.
# Python still recognizes utils/ as a package.
However, you can use __init__.py to control what gets imported when someone imports your package. This is called the package’s public interface:
Purpose of this __init__.py: When someone does from math_tools import add, Python looks in __init__.py first. This file imports add from the submodule and makes it directly available.
Now users can write simpler code:
# Instead of:
from math_tools.calculations import add
# They can write:
from math_tools import add
When is __init__.py executed? The __init__.py file runs once when the package is first imported. If you put print statements or initialization code there, they execute at import time.
In Python 3.3+, you can also create namespace packages—directories without __init__.py files. However, for clarity and compatibility, most projects use __init__.py files explicitly.
Import Styles and Best Practices
Python gives you multiple ways to import code. Choosing the right style matters for readability and avoiding bugs.
Style 1: Import the entire module
import utils
result = utils.add(5, 3)
Pro: Clear where add comes from. Con: Requires the module prefix every time.
Style 2: Import specific items
from utils import add, subtract
result = add(5, 3)
Pro: Cleaner syntax, less typing. Con: Can be unclear where add comes from if not paying attention.
Style 3: Import with aliases
import numpy as np
import pandas as pd
from utils import add as add_numbers
result = add_numbers(5, 3)
Pro: Useful for long module names or preventing naming conflicts. Con: Requires that all code uses the alias.
Style 4: Import everything (AVOID THIS)
from utils import *
result = add(5, 3) # Where does add come from? No idea!
Pro: Minimal typing. Con: Creates ambiguity, can cause naming conflicts, makes code hard to maintain.
Here’s a comparison table of common patterns:
Pattern
Use Case
Readability
Recommendation
import module
Simple modules you use throughout the code
Excellent
Preferred
from module import func
Using a few specific items frequently
Good
Preferred
import module as alias
Long module names, preventing conflicts
Good
Use with care
from module import *
Interactive sessions only
Poor
Avoid in production
Best Practice: Use absolute imports (like from utils import func) over relative imports (like from . import func) in most cases. Absolute imports are clearer about where code comes from.
Modules click together. That’s the whole point.
Understanding __name__ and __main__
One of the most useful but confusing features in Python is the __name__ variable. Every Python file has a special variable called __name__ that Python sets automatically.
How __name__ works: When a file runs directly (not imported), __name__ is set to "__main__". When the file is imported as a module, __name__ is set to the module’s name.
Let’s see this in action:
# demo.py
print(f"Module name: {__name__}")
def greet():
return "Hello from demo.py"
if __name__ == "__main__":
print("This code only runs when demo.py is executed directly.")
print(greet())
else:
print("This code runs when demo.py is imported as a module.")
Output (when you run demo.py directly):
Module name: __main__
This code only runs when demo.py is executed directly.
Hello from demo.py
Output (when you import it from another file):
# another_file.py
import demo
# This prints:
# Module name: demo
# This code runs when demo.py is imported as a module.
This pattern is invaluable. It lets your module do two things: define functions for others to use AND include tests or example code that only runs when you execute the file directly.
# calculations.py
def add(a, b):
"""Add two numbers."""
return a + b
def subtract(a, b):
"""Subtract two numbers."""
return a - b
if __name__ == "__main__":
# Test the functions
print(f"5 + 3 = {add(5, 3)}")
print(f"5 - 3 = {subtract(5, 3)}")
Output (when calculations.py runs directly):
5 + 3 = 8
5 - 3 = 2
Now, calculations.py can be imported by other files (the tests won’t run), or executed directly to test itself. This is why professional Python code always includes the if __name__ == "__main__": guard.
Understanding __file__
Another special variable is __file__, which contains the path to the current Python file. This is surprisingly useful for finding files relative to your module.
When you need to load a data file or configuration that lives next to your module, __file__ helps you find it:
# data_loader.py
import os
import json
def load_config():
"""Load configuration from a JSON file next to this module."""
current_dir = os.path.dirname(__file__)
config_path = os.path.join(current_dir, "config.json")
with open(config_path) as f:
return json.load(f)
if __name__ == "__main__":
config = load_config()
print(f"Loaded config: {config}")
Without __file__, finding relative paths becomes a nightmare. Different working directories would break your code. With __file__, your module is portable—it finds files relative to itself, not to wherever the user ran the script.
Common Pitfalls and How to Avoid Them
Even experienced developers hit these snags. Understanding them saves hours of debugging.
Pitfall 1: Circular Imports occur when Module A imports Module B, and Module B imports Module A. Python can’t resolve this circular dependency:
# module_a.py
from module_b import function_b
def function_a():
return function_b()
And then module_b.py tries to import from module_a in return:
Solution: Restructure your code so dependencies flow in one direction. Move shared code to a third module that both can import from, or delay the import until it’s actually needed inside a function.
Pitfall 2: Shadowing Built-in Modules happens when your module name matches Python’s built-in modules:
# DON'T create a file named "string.py" or "json.py" in your project.
# Python will import YOUR file instead of the built-in module.
# string.py (your file - BAD IDEA)
def process():
return "My string module"
Solution: Use descriptive names that won’t conflict. Instead of string.py, use string_utils.py.
Pitfall 3: Confusion Between Relative and Absolute Imports happens when working with packages:
# Inside mypackage/module_a.py - RELATIVE IMPORT
from . import module_b # Import from the same package
# Inside mypackage/module_a.py - ABSOLUTE IMPORT
from mypackage import module_b # Full path from root
Guideline: Use absolute imports in most cases; they’re clearer and more portable. Use relative imports sparingly, only when you have a good reason.
Pitfall 4: Importing From a Directory Not in sys.path happens when Python can’t find your module:
# This fails if utils/ isn't in Python's search path
from utils import helper # ModuleNotFoundError!
Solution: Use proper package structure with __init__.py files, or add directories to sys.path if needed (though this is a code smell).
Real-Life Example: Building a Modular Weather Dashboard
Let’s put everything together. Here’s a complete project that demonstrates proper organization:
The data/sources.py module handles fetching weather data (simulated here with random values). In a real project, this would call a weather API. Now let’s create the display formatter:
The formatter converts temperatures and builds a clean text-based report. Next, set up the __init__.py files to control each package's public interface:
# data/__init__.py
"""Data package for weather sources."""
from .sources import fetch_weather
__all__ = ["fetch_weather"]
The data/__init__.py re-exports fetch_weather so users can import directly from the package. Do the same for the display package:
# display/__init__.py
"""Display package for formatting weather information."""
from .formatters import format_weather_report
__all__ = ["format_weather_report"]
With the __init__.py files in place, the main script can use clean, simple imports from each package:
# main.py
"""Weather Dashboard - Main Entry Point."""
from data import fetch_weather
from display import format_weather_report
def main():
"""Run the weather dashboard."""
locations = ["London", "New York", "Tokyo", "Sydney"]
for location in locations:
weather = fetch_weather(location)
report = format_weather_report(weather)
print(report)
if __name__ == "__main__":
main()
Output (when you run main.py):
╔════════════════════════════════════╗
║ Weather Report for London ║
╠════════════════════════════════════╣
║ Temperature: 22°C (71.6°F) ║
║ Humidity: 65% ║
║ Condition: Sunny ║
║ Updated: 2026-03-14T14:32:18.123456 ║
╚════════════════════════════════════╝
╔════════════════════════════════════╗
║ Weather Report for New York ║
╠════════════════════════════════════╣
║ Temperature: 18°C (64.4°F) ║
║ Humidity: 72% ║
║ Condition: Cloudy ║
║ Updated: 2026-03-14T14:32:18.234567 ║
╚════════════════════════════════════╝
(Output continues for Tokyo and Sydney with randomized values...)
This example demonstrates several key concepts: modules organized into packages, __init__.py files controlling the public interface, absolute imports throughout, and a clear separation of concerns (data fetching vs. display formatting). When your dashboard grows to 50 functions, this organization keeps everything manageable.
Frequently Asked Questions
Should I organize my imports in any particular order?
Yes, PEP 8 (Python's style guide) recommends grouping imports: standard library first, third-party packages second, and local modules last, with blank lines between groups. Example:
import os
import sys
import requests
import numpy as np
from myproject import utils
from myproject.data import loader
When should I use relative imports like from . import module?
Use relative imports only within packages when you have a good reason (like avoiding name collisions). For most projects, absolute imports are clearer. Relative imports can break if your package structure changes or if someone runs the module in unexpected ways.
Can I leave __init__.py completely empty?
Yes, an empty __init__.py is perfectly valid and commonly used. Python just needs the file to exist to recognize a directory as a package. However, it's often helpful to put documentation, import statements, or initialization code there.
Are modules imported multiple times if I import them in multiple files?
No. Python caches imported modules in sys.modules. The first import runs the module's code, but subsequent imports return the cached version. This is efficient and prevents re-execution.
I have circular dependencies; how do I really fix them?
The best solution is restructuring: move shared code to a separate module that both modules import. If that's not feasible, delay the import until inside the function that needs it (import at the bottom of the function, not at the top). Example:
def my_function():
from another_module import some_func # Import only when needed
return some_func()
How do I properly import my modules when running tests from a different directory?
Use absolute imports with your project as the root. If you have a project structure with packages, install your project in development mode using pip install -e . (with a setup.py), or ensure your test runner is aware of the project root.
Conclusion
Splitting Python code into multiple files is not about complexity—it's about clarity. A well-organized project with modules and packages is easier to understand, test, extend, and collaborate on. The patterns you've learned here—modules, packages, __init__.py, import styles, and the __name__ variable—are the foundation of every professional Python project, from small scripts to massive frameworks.
Start with simple modules in the same directory. As your project grows, organize them into packages. Use __init__.py to control your public interface. Follow import best practices. Your future self (and your teammates) will thank you. For more details on Python's module system, check the official Python documentation on modules and packages.
Putting parameters in configuration files can take some extra effort at the start, but then can save you a lot of time and heartache in the future. We are all tempted to simply hardcode parameters directly into our code as we save precious time when we write code, but then doing this properly can take extra effort. Some of us at least create constants or store parameters in a variable, while others store them in a class variable to keep this even cleaner. Arguably the best option is store these in a configuration file. In this article you’ll learn the steps compulsory to use configuration files in python 3. It will be strictly according to the official documentation of python 3.
ConfigParser is the class used to implement configuration files in python 3. The main function of using these files is to write python programs which can easily be modified by end users easily. The main aspect of this article is to know about the complete implementation of configuration files. We will cover the three main aspects in this article which are Setup, File format and Basic API.
Written by Pubs
Python developer and educator with 15+ years building production systems across data engineering, web APIs, and AI tooling. Founder of Python How To Program — 270+ in-depth tutorials covering the modern Python stack.
Configuration files can play a vital role in any program and its management. One of the popular approaches to separate code from configuration is to store these files in YAML, JSON or INI and not in .py format. One reason that .py files are not used is that Python 3 can be slower when it comes to reloading. You would need to restart the whole program if you stored your config in a python .py file. Also, the end user can modify the code at will if it is in .py format. Configuration files make it easier to modify or change the code. The data stored in configuration is to have separation so that the programmer can focus on code development and ensure that is clean as possible and the user only needs to touch the configuration file.
Setup of Python 3 ConfigParser
The class used to create configuration files is ConfigParser. This is a part of the standard python 3 library so no need to do any pip installation. We have to import it: “import configparser” to use it or there is another way of using it, it will work in both python2 and python 3, which is:
import configparser
File Format of configuration file
One convention that is used for the file format is to use the extension .ini (short for initial or initiation) but you can use the configuration based on your own or on clients preferences. There are different parts of configuration files.
A configuration file consists of one or more sections.
The section names are written in these delimiters [section name].
The concept is similar to mapping. It consists of key-value pairs meaning there is a name of the configuration item (“key”) and the other the actual value of the configuration (“value”)
Two operators are used to initialize or separate key-value pair assignment operator (=) or colon operator (:).
You can even put in a comment using the # or ; prefix.
Example:
[default]
host = 192.168.1.1
port = 31
username = admin
password = admin
[database]
#database related configuration files
port = 22
forwardx11 = no
name = db_test
In the above configuration file example, we have two sections first is [default] and second is [database]. Each section has its own key-value pairs/entries like username = admin and name = db_test. So all of the key-value pairs belong to a given section, so it is easier to organise your configuration files. Finally the sentence with a prefix of # is for commenting
Reading the configuration file from python code
Now, we will talk about the method to read from the config file. As mentioned earlier, ConfigParser is the module/class used to create configuration files. First, ConfigParser object has to be initialized: config = configparser.ConfigParser(); The following are functions:
Initialization of ConfigParser
You can can initiate the configuration file with the following syntax. Here the variable “config” will contain all the values
config = configparser.ConfigParser()
Write to a Configuration file with ConfigParser
Although normally you normally edit to a configuration file in a text editor by hand, there are times where you want to programmatically write to a config file. For example, this could be to create a default config file which a user can then use as a basis to change or edit. You may also want to over-ride a config entry (after confirming with the user) that is erroneous.
Once the object is initialised, we can now write in it. There are ways through which we can initialize the section to write in the config file. We are going use the example mentioned above in file format. Let’s initialize the default section using dictionary.
Here, “default” is the name of the section (the part in the actual configuration file that had the square “[” and “]” brackets) and curly braces denote the start and end of a dictionary. Inside the dictionary are key-value pairs i.e. “host” is the key and “192.168.1.1” is the value separated by colon “:”
Now, let’s initialize the database section using empty dictionary and add the key-value pairs line by line.
Here, “database” is the name of the section and curly braces denote the same start and end of a dictionary. In this case, the dictionary is empty. Key-value pairs i.e. “port” is the key and “22” is the value separated by colon “=.” This method provides a lot more flexibility.
After initializing the sections in config, you can now write it to a config file:
with open('test.ini', 'w') as configfile:
config.write(configfile);
Now, you will be able to see the file named test.ini created.
Read config from the config file using ConfigParser
The next step is to read the file which you just have created.
The config file can be read by using read() method: config.read(‘test.ini’). This will read the test.ini file which you just created.
If you want to print just the sections available in configuration file, method sections() can be used: config.sections().
Next is getting the value of any key stored in the section. config[‘database’][‘name’]
This will give you the value which is “db_test” of the key called “name” stored in data_base section.
The following code will print out all the values stored against the keys in the default section using a for loop.
for key in config['default']:
print(config['default'][key])
Code:
Output:
Changing the datatype of the configuration value from ConfigParser
The datatype of the object of ConfigParser is string by default. This is fine for most situations, but then suppose you want to get a true/false value instead, or a number value to do maths operations. For this the string default may not work. We can typecast/covert the datatype of the object of configparser or the datatype of keys of section into any other type such as integer, float etc. In order to change the datatype of object, you have to covert it manually or by using getter methods. The best and the preferred way is to use getter methods.
There are three getter methods:
getint();
getfloat();
getboolean();
Example: config['default'].getint('port')
getint() will covert the datatype of port key of section “default” into “integer”. If you use the typeof(); method on port then it will show integer type now.
In this way, config file is invoking the getboolean() method and its takin two parameters as argument. The first is the name of the section and the other is the key whole value’s type will be changed.
What to do if a value is not available from a configfile
A fallback result can also be obtained. Fallback is the result obtained when the key or section we want to get isn’t available.
In this case, not_database will be returned if the “database” key isn’t available or the section default is not found.
Conclusion
We come to know about the setup i.e. importing the ConfigParser first to create configuration files. Next section was about the file format. There you can check about the basic syntax of creating a configuration file. It consists of sections and key-value pairs.
We played with the data types of keys in default and data_base sections. We can change datatypes using getter methods. Last but not the least, we studied about the basic api like write, read and about fallback.
Using configuration files is not difficult and can save a lot of time. So in your next coding work, take the extra few minutes to create a configuration file instead of hardcoding.
Full Code: ConfigParser Example Code
import configparser
config = configparser.ConfigParser()
#Set up default item for hosts using dictionary
config['default'] = {"host" : "192.168.1.1",
"port" : "22",
"username" : "username",
"password" : "password" }
#setup config item bytes
config['database'] = {}
config['database']['port'] = "22"
config['database']['forwardx11'] = "no"
config['database']['name'] = "db_test"
#Write default file
with open('test.ini', 'w') as configfile:
config.write(configfile)
#Open the file again to try to read it
config.read('test.ini')
#Print the sections
print(config.sections())
print( config['database']['name'] )
#Print each key pair
for key in config['default']:
print(config['default'][key])
#print the type of integer value
print (type (config['default'].getint('port')))
print( config.getboolean('database', 'forwardx11') )
#Print default value
print( config.get('default', 'databaseabc', fallback='not_database') )
You have a folder of PDFs, Word documents, and PowerPoint decks that you need to feed into an LLM pipeline — a RAG system, a document summarizer, or a knowledge base builder. The problem is that LLMs work best with plain text, and most documents are packed with binary formatting, embedded fonts, and layout metadata that the model cannot interpret. Sending a raw PDF to an LLM is like handing someone a ZIP file and asking them to read it.
Microsoft’s markitdown library solves this by converting dozens of file formats — PDF, DOCX, PPTX, XLSX, HTML, CSV, EPUB, images, and audio — into clean Markdown that any LLM can process. It is a single pip install, works from Python code or the command line, and handles the conversion pipeline so your code does not have to. The Markdown output preserves headings, tables, and code blocks in a structured format that models handle especially well.
This article covers everything you need to get documents into your AI pipelines with MarkItDown. You will learn how to install it, convert individual files and entire directories, work with the Python API, handle different file types, and build a real document-processing pipeline that prepares files for a RAG system. By the end you will have a working utility that accepts any folder of mixed-format documents and outputs a structured Markdown dataset ready for embedding.
MarkItDown: Quick Example
Before diving into the details, here is the fastest path from a file to Markdown text you can feed into an LLM. This example converts an HTML page to Markdown in four lines of Python.
# quick_markitdown.py
from markitdown import MarkItDown
md = MarkItDown()
result = md.convert("https://example.com")
print(result.text_content[:500])
Output:
Example Domain
==============
This domain is for use in illustrative examples in documents. You may use this
domain in literature without prior coordination or asking for permission.
[More information...](https://www.iana.org/domains/reserved)
The MarkItDown() constructor creates a converter instance, and convert() accepts a file path, a URL, or a file-like object. The result is a DocumentConverterResult object — result.text_content holds the clean Markdown string ready to pass into any LLM or text processing pipeline.
The real power emerges when you need to handle PDFs, Office files, and mixed directories at scale. The sections below cover all of that, starting with installation.
What Is MarkItDown and Why Use It?
MarkItDown is an open-source Python library from Microsoft that acts as a universal document-to-Markdown converter. Think of it as a universal adapter — on one end you plug in a document in almost any format, and on the other end you get clean, structured Markdown text. The library was built specifically with LLM use cases in mind: the Markdown output is structured in a way that helps models understand document hierarchy (headings, tables, code blocks) rather than receiving a flat blob of text.
The key difference from alternatives like pypdf2 or python-docx is breadth and consistency. Those libraries require a different API for each format, handle only one format each, and return raw extracted text with no structure. MarkItDown gives you one API that handles all formats and preserves semantic structure as Markdown.
Format
MarkItDown
pypdf2 / python-docx / openpyxl
PDF
Yes
pypdf2 only
DOCX
Yes
python-docx only
PPTX
Yes
python-pptx only
XLSX
Yes
openpyxl only
HTML / URL
Yes
No
EPUB
Yes
No
CSV / JSON
Yes
No
Images (OCR)
Yes (optional)
No
Audio (transcription)
Yes (optional)
No
Unified output format
Markdown
Raw text / format-specific objects
The optional image OCR and audio transcription require extra dependencies (and an LLM API key for the best results), but the core document converters — PDF, Office, HTML — work completely offline with no API key required. That makes MarkItDown an excellent fit for any pipeline where you control the infrastructure.
Installing MarkItDown
MarkItDown is on PyPI. A basic install that handles PDFs, Office documents, and HTML covers most use cases and has minimal dependencies.
# Install the base package
pip install markitdown
# For PDF support (pdfminer.six is included in most installs)
pip install markitdown[pdf]
# For all optional extras (OCR, audio, Azure Document Intelligence)
pip install markitdown[all]
The [pdf] extra pulls in pdfminer.six for text-based PDF extraction. If you need image OCR within PDFs, you will also need an LLM plugin (covered in the advanced section). For most document-to-Markdown pipelines the base install is all you need — it handles DOCX, PPTX, XLSX, HTML, CSV, JSON, and EPUB without any extras.
One API to rule them all. Finally.
Converting Files, URLs, and Streams
The MarkItDown class is the main entry point. It auto-detects the file format based on extension or MIME type, so you call the same method regardless of what you are converting.
Converting a Local File
Pass any local file path as a string. MarkItDown detects the format automatically and returns a DocumentConverterResult.
# convert_file.py
from markitdown import MarkItDown
md = MarkItDown()
# Convert a DOCX file
result = md.convert("report.docx")
print(f"Title: {result.title}")
print(f"Characters: {len(result.text_content)}")
print()
print(result.text_content[:300])
Output:
Title: Q3 Sales Report
Characters: 4821
# Q3 Sales Report
**Prepared by:** Finance Team
**Date:** September 30, 2025
## Executive Summary
Revenue grew 12% year-over-year driven by the enterprise segment...
The result.title property extracts the document title from metadata where available (DOCX, PDF). The text_content property always holds the full Markdown string. Notice that the headings from the Word document are preserved as Markdown heading levels — this is exactly the structural information that LLMs use to understand document hierarchy.
Converting a URL
Pass a URL string and MarkItDown fetches the page and converts the HTML to Markdown. This works especially well for documentation pages, Wikipedia articles, and any page with semantic HTML structure.
# convert_url.py
from markitdown import MarkItDown
md = MarkItDown()
result = md.convert("https://docs.python.org/3/library/json.html")
print(result.text_content[:600])
Output:
json --- JSON encoder and decoder
=================================
**Source code:** [Lib/json/__init__.py](https://github.com/python/cpython/tree/3.13/Lib/json/__init__.py)
JSON (JavaScript Object Notation), specified by [RFC 7159](https://datatracker.ietf.org/doc/html/rfc7159.html)...
## json.dumps(obj, *, skipkeys=False, ...)
Serialize obj to a JSON formatted str...
Navigation menus, footers, and sidebars are typically stripped out, leaving the actual content. This makes URL conversion a fast way to pull documentation into a RAG corpus without building a custom scraper for every site.
Converting from a File-Like Object
When you receive a file as bytes (from an API response, an email attachment, or a web upload), you can convert it directly from a BytesIO object without writing it to disk first.
# convert_stream.py
import io
from markitdown import MarkItDown
import requests
md = MarkItDown()
# Download a PDF into memory and convert without saving to disk
response = requests.get("https://www.w3.org/WAI/WCAG21/wcag21.pdf")
pdf_stream = io.BytesIO(response.content)
# Must pass extension hint when using streams -- no filename to detect from
result = md.convert(pdf_stream, file_extension=".pdf")
print(f"Converted {len(result.text_content)} characters from in-memory PDF")
print(result.text_content[:400])
Output:
Converted 87432 characters from in-memory PDF
Web Content Accessibility Guidelines (WCAG) 2.1
================================================
W3C Recommendation 05 June 2018
Abstract
--------
Web Content Accessibility Guidelines (WCAG) 2.1 covers a wide range of...
The file_extension parameter is required when passing a stream because there is no filename to inspect. Always include it for streams to ensure the correct converter is selected.
BytesIO: no temp files, no disk I/O, no drama.
Format-Specific Conversion Options
Most formats work out of the box, but a few have options worth knowing about. PowerPoint files get per-slide conversion, Excel files convert to Markdown tables, and PDFs expose page-level control.
Excel and CSV to Markdown Tables
Excel sheets are converted to Markdown tables — one table per worksheet. This is particularly useful when feeding structured data to LLMs that need to reason about tabular information.
# convert_excel.py
from markitdown import MarkItDown
md = MarkItDown()
result = md.convert("sales_data.xlsx")
print(result.text_content)
Output (example with a two-sheet workbook):
## Sheet1
| Month | Revenue | Units |
|-------|---------|-------|
| Jan | 84000 | 420 |
| Feb | 91200 | 456 |
| Mar | 78500 | 392 |
## Sheet2
| Region | Manager | Target |
|--------|---------|--------|
| East | Alice | 100000 |
| West | Bob | 95000 |
Each worksheet becomes an H2 section followed by a Markdown table. LLMs handle this format well for question-answering tasks — the model can identify column headers, filter by region, and compute simple aggregations when the data is in this structured Markdown table format rather than raw CSV text.
PowerPoint Slide Extraction
PPTX files are converted slide by slide. Each slide becomes a section with its title as a heading and the body text extracted below it. Speaker notes are included when present.
# convert_pptx.py
from markitdown import MarkItDown
md = MarkItDown()
result = md.convert("product_roadmap.pptx")
# Show first 500 chars to see the structure
print(result.text_content[:500])
Output:
## Slide 1: Product Roadmap 2026
Vision: Ship the AI-native workflow layer by Q3.
- Q1: Core infrastructure and auth
- Q2: Integration layer + partner APIs
- Q3: Public launch
- Q4: Enterprise tier
**Notes:** Emphasize the partnership angle -- this is key differentiator vs competitors.
## Slide 2: Q1 Milestones
- Authentication service -- 95% complete
- Database migration -- in progress
...
Speaker notes appear as bold “Notes:” blocks after each slide’s content. For meeting-notes pipelines or sales-deck summarizers this is especially useful — you get the full context that the presenter intended to convey, not just the bullet points on the slide.
Speaker notes included. Your LLM finally hears what the presenter was thinking.
Batch Converting a Directory
Real pipelines rarely deal with a single file. Here is a pattern to convert every supported file in a directory, log any failures, and save all results to a single Markdown file for easy embedding.
# batch_convert.py
import os
from pathlib import Path
from markitdown import MarkItDown
SUPPORTED = {".pdf", ".docx", ".pptx", ".xlsx", ".html", ".csv", ".json", ".epub"}
def batch_convert(input_dir: str, output_path: str) -> dict:
"""Convert all supported files in input_dir to a single Markdown file."""
md = MarkItDown()
results = {"success": [], "failed": []}
output_parts = []
for fpath in sorted(Path(input_dir).rglob("*")):
if fpath.suffix.lower() not in SUPPORTED:
continue
print(f"Converting: {fpath.name}")
try:
result = md.convert(str(fpath))
# Separate each document with a clear section header
section = f"\n\n---\n## Document: {fpath.name}\n\n{result.text_content}"
output_parts.append(section)
results["success"].append(str(fpath))
except Exception as exc:
print(f" FAILED: {exc}")
results["failed"].append({"file": str(fpath), "error": str(exc)})
with open(output_path, "w", encoding="utf-8") as f:
f.write("# Document Corpus\n")
f.write(f"Converted {len(results['success'])} documents.\n")
f.write("".join(output_parts))
return results
if __name__ == "__main__":
stats = batch_convert("./docs", "corpus.md")
print(f"\nDone: {len(stats['success'])} converted, {len(stats['failed'])} failed")
Output:
Converting: annual_report.pdf
Converting: onboarding.docx
Converting: roadmap.pptx
Converting: q3_data.xlsx
FAILED: File appears to be encrypted
Done: 3 converted, 1 failed
The try/except around each conversion is essential — encrypted PDFs, corrupted files, or unsupported subtypes will raise exceptions rather than silently producing empty output. The pattern above logs the failure and continues with the rest of the batch, which is the right behavior for any automated pipeline. The output corpus.md contains all documents separated by clear section dividers that chunk-based RAG systems can split on.
Using MarkItDown with LLM Pipelines
The most common use case is feeding converted documents into an LLM. Here is how to wire MarkItDown into an OpenAI-compatible pipeline for a simple document Q&A pattern.
# doc_qa.py
from markitdown import MarkItDown
from openai import OpenAI
def answer_from_document(file_path: str, question: str, api_key: str) -> str:
"""Convert a document to Markdown and answer a question about it."""
md = MarkItDown()
result = md.convert(file_path)
doc_text = result.text_content
# Truncate if the document exceeds a safe context window size
max_chars = 80000 # ~20K tokens for most models
if len(doc_text) > max_chars:
doc_text = doc_text[:max_chars] + "\n\n[Document truncated...]"
client = OpenAI(api_key=api_key)
response = client.chat.completions.create(
model="gpt-4o-mini",
messages=[
{
"role": "system",
"content": "You are a document analyst. Answer questions based only on the provided document.",
},
{
"role": "user",
"content": f"Document:\n\n{doc_text}\n\nQuestion: {question}",
},
],
)
return response.choices[0].message.content
# Example usage
answer = answer_from_document(
"contract.pdf",
"What is the termination clause?",
api_key="your-openai-api-key"
)
print(answer)
Output:
Section 12.3 of the contract states that either party may terminate this agreement
with 30 days written notice. Termination for cause requires only 5 business days
notice and must be accompanied by written documentation of the breach.
This pattern works with any OpenAI-compatible API — swap the base URL and API key for Anthropic, Gemini, or a local Ollama endpoint and the pattern is identical. The key insight is that MarkItDown’s Markdown output is substantially better context than raw extracted text because the model can use heading levels and table structure to locate specific sections of long documents.
Raw PDF to LLM: garbled. Markdown to LLM: actually works.
Real-Life Example: Building a Document Corpus Preparer for RAG
This project ties together everything from this article. It accepts a folder of mixed-format documents, converts all of them to Markdown, chunks the output into LLM-ready segments, and saves a JSON file that a vector database like Chroma or Pinecone can ingest directly.
# rag_preparer.py
import json
import os
from pathlib import Path
from markitdown import MarkItDown
SUPPORTED = {".pdf", ".docx", ".pptx", ".xlsx", ".html", ".csv", ".epub"}
CHUNK_SIZE = 1500 # characters per chunk (~375 tokens)
CHUNK_OVERLAP = 150 # overlap so context is not lost at boundaries
def chunk_text(text: str, size: int = CHUNK_SIZE, overlap: int = CHUNK_OVERLAP) -> list:
"""Split text into overlapping chunks."""
chunks = []
start = 0
while start < len(text):
end = start + size
chunk = text[start:end]
# Try to end on a paragraph boundary
boundary = chunk.rfind("\n\n")
if boundary > size // 2:
chunk = chunk[:boundary]
chunks.append(chunk.strip())
start += len(chunk) - overlap
return [c for c in chunks if len(c) > 50] # drop tiny trailing chunks
def prepare_rag_corpus(docs_dir: str, output_path: str) -> None:
md = MarkItDown()
corpus = []
chunk_id = 0
for fpath in sorted(Path(docs_dir).rglob("*")):
if fpath.suffix.lower() not in SUPPORTED:
continue
print(f"Processing: {fpath.name}")
try:
result = md.convert(str(fpath))
chunks = chunk_text(result.text_content)
for i, chunk in enumerate(chunks):
corpus.append({
"id": f"chunk_{chunk_id:05d}",
"source_file": fpath.name,
"source_title": result.title or fpath.stem,
"chunk_index": i,
"total_chunks": len(chunks),
"text": chunk,
})
chunk_id += 1
print(f" -> {len(chunks)} chunks")
except Exception as exc:
print(f" FAILED: {exc}")
with open(output_path, "w", encoding="utf-8") as f:
json.dump(corpus, f, indent=2, ensure_ascii=False)
print(f"\nCorpus saved: {len(corpus)} chunks from {chunk_id} total across all docs")
print(f"Output: {output_path}")
if __name__ == "__main__":
prepare_rag_corpus("./knowledge_base", "rag_corpus.json")
Output:
Processing: company_handbook.pdf
-> 47 chunks
Processing: product_specs.docx
-> 18 chunks
Processing: roadmap_2026.pptx
-> 9 chunks
Processing: pricing.xlsx
-> 3 chunks
Corpus saved: 77 chunks from 77 total across all docs
Output: rag_corpus.json
The output rag_corpus.json is ready to embed. Each chunk carries its source file and title as metadata, so your vector database can filter by document when answering queries that should be scoped to a specific source. The overlapping chunks prevent context loss at boundaries — a sentence that straddles a chunk boundary will appear in both adjacent chunks, so the model always sees complete context around any retrieved passage. To extend this project, add an embedding step using sentence-transformers or the OpenAI Embeddings API and pipe the corpus directly into your vector store of choice.
Frequently Asked Questions
Can MarkItDown convert password-protected PDFs?
No — password-protected PDFs raise an exception during conversion because the underlying pdfminer.six library cannot read encrypted content without the password. You will see a PDFPasswordIncorrect or PDFEncryptionError. The fix is to pre-decrypt the PDF before conversion using a library like pikepdf: open with the password and save a decrypted copy, then convert the decrypted file. Always wrap conversion in try/except in batch pipelines so a single locked file does not abort the entire run.
Does MarkItDown extract images from PDFs?
With the base install, MarkItDown extracts text from PDFs but skips embedded images. If your PDFs are scanned documents (images of text, not actual text layers), the base converter will return little or no content. For scanned PDFs you need to add an LLM plugin — MarkItDown supports Azure Document Intelligence and OpenAI Vision as optional backends that can OCR images within documents. Pass an llm_client and llm_model to the MarkItDown constructor to enable this. The optional dependency install is pip install markitdown[all].
How should I handle very large documents?
For documents that produce more than 100,000 characters of Markdown, pass the whole text to an LLM in a single call only if your model supports a large context window (128K+). Otherwise, use the chunking pattern from the real-life example above — split the Markdown at paragraph boundaries with a 10% overlap and embed the chunks rather than the whole document. MarkItDown itself handles arbitrarily large files without issue; the bottleneck is always the downstream LLM context window, not the conversion step.
How well does MarkItDown handle complex tables?
Simple flat tables — with consistent column counts and no merged cells — convert reliably to Markdown tables. Complex tables with merged headers, multi-row cells, or heavily styled cells may produce irregular Markdown. Excel files generally convert better than Word or PDF tables because the underlying data is already structured. If you find table output unreliable for a specific document type, consider using openpyxl or python-docx for that format and MarkItDown for everything else in the same pipeline.
Can I stream the conversion output?
MarkItDown does not support streaming output — the convert() call blocks until the full document is converted and returns the complete result. For large documents this can take several seconds, especially for multi-hundred-page PDFs. If you need non-blocking behavior in an async pipeline, wrap the conversion in asyncio.run_in_executor() to run it in a thread pool and await the result without blocking your event loop.
Can I add a custom converter for a format MarkItDown does not support?
Yes — MarkItDown has a plugin system. You can register a custom DocumentConverter subclass for any file extension. Implement the convert() method that accepts a file path and returns a DocumentConverterResult, then register it via md.register_converter(MyConverter()). This is useful for proprietary formats specific to your industry — medical records in HL7, CAD files, or internal XML schemas — where you have the parsing logic but need to plug it into the same batch pipeline that handles standard formats.
Conclusion
MarkItDown removes the most painful part of building LLM document pipelines: writing and maintaining a different parser for every file format. A single MarkItDown().convert() call handles PDFs, DOCX, PPTX, XLSX, HTML, CSV, EPUB, and more, returning clean Markdown that LLMs can reason over rather than raw binary or poorly-structured text. The real-life example above gives you a complete RAG corpus preparer that you can extend — add an embedding step, plug in a vector store, or swap in a different chunking strategy depending on your document types.
The next step is to test it on your actual document set. Run the batch converter, inspect the output Markdown for any formatting issues specific to your files, and tune the chunk size to match your embedding model’s token limit. For OCR-heavy or audio transcription pipelines, explore the optional llm_client parameter to unlock MarkItDown’s full feature set.
ConfigParser is a built-in Python module for reading and writing configuration files in INI format. It handles settings organized into sections with key-value pairs, making it easy to store and retrieve application configuration without hardcoding values.
What format does ConfigParser use?
ConfigParser uses the INI file format with sections in square brackets ([section]), followed by key-value pairs using = or : as delimiters. Comments start with # or ;. There is always a [DEFAULT] section for fallback values.
How do I read a config file with ConfigParser?
Create a ConfigParser() instance, call config.read('filename.ini'), then access values with config['section']['key'] or config.get('section', 'key'). Use getint(), getfloat(), or getboolean() for type conversion.
Can ConfigParser handle nested sections?
No, ConfigParser does not support nested sections natively. For nested configuration structures, consider using TOML (tomllib in Python 3.11+), YAML (PyYAML), or JSON configuration files instead.
What is the difference between ConfigParser and JSON for configuration?
ConfigParser uses human-friendly INI format with sections and is ideal for simple settings. JSON supports nested structures and lists but lacks comments. ConfigParser has built-in type conversion methods and a DEFAULT section for fallback values, while JSON requires manual type handling.
Making computer generated text mimic human speech is fascinating and actually not that difficult for an effect that is sometimes convincing, but certainly entertaining. Markov Chain’s is one way to do this. It works by generating new text based on historical texts where the original sequencing of neighboring words (or groups of words) is used to generate meaningful sentences. Read the below guide on how to code a Markov Chain text generator (code example in python) including explanation of the concept.
What’s really interesting, is that you can take historical texts of a person, then generate new sentences which can sound similar to the way that person speaks. Alternatively, you can combine texts from two different people and get a mixed “voice”.
I played around this with texts of speeches from two great presidents:
What my Markov Chain generated which was “trained” using the combination of texts from Obama speeches and Bartlet scripts, is as follows:
‘Can I burn my mother in North Carolina for giving us a great night planned.’
‘And so going forward, I believe that we can build a bomb into their church.’
‘’Charlie, my father had grown up in the Situation Room every time I came in.’’
‘This campaign must be ballistic.’,
Written by Pubs
Python developer and educator with 15+ years building production systems across data engineering, web APIs, and AI tooling. Founder of Python How To Program — 270+ in-depth tutorials covering the modern Python stack.
What is a Markov Chain in the context of a text generation?
For a more technical explanation, I think you can find plenty of resources out there. In simple terms, it is an algorithm which is used to generate a new outcome from a weighted list of words based on historical texts. Now that’s rather abstract. In more practical terms, in the scenario for text generation, it is a way to use historical texts, chop it up into individual words (or sets of words), and then randomly chose a given word then randomly chose the next likely words based on historical sequences. For example:
An example that shows the original text (A), the dictionary that gets generated of the words (B), and a sample text (C ) that was generated from randomly selecting words with selected words highlighted in red. The numbers in brackets indicates the occurrences of that word in the original word.
This doesn’t just apply in text as well (although one of the most popular applications is in your smart phone where there’s predictive text), it can be used for any scenario where you use historical information to define next steps for a given state. For example, you could codify a given stock market pattern (such as the % daily changes for the last 30 days), then use that to see historically what was the likely next day outcome (example only.. I’m very doubtful how effective it would be).
Why are Markov Chain Text Generators so fun?
I’ve always wanted to build a text generator as it’s just an awesome way to see how you could mimic intelligence using a very cheap shortcut. You’ll see the algorithm below, and it is super simple. The other fact is that, like above example, you can use it to mix the ‘voice’ from two different persons and see the outcome.
How does the Markov Chain Text Generator work?
There are two phases for text generation with Markov Chains. There’s first the ‘dictionary build phase’ which involves gathering the historical texts, and then generating a dictionary with the key being a given word in a sentence, and then having the resultant being the natural follow-up words.
Here you can see the original sentences were broken down into words and the included the subsequent words with a counter to indicate number of occurrences. Note that full-stops are also included.
The second is the execution, where you start from a given word, then use that word to see what the next word would be in a probabilistic way. For example:
Traversing the dictionary to generate text
Now, there are some tricks which you need to be mindful of ( I found this out the hard way):
You can’t start from any random word — if you do, then you’ll get sentences like this: “ate the cat.” . You have to keep track of “starting words” to keep things simple — hence you can have: “John ate the cat”.
Don’t ignore punctuation— if you do remove punctuation, you’ll get sentence like this: “The dog barked at John cat”. Instead keep them there so that you can have a better chance to have a more realistic sentence — i.e. “The dog barked at John’s ca”
End on a full-stop word. When you go through and start from a word, then find the next word, then find the next word and so on, you can continue until you reach a specified length, but then you’ll end up stopping in mid-sentence such as this: “The cat ate John’s”. Instead, simply end when you have a word that has a full stop (another reason not to remove the punctuation) — i.e. “The cat ate John’s boots.”
Markov Chain Example Code Source texts
I played around with different texts including: Eddie Murphy stand-up routines, Donald Trump tweets, Obama speeches, and Jed Bartlet dialogue. You can find the the markov chain example source text here. It’s great to use one source and then generate the dictionary, but then you can mix and match and use two sources (e.g. Obama and Bartlet) and then create the one dictionary file. Then when you traverse the dictionary you get the both voices.
It is important to make sure that you can balance the text — e.g. if you had a 8000 text from Obama and only 1000 text from Eddie Murphy, it’s likely that you would see more of the Obama words. Of course, when you build the dictionary, you can also add some artificial weighting towards the lighter text source to balance things out.
Markov Chain Summary
The Markov Chain text generator is not perfect — you’ll see when you create your own, that some text is just gibberish. The more text that you have the better. Secondly, using single words is not helpful in the dictionary — you should use groups of 2–3 words. The actual number depends on how much historical text you have.
You can find all the python code, source texts and Markov Chain python example code here. Good luck!
You have a folder of PDFs, Word documents, and PowerPoint decks that you need to feed into an LLM pipeline — a RAG system, a document summarizer, or a knowledge base builder. The problem is that LLMs work best with plain text, and most documents are packed with binary formatting, embedded fonts, and layout metadata that the model cannot interpret. Sending a raw PDF to an LLM is like handing someone a ZIP file and asking them to read it.
Microsoft’s markitdown library solves this by converting dozens of file formats — PDF, DOCX, PPTX, XLSX, HTML, CSV, EPUB, images, and audio — into clean Markdown that any LLM can process. It is a single pip install, works from Python code or the command line, and handles the conversion pipeline so your code does not have to. The Markdown output preserves headings, tables, and code blocks in a structured format that models handle especially well.
This article covers everything you need to get documents into your AI pipelines with MarkItDown. You will learn how to install it, convert individual files and entire directories, work with the Python API, handle different file types, and build a real document-processing pipeline that prepares files for a RAG system. By the end you will have a working utility that accepts any folder of mixed-format documents and outputs a structured Markdown dataset ready for embedding.
MarkItDown: Quick Example
Before diving into the details, here is the fastest path from a file to Markdown text you can feed into an LLM. This example converts an HTML page to Markdown in four lines of Python.
# quick_markitdown.py
from markitdown import MarkItDown
md = MarkItDown()
result = md.convert("https://example.com")
print(result.text_content[:500])
Output:
Example Domain
==============
This domain is for use in illustrative examples in documents. You may use this
domain in literature without prior coordination or asking for permission.
[More information...](https://www.iana.org/domains/reserved)
The MarkItDown() constructor creates a converter instance, and convert() accepts a file path, a URL, or a file-like object. The result is a DocumentConverterResult object — result.text_content holds the clean Markdown string ready to pass into any LLM or text processing pipeline.
The real power emerges when you need to handle PDFs, Office files, and mixed directories at scale. The sections below cover all of that, starting with installation.
What Is MarkItDown and Why Use It?
MarkItDown is an open-source Python library from Microsoft that acts as a universal document-to-Markdown converter. Think of it as a universal adapter — on one end you plug in a document in almost any format, and on the other end you get clean, structured Markdown text. The library was built specifically with LLM use cases in mind: the Markdown output is structured in a way that helps models understand document hierarchy (headings, tables, code blocks) rather than receiving a flat blob of text.
The key difference from alternatives like pypdf2 or python-docx is breadth and consistency. Those libraries require a different API for each format, handle only one format each, and return raw extracted text with no structure. MarkItDown gives you one API that handles all formats and preserves semantic structure as Markdown.
Format
MarkItDown
pypdf2 / python-docx / openpyxl
PDF
Yes
pypdf2 only
DOCX
Yes
python-docx only
PPTX
Yes
python-pptx only
XLSX
Yes
openpyxl only
HTML / URL
Yes
No
EPUB
Yes
No
CSV / JSON
Yes
No
Images (OCR)
Yes (optional)
No
Audio (transcription)
Yes (optional)
No
Unified output format
Markdown
Raw text / format-specific objects
The optional image OCR and audio transcription require extra dependencies (and an LLM API key for the best results), but the core document converters — PDF, Office, HTML — work completely offline with no API key required. That makes MarkItDown an excellent fit for any pipeline where you control the infrastructure.
Installing MarkItDown
MarkItDown is on PyPI. A basic install that handles PDFs, Office documents, and HTML covers most use cases and has minimal dependencies.
# Install the base package
pip install markitdown
# For PDF support (pdfminer.six is included in most installs)
pip install markitdown[pdf]
# For all optional extras (OCR, audio, Azure Document Intelligence)
pip install markitdown[all]
The [pdf] extra pulls in pdfminer.six for text-based PDF extraction. If you need image OCR within PDFs, you will also need an LLM plugin (covered in the advanced section). For most document-to-Markdown pipelines the base install is all you need — it handles DOCX, PPTX, XLSX, HTML, CSV, JSON, and EPUB without any extras.
One API to rule them all. Finally.
Converting Files, URLs, and Streams
The MarkItDown class is the main entry point. It auto-detects the file format based on extension or MIME type, so you call the same method regardless of what you are converting.
Converting a Local File
Pass any local file path as a string. MarkItDown detects the format automatically and returns a DocumentConverterResult.
# convert_file.py
from markitdown import MarkItDown
md = MarkItDown()
# Convert a DOCX file
result = md.convert("report.docx")
print(f"Title: {result.title}")
print(f"Characters: {len(result.text_content)}")
print()
print(result.text_content[:300])
Output:
Title: Q3 Sales Report
Characters: 4821
# Q3 Sales Report
**Prepared by:** Finance Team
**Date:** September 30, 2025
## Executive Summary
Revenue grew 12% year-over-year driven by the enterprise segment...
The result.title property extracts the document title from metadata where available (DOCX, PDF). The text_content property always holds the full Markdown string. Notice that the headings from the Word document are preserved as Markdown heading levels — this is exactly the structural information that LLMs use to understand document hierarchy.
Converting a URL
Pass a URL string and MarkItDown fetches the page and converts the HTML to Markdown. This works especially well for documentation pages, Wikipedia articles, and any page with semantic HTML structure.
# convert_url.py
from markitdown import MarkItDown
md = MarkItDown()
result = md.convert("https://docs.python.org/3/library/json.html")
print(result.text_content[:600])
Output:
json --- JSON encoder and decoder
=================================
**Source code:** [Lib/json/__init__.py](https://github.com/python/cpython/tree/3.13/Lib/json/__init__.py)
JSON (JavaScript Object Notation), specified by [RFC 7159](https://datatracker.ietf.org/doc/html/rfc7159.html)...
## json.dumps(obj, *, skipkeys=False, ...)
Serialize obj to a JSON formatted str...
Navigation menus, footers, and sidebars are typically stripped out, leaving the actual content. This makes URL conversion a fast way to pull documentation into a RAG corpus without building a custom scraper for every site.
Converting from a File-Like Object
When you receive a file as bytes (from an API response, an email attachment, or a web upload), you can convert it directly from a BytesIO object without writing it to disk first.
# convert_stream.py
import io
from markitdown import MarkItDown
import requests
md = MarkItDown()
# Download a PDF into memory and convert without saving to disk
response = requests.get("https://www.w3.org/WAI/WCAG21/wcag21.pdf")
pdf_stream = io.BytesIO(response.content)
# Must pass extension hint when using streams -- no filename to detect from
result = md.convert(pdf_stream, file_extension=".pdf")
print(f"Converted {len(result.text_content)} characters from in-memory PDF")
print(result.text_content[:400])
Output:
Converted 87432 characters from in-memory PDF
Web Content Accessibility Guidelines (WCAG) 2.1
================================================
W3C Recommendation 05 June 2018
Abstract
--------
Web Content Accessibility Guidelines (WCAG) 2.1 covers a wide range of...
The file_extension parameter is required when passing a stream because there is no filename to inspect. Always include it for streams to ensure the correct converter is selected.
BytesIO: no temp files, no disk I/O, no drama.
Format-Specific Conversion Options
Most formats work out of the box, but a few have options worth knowing about. PowerPoint files get per-slide conversion, Excel files convert to Markdown tables, and PDFs expose page-level control.
Excel and CSV to Markdown Tables
Excel sheets are converted to Markdown tables — one table per worksheet. This is particularly useful when feeding structured data to LLMs that need to reason about tabular information.
# convert_excel.py
from markitdown import MarkItDown
md = MarkItDown()
result = md.convert("sales_data.xlsx")
print(result.text_content)
Output (example with a two-sheet workbook):
## Sheet1
| Month | Revenue | Units |
|-------|---------|-------|
| Jan | 84000 | 420 |
| Feb | 91200 | 456 |
| Mar | 78500 | 392 |
## Sheet2
| Region | Manager | Target |
|--------|---------|--------|
| East | Alice | 100000 |
| West | Bob | 95000 |
Each worksheet becomes an H2 section followed by a Markdown table. LLMs handle this format well for question-answering tasks — the model can identify column headers, filter by region, and compute simple aggregations when the data is in this structured Markdown table format rather than raw CSV text.
PowerPoint Slide Extraction
PPTX files are converted slide by slide. Each slide becomes a section with its title as a heading and the body text extracted below it. Speaker notes are included when present.
# convert_pptx.py
from markitdown import MarkItDown
md = MarkItDown()
result = md.convert("product_roadmap.pptx")
# Show first 500 chars to see the structure
print(result.text_content[:500])
Output:
## Slide 1: Product Roadmap 2026
Vision: Ship the AI-native workflow layer by Q3.
- Q1: Core infrastructure and auth
- Q2: Integration layer + partner APIs
- Q3: Public launch
- Q4: Enterprise tier
**Notes:** Emphasize the partnership angle -- this is key differentiator vs competitors.
## Slide 2: Q1 Milestones
- Authentication service -- 95% complete
- Database migration -- in progress
...
Speaker notes appear as bold “Notes:” blocks after each slide’s content. For meeting-notes pipelines or sales-deck summarizers this is especially useful — you get the full context that the presenter intended to convey, not just the bullet points on the slide.
Speaker notes included. Your LLM finally hears what the presenter was thinking.
Batch Converting a Directory
Real pipelines rarely deal with a single file. Here is a pattern to convert every supported file in a directory, log any failures, and save all results to a single Markdown file for easy embedding.
# batch_convert.py
import os
from pathlib import Path
from markitdown import MarkItDown
SUPPORTED = {".pdf", ".docx", ".pptx", ".xlsx", ".html", ".csv", ".json", ".epub"}
def batch_convert(input_dir: str, output_path: str) -> dict:
"""Convert all supported files in input_dir to a single Markdown file."""
md = MarkItDown()
results = {"success": [], "failed": []}
output_parts = []
for fpath in sorted(Path(input_dir).rglob("*")):
if fpath.suffix.lower() not in SUPPORTED:
continue
print(f"Converting: {fpath.name}")
try:
result = md.convert(str(fpath))
# Separate each document with a clear section header
section = f"\n\n---\n## Document: {fpath.name}\n\n{result.text_content}"
output_parts.append(section)
results["success"].append(str(fpath))
except Exception as exc:
print(f" FAILED: {exc}")
results["failed"].append({"file": str(fpath), "error": str(exc)})
with open(output_path, "w", encoding="utf-8") as f:
f.write("# Document Corpus\n")
f.write(f"Converted {len(results['success'])} documents.\n")
f.write("".join(output_parts))
return results
if __name__ == "__main__":
stats = batch_convert("./docs", "corpus.md")
print(f"\nDone: {len(stats['success'])} converted, {len(stats['failed'])} failed")
Output:
Converting: annual_report.pdf
Converting: onboarding.docx
Converting: roadmap.pptx
Converting: q3_data.xlsx
FAILED: File appears to be encrypted
Done: 3 converted, 1 failed
The try/except around each conversion is essential — encrypted PDFs, corrupted files, or unsupported subtypes will raise exceptions rather than silently producing empty output. The pattern above logs the failure and continues with the rest of the batch, which is the right behavior for any automated pipeline. The output corpus.md contains all documents separated by clear section dividers that chunk-based RAG systems can split on.
Using MarkItDown with LLM Pipelines
The most common use case is feeding converted documents into an LLM. Here is how to wire MarkItDown into an OpenAI-compatible pipeline for a simple document Q&A pattern.
# doc_qa.py
from markitdown import MarkItDown
from openai import OpenAI
def answer_from_document(file_path: str, question: str, api_key: str) -> str:
"""Convert a document to Markdown and answer a question about it."""
md = MarkItDown()
result = md.convert(file_path)
doc_text = result.text_content
# Truncate if the document exceeds a safe context window size
max_chars = 80000 # ~20K tokens for most models
if len(doc_text) > max_chars:
doc_text = doc_text[:max_chars] + "\n\n[Document truncated...]"
client = OpenAI(api_key=api_key)
response = client.chat.completions.create(
model="gpt-4o-mini",
messages=[
{
"role": "system",
"content": "You are a document analyst. Answer questions based only on the provided document.",
},
{
"role": "user",
"content": f"Document:\n\n{doc_text}\n\nQuestion: {question}",
},
],
)
return response.choices[0].message.content
# Example usage
answer = answer_from_document(
"contract.pdf",
"What is the termination clause?",
api_key="your-openai-api-key"
)
print(answer)
Output:
Section 12.3 of the contract states that either party may terminate this agreement
with 30 days written notice. Termination for cause requires only 5 business days
notice and must be accompanied by written documentation of the breach.
This pattern works with any OpenAI-compatible API — swap the base URL and API key for Anthropic, Gemini, or a local Ollama endpoint and the pattern is identical. The key insight is that MarkItDown’s Markdown output is substantially better context than raw extracted text because the model can use heading levels and table structure to locate specific sections of long documents.
Raw PDF to LLM: garbled. Markdown to LLM: actually works.
Real-Life Example: Building a Document Corpus Preparer for RAG
This project ties together everything from this article. It accepts a folder of mixed-format documents, converts all of them to Markdown, chunks the output into LLM-ready segments, and saves a JSON file that a vector database like Chroma or Pinecone can ingest directly.
# rag_preparer.py
import json
import os
from pathlib import Path
from markitdown import MarkItDown
SUPPORTED = {".pdf", ".docx", ".pptx", ".xlsx", ".html", ".csv", ".epub"}
CHUNK_SIZE = 1500 # characters per chunk (~375 tokens)
CHUNK_OVERLAP = 150 # overlap so context is not lost at boundaries
def chunk_text(text: str, size: int = CHUNK_SIZE, overlap: int = CHUNK_OVERLAP) -> list:
"""Split text into overlapping chunks."""
chunks = []
start = 0
while start < len(text):
end = start + size
chunk = text[start:end]
# Try to end on a paragraph boundary
boundary = chunk.rfind("\n\n")
if boundary > size // 2:
chunk = chunk[:boundary]
chunks.append(chunk.strip())
start += len(chunk) - overlap
return [c for c in chunks if len(c) > 50] # drop tiny trailing chunks
def prepare_rag_corpus(docs_dir: str, output_path: str) -> None:
md = MarkItDown()
corpus = []
chunk_id = 0
for fpath in sorted(Path(docs_dir).rglob("*")):
if fpath.suffix.lower() not in SUPPORTED:
continue
print(f"Processing: {fpath.name}")
try:
result = md.convert(str(fpath))
chunks = chunk_text(result.text_content)
for i, chunk in enumerate(chunks):
corpus.append({
"id": f"chunk_{chunk_id:05d}",
"source_file": fpath.name,
"source_title": result.title or fpath.stem,
"chunk_index": i,
"total_chunks": len(chunks),
"text": chunk,
})
chunk_id += 1
print(f" -> {len(chunks)} chunks")
except Exception as exc:
print(f" FAILED: {exc}")
with open(output_path, "w", encoding="utf-8") as f:
json.dump(corpus, f, indent=2, ensure_ascii=False)
print(f"\nCorpus saved: {len(corpus)} chunks from {chunk_id} total across all docs")
print(f"Output: {output_path}")
if __name__ == "__main__":
prepare_rag_corpus("./knowledge_base", "rag_corpus.json")
Output:
Processing: company_handbook.pdf
-> 47 chunks
Processing: product_specs.docx
-> 18 chunks
Processing: roadmap_2026.pptx
-> 9 chunks
Processing: pricing.xlsx
-> 3 chunks
Corpus saved: 77 chunks from 77 total across all docs
Output: rag_corpus.json
The output rag_corpus.json is ready to embed. Each chunk carries its source file and title as metadata, so your vector database can filter by document when answering queries that should be scoped to a specific source. The overlapping chunks prevent context loss at boundaries — a sentence that straddles a chunk boundary will appear in both adjacent chunks, so the model always sees complete context around any retrieved passage. To extend this project, add an embedding step using sentence-transformers or the OpenAI Embeddings API and pipe the corpus directly into your vector store of choice.
Frequently Asked Questions
Can MarkItDown convert password-protected PDFs?
No — password-protected PDFs raise an exception during conversion because the underlying pdfminer.six library cannot read encrypted content without the password. You will see a PDFPasswordIncorrect or PDFEncryptionError. The fix is to pre-decrypt the PDF before conversion using a library like pikepdf: open with the password and save a decrypted copy, then convert the decrypted file. Always wrap conversion in try/except in batch pipelines so a single locked file does not abort the entire run.
Does MarkItDown extract images from PDFs?
With the base install, MarkItDown extracts text from PDFs but skips embedded images. If your PDFs are scanned documents (images of text, not actual text layers), the base converter will return little or no content. For scanned PDFs you need to add an LLM plugin — MarkItDown supports Azure Document Intelligence and OpenAI Vision as optional backends that can OCR images within documents. Pass an llm_client and llm_model to the MarkItDown constructor to enable this. The optional dependency install is pip install markitdown[all].
How should I handle very large documents?
For documents that produce more than 100,000 characters of Markdown, pass the whole text to an LLM in a single call only if your model supports a large context window (128K+). Otherwise, use the chunking pattern from the real-life example above — split the Markdown at paragraph boundaries with a 10% overlap and embed the chunks rather than the whole document. MarkItDown itself handles arbitrarily large files without issue; the bottleneck is always the downstream LLM context window, not the conversion step.
How well does MarkItDown handle complex tables?
Simple flat tables — with consistent column counts and no merged cells — convert reliably to Markdown tables. Complex tables with merged headers, multi-row cells, or heavily styled cells may produce irregular Markdown. Excel files generally convert better than Word or PDF tables because the underlying data is already structured. If you find table output unreliable for a specific document type, consider using openpyxl or python-docx for that format and MarkItDown for everything else in the same pipeline.
Can I stream the conversion output?
MarkItDown does not support streaming output — the convert() call blocks until the full document is converted and returns the complete result. For large documents this can take several seconds, especially for multi-hundred-page PDFs. If you need non-blocking behavior in an async pipeline, wrap the conversion in asyncio.run_in_executor() to run it in a thread pool and await the result without blocking your event loop.
Can I add a custom converter for a format MarkItDown does not support?
Yes — MarkItDown has a plugin system. You can register a custom DocumentConverter subclass for any file extension. Implement the convert() method that accepts a file path and returns a DocumentConverterResult, then register it via md.register_converter(MyConverter()). This is useful for proprietary formats specific to your industry — medical records in HL7, CAD files, or internal XML schemas — where you have the parsing logic but need to plug it into the same batch pipeline that handles standard formats.
Conclusion
MarkItDown removes the most painful part of building LLM document pipelines: writing and maintaining a different parser for every file format. A single MarkItDown().convert() call handles PDFs, DOCX, PPTX, XLSX, HTML, CSV, EPUB, and more, returning clean Markdown that LLMs can reason over rather than raw binary or poorly-structured text. The real-life example above gives you a complete RAG corpus preparer that you can extend — add an embedding step, plug in a vector store, or swap in a different chunking strategy depending on your document types.
The next step is to test it on your actual document set. Run the batch converter, inspect the output Markdown for any formatting issues specific to your files, and tune the chunk size to match your embedding model’s token limit. For OCR-heavy or audio transcription pipelines, explore the optional llm_client parameter to unlock MarkItDown’s full feature set.
A Markov chain is a mathematical model where the next state depends only on the current state, not on the sequence of events that preceded it. In text generation, this means the next word is predicted based only on the current word or phrase.
How does a Markov chain text generator work in Python?
A Python Markov chain text generator builds a dictionary of word transitions from training text. Each word maps to a list of words that follow it. The generator then randomly selects next words based on these observed probabilities to create new text.
What are the limitations of Markov chain text generation?
Markov chains produce text that can be grammatically inconsistent over long passages because they only consider local context (the previous few words). They lack understanding of meaning, coherence, and long-range dependencies that modern language models handle better.
Can I use Markov chains for purposes other than text generation?
Yes. Markov chains are used in weather prediction, stock market modeling, DNA sequence analysis, game AI, PageRank algorithms, and many simulation scenarios. Any system where transitions between states follow probabilistic rules can be modeled with Markov chains.
How do I improve the quality of Markov chain generated text?
Increase the chain order (use pairs or triples of words instead of single words as keys), use larger and higher-quality training data, add post-processing to fix grammar, and filter out nonsensical outputs. Higher-order chains produce more coherent text but require more training data.
The need to print when you program is of course one of the most important, and probably the very first things you ever did! This is your full guide on how to print for both python 2 and python 3).
The quickest and simplest scenario on how to print is to simply write the following:
print("Hello World")
However, there are many other variations of printing that comes up when you are coding in python. These could be printing json files, printing without a new line, printing to a log file, printing formatted text, and many more. Find below what you’re looking for in this one stop guide to printing!
Written by Pubs
Python developer and educator with 15+ years building production systems across data engineering, web APIs, and AI tooling. Founder of Python How To Program — 270+ in-depth tutorials covering the modern Python stack.
When you normally use the print(“abc”) construct it still adds a new line character. In order to print without a new line use the end parameter.
print("Hello World", end="")
Normally when printing:
See example with the print parameter:
Printing Text together
When printing items, there are often times you need to print text write next to each other, or you need concatenate text together. Concatenating text in Python is simple and can be done in several ways.
Note that in the below approach that for the method 2, there is no space between the text which is why method 3 helps to solve this problem.
When printing, often it’s needed to format the print output. Here’s a list of formatting scenarios.
Printing a number with a string
When printing a number, it is typically simple to do with the following statement:
counter = 5
print(counter)
The problem arises when you want to print text along the same line. You will typically get this error TypeError: unsupported operand type(s) for +: ‘int’ and ‘str’ . For example for the following:
The trick is that you can always concatenate two strings together. Hence, you simply need to convert the int (short for integer, or whole number) into a str (string).
counter = 5
print( str(counter) + ' apples' )
Padding zeros when printing numbers
When printing numbers, often you need to pad with zeros. There are multiple ways to do this, but one of the easier ways is to first convert the number to a string, and then use the zfill function of the string where you can specify how long the number should be.
#this prints the number 10 with up to 8 padded zeros
counter = 10str(counter).zfill(8)
A more advanced example follows where we’re printing 7 numbers. Notice that for the last number where the number is more than 8 digits, that there are no padded zeros.
counter = 2
for x in range(1, 7):
print( str(counter).zfill(8) )
counter = counter * counter
Another method to pad zeros is the following method to use the format function where a zero is placed in front of the number of digits. Here the “08” refers to padding zeros for 8 digits
counter = 2
for x in range(1, 7):
print( format(counter, '08'))
counter = counter * counter
Printing with text alignment
The following can be used when you want to print a table of contents where the structure “{:>nn”.format(‘text to format’) is used. nn is the number of letters to pad.
'{:>15}'.format('text')
Without any alignment:
With alignment:
Printing complex data structures in readable format
One of the great things about python is that you can put together complex data structures fairly easily. This could be a dictionary where each dictionary item is a list. However, to print this out normally is quite difficult to read. This is where pretty print comes in. Suppose you have the following structure:
Within python, this is represented as a dictionary where the main items “furniture” and “appliances” have the sub-items. So if the data structure is “listitems”, then the data coudl be represented as follows:
This is where the import library pprint comes in. You can simply use this to print out the output in a more readable fashion. There are two important parameters though. You should use the indent parameter to specify how much space there is per element, and then width to ensure that limited items are put on a single two. If you put a width of 1 character, then that’ll ensure only show one element at most (so if a element has more than 1 character it’s ok, but you cannot include a second element in there as you’re already the 1 width limit).
Printing time is another important item that you tend to do often in case you want to monitor performance or perhaps to give an update that your long operation is still running.
Print the time
First lets simply print the current date and time
import datetime
print(datetime.datetime.now())
This date time can be easily formatted using the special function from the date object “strftime”. With strftime you can convert the format of the time quite easily to a specified format of hours, mins, seconds and date, with or without the timezone information
As you can guess the Y=year, m = month, d = year, H = hour, M=minutes, S = seconds. Z = timezone. You’ll notice that for the 3rd print item the timezone is blank. We’ll address that in the next section.
Print the time in the correct timezone
However, if you are using a remote machine, or a virtual machine where your local timezone is not set, you may want to chose your own timezone. Also, if you are running services which are across different machines, it is important to make sure you use the right timezone. One simple way is to use universal time (UTC), or to simply to set a single timezone. You can then convert as required.
Please note in the above example that when the timezone format was shown it showed that the timezone was set to UTC+0000 unlike the previous example. This means that the timezone information was present there.
In the following code, we will first get the time in the UTC timezone, and then convert the time to Hong Kong timezone.
Please note that in the “Time 2a” output, you can see the Hong Kong time as 2am with the timezone indicator at the end of +8 hours. The final “Time 2b” is the same time without the timezone included.
Finally, you can get a list of all the timezones available with a quick check on the pytz module and checking “all_timezones”.
import pytzfor tz in pytz.all_timezones:
print(tz)
How to print an exception
Things will go wrong in your code all the time – especially things that you don’t expect. This is where exceptions come in where the try exception blocks fit in quite nicely. The tricky part is that you need to make sure you output what the exception is in order for you to understand what’s going on.
Firstly a quick example of where a try /except can be helpful. Suppose you had the following code where after the definition of the function, the function was called.
def badFunction():
print(a) #print an undefined function
badFunction()#call the functionprint("have a nice day")
In here, as the variable “a” was not defined, then the program terminated and the final line “have a nice day” was never printed.
This is where try/except blocks can come in where you can catch errors from uncertain actions. So you can wrap the “badfunction” in a try block. See following example:
def badFunction():
print(a)#Try the unsafe code
try:
badFunction() except NameError:
print("Variable x is not defined")
except:
print("Something else went wrong")
print("have a nice day")
Here, the program continued to run gracefully and it caught the exception with the error “Variable x is not defined”. The reason it was caught was due to “NameError” exception object being defined.
In this next example, we have put a different error. Now the variable is defined as a number but there will be an exception as the number will be concatenated to a string.
def badFunction():
a = 1
print(a + ' join str') #this will fail as joining a string with a number
#try the unsafe codetry:
badFunction()
except NameError:
print("Variable x is not defined")
except:
print("Something else went wrong")
print("have a nice day")
Here another exception was caught but with the generic message of “Something else went wrong”. This is where printing the actual exception is really important. This is where you can define the exception object and print out the error.
ef badFunction():
a = 1
print(a + ' join str')
try:
badFunction()
except NameError:
print("Variable x is not defined")
except Exception as e:
print(e) #print the exception object print("have a nice day")
Here you can see that the reason for the failure was included, and the program continued to run.
There’s a final improvement we can make which is to include where the problem occurred. This is really important where you have logging defined and you can see where the issue was caused.
import traceback
def badFunction():
a = 1
print(a + ' join str')
#run the unsafe codetry:
badFunction()
except NameError:
print("Variable x is not defined")
except Exception as e:
print(e)
traceback.print_tb(e.__traceback__) #show the call list
print("have a nice day")
Here you can see the error description “Unsupported operand type(s) for +”, and then also where the error occurred from the initial call on line 8 with the call to “badFunction()” and the actual offending line of line 5.
Many more printing on python
There’s many more ways to print outputs within python, however this was intended to be a simple resource for some of the common printing challenges that come up, how you can use them, and with a simple example to get you up to speed very quickly with usable code. More to come!
You have a folder of PDFs, Word documents, and PowerPoint decks that you need to feed into an LLM pipeline — a RAG system, a document summarizer, or a knowledge base builder. The problem is that LLMs work best with plain text, and most documents are packed with binary formatting, embedded fonts, and layout metadata that the model cannot interpret. Sending a raw PDF to an LLM is like handing someone a ZIP file and asking them to read it.
Microsoft’s markitdown library solves this by converting dozens of file formats — PDF, DOCX, PPTX, XLSX, HTML, CSV, EPUB, images, and audio — into clean Markdown that any LLM can process. It is a single pip install, works from Python code or the command line, and handles the conversion pipeline so your code does not have to. The Markdown output preserves headings, tables, and code blocks in a structured format that models handle especially well.
This article covers everything you need to get documents into your AI pipelines with MarkItDown. You will learn how to install it, convert individual files and entire directories, work with the Python API, handle different file types, and build a real document-processing pipeline that prepares files for a RAG system. By the end you will have a working utility that accepts any folder of mixed-format documents and outputs a structured Markdown dataset ready for embedding.
MarkItDown: Quick Example
Before diving into the details, here is the fastest path from a file to Markdown text you can feed into an LLM. This example converts an HTML page to Markdown in four lines of Python.
# quick_markitdown.py
from markitdown import MarkItDown
md = MarkItDown()
result = md.convert("https://example.com")
print(result.text_content[:500])
Output:
Example Domain
==============
This domain is for use in illustrative examples in documents. You may use this
domain in literature without prior coordination or asking for permission.
[More information...](https://www.iana.org/domains/reserved)
The MarkItDown() constructor creates a converter instance, and convert() accepts a file path, a URL, or a file-like object. The result is a DocumentConverterResult object — result.text_content holds the clean Markdown string ready to pass into any LLM or text processing pipeline.
The real power emerges when you need to handle PDFs, Office files, and mixed directories at scale. The sections below cover all of that, starting with installation.
What Is MarkItDown and Why Use It?
MarkItDown is an open-source Python library from Microsoft that acts as a universal document-to-Markdown converter. Think of it as a universal adapter — on one end you plug in a document in almost any format, and on the other end you get clean, structured Markdown text. The library was built specifically with LLM use cases in mind: the Markdown output is structured in a way that helps models understand document hierarchy (headings, tables, code blocks) rather than receiving a flat blob of text.
The key difference from alternatives like pypdf2 or python-docx is breadth and consistency. Those libraries require a different API for each format, handle only one format each, and return raw extracted text with no structure. MarkItDown gives you one API that handles all formats and preserves semantic structure as Markdown.
Format
MarkItDown
pypdf2 / python-docx / openpyxl
PDF
Yes
pypdf2 only
DOCX
Yes
python-docx only
PPTX
Yes
python-pptx only
XLSX
Yes
openpyxl only
HTML / URL
Yes
No
EPUB
Yes
No
CSV / JSON
Yes
No
Images (OCR)
Yes (optional)
No
Audio (transcription)
Yes (optional)
No
Unified output format
Markdown
Raw text / format-specific objects
The optional image OCR and audio transcription require extra dependencies (and an LLM API key for the best results), but the core document converters — PDF, Office, HTML — work completely offline with no API key required. That makes MarkItDown an excellent fit for any pipeline where you control the infrastructure.
Installing MarkItDown
MarkItDown is on PyPI. A basic install that handles PDFs, Office documents, and HTML covers most use cases and has minimal dependencies.
# Install the base package
pip install markitdown
# For PDF support (pdfminer.six is included in most installs)
pip install markitdown[pdf]
# For all optional extras (OCR, audio, Azure Document Intelligence)
pip install markitdown[all]
The [pdf] extra pulls in pdfminer.six for text-based PDF extraction. If you need image OCR within PDFs, you will also need an LLM plugin (covered in the advanced section). For most document-to-Markdown pipelines the base install is all you need — it handles DOCX, PPTX, XLSX, HTML, CSV, JSON, and EPUB without any extras.
One API to rule them all. Finally.
Converting Files, URLs, and Streams
The MarkItDown class is the main entry point. It auto-detects the file format based on extension or MIME type, so you call the same method regardless of what you are converting.
Converting a Local File
Pass any local file path as a string. MarkItDown detects the format automatically and returns a DocumentConverterResult.
# convert_file.py
from markitdown import MarkItDown
md = MarkItDown()
# Convert a DOCX file
result = md.convert("report.docx")
print(f"Title: {result.title}")
print(f"Characters: {len(result.text_content)}")
print()
print(result.text_content[:300])
Output:
Title: Q3 Sales Report
Characters: 4821
# Q3 Sales Report
**Prepared by:** Finance Team
**Date:** September 30, 2025
## Executive Summary
Revenue grew 12% year-over-year driven by the enterprise segment...
The result.title property extracts the document title from metadata where available (DOCX, PDF). The text_content property always holds the full Markdown string. Notice that the headings from the Word document are preserved as Markdown heading levels — this is exactly the structural information that LLMs use to understand document hierarchy.
Converting a URL
Pass a URL string and MarkItDown fetches the page and converts the HTML to Markdown. This works especially well for documentation pages, Wikipedia articles, and any page with semantic HTML structure.
# convert_url.py
from markitdown import MarkItDown
md = MarkItDown()
result = md.convert("https://docs.python.org/3/library/json.html")
print(result.text_content[:600])
Output:
json --- JSON encoder and decoder
=================================
**Source code:** [Lib/json/__init__.py](https://github.com/python/cpython/tree/3.13/Lib/json/__init__.py)
JSON (JavaScript Object Notation), specified by [RFC 7159](https://datatracker.ietf.org/doc/html/rfc7159.html)...
## json.dumps(obj, *, skipkeys=False, ...)
Serialize obj to a JSON formatted str...
Navigation menus, footers, and sidebars are typically stripped out, leaving the actual content. This makes URL conversion a fast way to pull documentation into a RAG corpus without building a custom scraper for every site.
Converting from a File-Like Object
When you receive a file as bytes (from an API response, an email attachment, or a web upload), you can convert it directly from a BytesIO object without writing it to disk first.
# convert_stream.py
import io
from markitdown import MarkItDown
import requests
md = MarkItDown()
# Download a PDF into memory and convert without saving to disk
response = requests.get("https://www.w3.org/WAI/WCAG21/wcag21.pdf")
pdf_stream = io.BytesIO(response.content)
# Must pass extension hint when using streams -- no filename to detect from
result = md.convert(pdf_stream, file_extension=".pdf")
print(f"Converted {len(result.text_content)} characters from in-memory PDF")
print(result.text_content[:400])
Output:
Converted 87432 characters from in-memory PDF
Web Content Accessibility Guidelines (WCAG) 2.1
================================================
W3C Recommendation 05 June 2018
Abstract
--------
Web Content Accessibility Guidelines (WCAG) 2.1 covers a wide range of...
The file_extension parameter is required when passing a stream because there is no filename to inspect. Always include it for streams to ensure the correct converter is selected.
BytesIO: no temp files, no disk I/O, no drama.
Format-Specific Conversion Options
Most formats work out of the box, but a few have options worth knowing about. PowerPoint files get per-slide conversion, Excel files convert to Markdown tables, and PDFs expose page-level control.
Excel and CSV to Markdown Tables
Excel sheets are converted to Markdown tables — one table per worksheet. This is particularly useful when feeding structured data to LLMs that need to reason about tabular information.
# convert_excel.py
from markitdown import MarkItDown
md = MarkItDown()
result = md.convert("sales_data.xlsx")
print(result.text_content)
Output (example with a two-sheet workbook):
## Sheet1
| Month | Revenue | Units |
|-------|---------|-------|
| Jan | 84000 | 420 |
| Feb | 91200 | 456 |
| Mar | 78500 | 392 |
## Sheet2
| Region | Manager | Target |
|--------|---------|--------|
| East | Alice | 100000 |
| West | Bob | 95000 |
Each worksheet becomes an H2 section followed by a Markdown table. LLMs handle this format well for question-answering tasks — the model can identify column headers, filter by region, and compute simple aggregations when the data is in this structured Markdown table format rather than raw CSV text.
PowerPoint Slide Extraction
PPTX files are converted slide by slide. Each slide becomes a section with its title as a heading and the body text extracted below it. Speaker notes are included when present.
# convert_pptx.py
from markitdown import MarkItDown
md = MarkItDown()
result = md.convert("product_roadmap.pptx")
# Show first 500 chars to see the structure
print(result.text_content[:500])
Output:
## Slide 1: Product Roadmap 2026
Vision: Ship the AI-native workflow layer by Q3.
- Q1: Core infrastructure and auth
- Q2: Integration layer + partner APIs
- Q3: Public launch
- Q4: Enterprise tier
**Notes:** Emphasize the partnership angle -- this is key differentiator vs competitors.
## Slide 2: Q1 Milestones
- Authentication service -- 95% complete
- Database migration -- in progress
...
Speaker notes appear as bold “Notes:” blocks after each slide’s content. For meeting-notes pipelines or sales-deck summarizers this is especially useful — you get the full context that the presenter intended to convey, not just the bullet points on the slide.
Speaker notes included. Your LLM finally hears what the presenter was thinking.
Batch Converting a Directory
Real pipelines rarely deal with a single file. Here is a pattern to convert every supported file in a directory, log any failures, and save all results to a single Markdown file for easy embedding.
# batch_convert.py
import os
from pathlib import Path
from markitdown import MarkItDown
SUPPORTED = {".pdf", ".docx", ".pptx", ".xlsx", ".html", ".csv", ".json", ".epub"}
def batch_convert(input_dir: str, output_path: str) -> dict:
"""Convert all supported files in input_dir to a single Markdown file."""
md = MarkItDown()
results = {"success": [], "failed": []}
output_parts = []
for fpath in sorted(Path(input_dir).rglob("*")):
if fpath.suffix.lower() not in SUPPORTED:
continue
print(f"Converting: {fpath.name}")
try:
result = md.convert(str(fpath))
# Separate each document with a clear section header
section = f"\n\n---\n## Document: {fpath.name}\n\n{result.text_content}"
output_parts.append(section)
results["success"].append(str(fpath))
except Exception as exc:
print(f" FAILED: {exc}")
results["failed"].append({"file": str(fpath), "error": str(exc)})
with open(output_path, "w", encoding="utf-8") as f:
f.write("# Document Corpus\n")
f.write(f"Converted {len(results['success'])} documents.\n")
f.write("".join(output_parts))
return results
if __name__ == "__main__":
stats = batch_convert("./docs", "corpus.md")
print(f"\nDone: {len(stats['success'])} converted, {len(stats['failed'])} failed")
Output:
Converting: annual_report.pdf
Converting: onboarding.docx
Converting: roadmap.pptx
Converting: q3_data.xlsx
FAILED: File appears to be encrypted
Done: 3 converted, 1 failed
The try/except around each conversion is essential — encrypted PDFs, corrupted files, or unsupported subtypes will raise exceptions rather than silently producing empty output. The pattern above logs the failure and continues with the rest of the batch, which is the right behavior for any automated pipeline. The output corpus.md contains all documents separated by clear section dividers that chunk-based RAG systems can split on.
Using MarkItDown with LLM Pipelines
The most common use case is feeding converted documents into an LLM. Here is how to wire MarkItDown into an OpenAI-compatible pipeline for a simple document Q&A pattern.
# doc_qa.py
from markitdown import MarkItDown
from openai import OpenAI
def answer_from_document(file_path: str, question: str, api_key: str) -> str:
"""Convert a document to Markdown and answer a question about it."""
md = MarkItDown()
result = md.convert(file_path)
doc_text = result.text_content
# Truncate if the document exceeds a safe context window size
max_chars = 80000 # ~20K tokens for most models
if len(doc_text) > max_chars:
doc_text = doc_text[:max_chars] + "\n\n[Document truncated...]"
client = OpenAI(api_key=api_key)
response = client.chat.completions.create(
model="gpt-4o-mini",
messages=[
{
"role": "system",
"content": "You are a document analyst. Answer questions based only on the provided document.",
},
{
"role": "user",
"content": f"Document:\n\n{doc_text}\n\nQuestion: {question}",
},
],
)
return response.choices[0].message.content
# Example usage
answer = answer_from_document(
"contract.pdf",
"What is the termination clause?",
api_key="your-openai-api-key"
)
print(answer)
Output:
Section 12.3 of the contract states that either party may terminate this agreement
with 30 days written notice. Termination for cause requires only 5 business days
notice and must be accompanied by written documentation of the breach.
This pattern works with any OpenAI-compatible API — swap the base URL and API key for Anthropic, Gemini, or a local Ollama endpoint and the pattern is identical. The key insight is that MarkItDown’s Markdown output is substantially better context than raw extracted text because the model can use heading levels and table structure to locate specific sections of long documents.
Raw PDF to LLM: garbled. Markdown to LLM: actually works.
Real-Life Example: Building a Document Corpus Preparer for RAG
This project ties together everything from this article. It accepts a folder of mixed-format documents, converts all of them to Markdown, chunks the output into LLM-ready segments, and saves a JSON file that a vector database like Chroma or Pinecone can ingest directly.
# rag_preparer.py
import json
import os
from pathlib import Path
from markitdown import MarkItDown
SUPPORTED = {".pdf", ".docx", ".pptx", ".xlsx", ".html", ".csv", ".epub"}
CHUNK_SIZE = 1500 # characters per chunk (~375 tokens)
CHUNK_OVERLAP = 150 # overlap so context is not lost at boundaries
def chunk_text(text: str, size: int = CHUNK_SIZE, overlap: int = CHUNK_OVERLAP) -> list:
"""Split text into overlapping chunks."""
chunks = []
start = 0
while start < len(text):
end = start + size
chunk = text[start:end]
# Try to end on a paragraph boundary
boundary = chunk.rfind("\n\n")
if boundary > size // 2:
chunk = chunk[:boundary]
chunks.append(chunk.strip())
start += len(chunk) - overlap
return [c for c in chunks if len(c) > 50] # drop tiny trailing chunks
def prepare_rag_corpus(docs_dir: str, output_path: str) -> None:
md = MarkItDown()
corpus = []
chunk_id = 0
for fpath in sorted(Path(docs_dir).rglob("*")):
if fpath.suffix.lower() not in SUPPORTED:
continue
print(f"Processing: {fpath.name}")
try:
result = md.convert(str(fpath))
chunks = chunk_text(result.text_content)
for i, chunk in enumerate(chunks):
corpus.append({
"id": f"chunk_{chunk_id:05d}",
"source_file": fpath.name,
"source_title": result.title or fpath.stem,
"chunk_index": i,
"total_chunks": len(chunks),
"text": chunk,
})
chunk_id += 1
print(f" -> {len(chunks)} chunks")
except Exception as exc:
print(f" FAILED: {exc}")
with open(output_path, "w", encoding="utf-8") as f:
json.dump(corpus, f, indent=2, ensure_ascii=False)
print(f"\nCorpus saved: {len(corpus)} chunks from {chunk_id} total across all docs")
print(f"Output: {output_path}")
if __name__ == "__main__":
prepare_rag_corpus("./knowledge_base", "rag_corpus.json")
Output:
Processing: company_handbook.pdf
-> 47 chunks
Processing: product_specs.docx
-> 18 chunks
Processing: roadmap_2026.pptx
-> 9 chunks
Processing: pricing.xlsx
-> 3 chunks
Corpus saved: 77 chunks from 77 total across all docs
Output: rag_corpus.json
The output rag_corpus.json is ready to embed. Each chunk carries its source file and title as metadata, so your vector database can filter by document when answering queries that should be scoped to a specific source. The overlapping chunks prevent context loss at boundaries — a sentence that straddles a chunk boundary will appear in both adjacent chunks, so the model always sees complete context around any retrieved passage. To extend this project, add an embedding step using sentence-transformers or the OpenAI Embeddings API and pipe the corpus directly into your vector store of choice.
Frequently Asked Questions
Can MarkItDown convert password-protected PDFs?
No — password-protected PDFs raise an exception during conversion because the underlying pdfminer.six library cannot read encrypted content without the password. You will see a PDFPasswordIncorrect or PDFEncryptionError. The fix is to pre-decrypt the PDF before conversion using a library like pikepdf: open with the password and save a decrypted copy, then convert the decrypted file. Always wrap conversion in try/except in batch pipelines so a single locked file does not abort the entire run.
Does MarkItDown extract images from PDFs?
With the base install, MarkItDown extracts text from PDFs but skips embedded images. If your PDFs are scanned documents (images of text, not actual text layers), the base converter will return little or no content. For scanned PDFs you need to add an LLM plugin — MarkItDown supports Azure Document Intelligence and OpenAI Vision as optional backends that can OCR images within documents. Pass an llm_client and llm_model to the MarkItDown constructor to enable this. The optional dependency install is pip install markitdown[all].
How should I handle very large documents?
For documents that produce more than 100,000 characters of Markdown, pass the whole text to an LLM in a single call only if your model supports a large context window (128K+). Otherwise, use the chunking pattern from the real-life example above — split the Markdown at paragraph boundaries with a 10% overlap and embed the chunks rather than the whole document. MarkItDown itself handles arbitrarily large files without issue; the bottleneck is always the downstream LLM context window, not the conversion step.
How well does MarkItDown handle complex tables?
Simple flat tables — with consistent column counts and no merged cells — convert reliably to Markdown tables. Complex tables with merged headers, multi-row cells, or heavily styled cells may produce irregular Markdown. Excel files generally convert better than Word or PDF tables because the underlying data is already structured. If you find table output unreliable for a specific document type, consider using openpyxl or python-docx for that format and MarkItDown for everything else in the same pipeline.
Can I stream the conversion output?
MarkItDown does not support streaming output — the convert() call blocks until the full document is converted and returns the complete result. For large documents this can take several seconds, especially for multi-hundred-page PDFs. If you need non-blocking behavior in an async pipeline, wrap the conversion in asyncio.run_in_executor() to run it in a thread pool and await the result without blocking your event loop.
Can I add a custom converter for a format MarkItDown does not support?
Yes — MarkItDown has a plugin system. You can register a custom DocumentConverter subclass for any file extension. Implement the convert() method that accepts a file path and returns a DocumentConverterResult, then register it via md.register_converter(MyConverter()). This is useful for proprietary formats specific to your industry — medical records in HL7, CAD files, or internal XML schemas — where you have the parsing logic but need to plug it into the same batch pipeline that handles standard formats.
Conclusion
MarkItDown removes the most painful part of building LLM document pipelines: writing and maintaining a different parser for every file format. A single MarkItDown().convert() call handles PDFs, DOCX, PPTX, XLSX, HTML, CSV, EPUB, and more, returning clean Markdown that LLMs can reason over rather than raw binary or poorly-structured text. The real-life example above gives you a complete RAG corpus preparer that you can extend — add an embedding step, plug in a vector store, or swap in a different chunking strategy depending on your document types.
The next step is to test it on your actual document set. Run the batch converter, inspect the output Markdown for any formatting issues specific to your files, and tune the chunk size to match your embedding model’s token limit. For OCR-heavy or audio transcription pipelines, explore the optional llm_client parameter to unlock MarkItDown’s full feature set.
The \n escape sequence creates a newline character, causing text after it to appear on the next line. For example, print('Hello\nWorld') outputs ‘Hello’ and ‘World’ on separate lines.
How do I print multiple lines without using \n?
You can use triple-quoted strings (''' or """) to write multi-line text directly, or call print() multiple times. The textwrap.dedent() function also helps format multi-line strings cleanly.
What is a format exception in Python?
A format exception (typically a ValueError) occurs when a format string and its arguments do not match. For example, using the wrong number of placeholders in str.format() or mismatched types in f-strings.
How do I use f-strings for text formatting in Python?
F-strings (formatted string literals) use the syntax f'text {variable}' and were introduced in Python 3.6. They allow you to embed expressions directly inside string literals for readable, efficient formatting.
What is the difference between print() and sys.stdout.write()?
print() adds a newline by default and accepts multiple arguments with separators. sys.stdout.write() writes raw text without any automatic newline, giving you more control over output formatting.